Version 20
All information regarding registration and licensing of version 20 can be found here: EZSuite 20 Registration & Licensing
EZSuite version 20 introduces a new registration and licensing system. Therefore, if you have already registered previous versions (version 16 or earlier), you will still need to register a new account for this new version.
Version 16 and Earlier
If you've purchased Ytria software, you'll need both a License Key and a Activation Code to use it. The method of registration differs a bit depending on whether a user downloaded the full EZ Suite installer or an individual product's installer.
1) Registering Paid Software (EZ Suite Installer)
If you used the YtriaEZSuite.nsf database (as opposed to signEZ.nsf, aclEZ.nsf etc.) to install your software, follow these instructions.
Step 1: Check your email for a message titled "Ytria.com Invoice..." Look for your License Key in the body of the message and copy it to the clipboard.
Step 2: If you haven't already Installed your software, do it now. After the installation is complete, the Manage Your Keys window should automatically appear.
Step 3: Paste your License Key into the space under the Enter License Key field and click the Add to List button. If you purchased more than one product go back to the Ytria.com Invoice email and copy the next tool's License Key and paste it to the Manage Your Keys windows. Be sure to click the Add to List button each time you add a License Key.
Step 4: Now you'll need to click the Activate button to get a key specific to the computer you are using. If you haven't previously registered an account with you will be prompted to do so now. The Before Connection dialog box should appear. In most cases you can click Next right away to begin the Account Registration process (unless you need to configure Proxy Settings or have connectivity issues that force you to manually Connect With Browser).
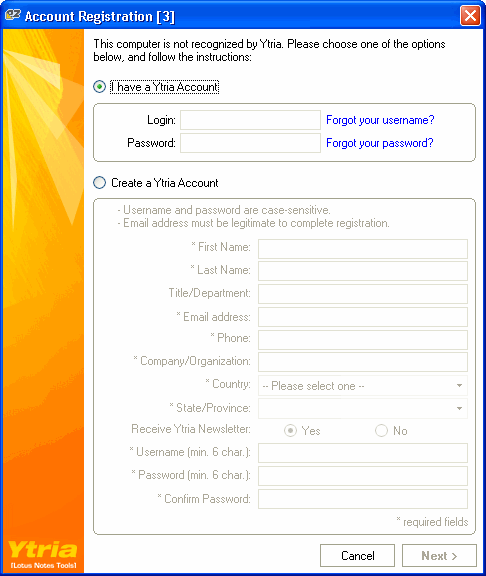
Step 5: You should now see the Account Registration dialog (unless you previously registered Ytria software on this specific computer, in which case the software will contact Ytria's servers at this point and register your software with a Activation Code right away). What you do here depends on whether or not you've previously registered any Ytria software.
- If you've previously registered for a Ytria product: Just click the I have a Ytria Account radio button, enter your information and click Next. Wait for the system to communicate with our servers and soon you should see a message that says "Success!" Now you can start using your Ytria software.
- If you're registering for the first time: Select the Create a Ytria Account radio button and fill out the fields. After you're done, just click Next. A valid Activation Code should arrive in your email within 15 minutes; copy it to the clipboard. Paste your Activation Code into the space under the Enter Activation Code field and click the Add Activation Code button. Done. Now you can begin using your Ytria software.

The Account Registration dialog box
2) Registering Paid Software (Individual Product Installer)
If you used the a single product database (e.g: signEZ.nsf, aclEZ.nsf etc.) to install your software, follow these instructions.
Step 1:
Check your email for a message titled "
Ytria.com Invoice..." Look for your
License Key in the body of the message and
copy it to the clipboard.
Step 2:
Install your software if you haven't already. After the installation is complete, launch the software (either from the
Ytria Toolbar in IBM Notes or from the product's .exe file).
Step 3:
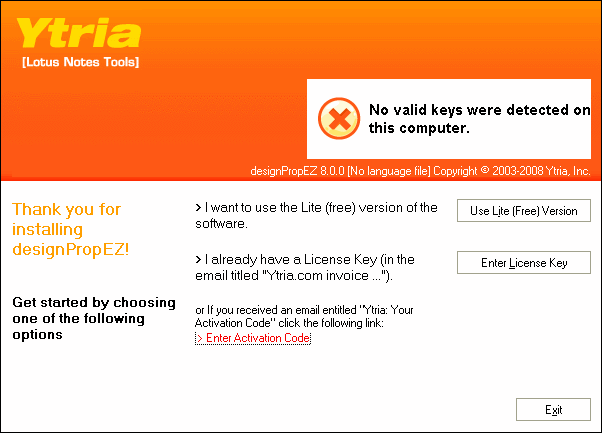
A splash screen like the one pictured below should now appear; click the
Enter License Key button on this screen. A dialog box should open.
 Step 4
:
Paste your
License Key into the dialog box and click
OK.
Step 5:
The
Before Connection dialog box should appear. In most cases you can click
Next right away to begin the Account Registration process (unless you need to configure
Proxy Settings or have connectivity issues that force you to manually
Connect With Browser.)
Step 5: You should now see the
Account Registration dialog (unless you previously registered Ytria software on this specific computer, in which case the software will contact Ytria's servers at this point and register your software with a
Activation Code right away). What you do here depends on whether or not you've previously registered any Ytria software.
- If you've previously registered for a Ytria product: Just click the I have a Ytria Account radio button, enter your information and click Next. Wait for the system to communicate with our servers and soon you should see a message that says "Success!" Now you can start using your Ytria software.
- If you're registering for the first time: Select the Create a Ytria Account radio button and fill out the the form; then click Next. A valid Activation Code should arrive in your email within 15 minutes; open the message and copy the Activation Code to the clipboard. Switch back to the Ytria software tool. A dialog box should now appear where you can paste your Activation Code. Click OK. Done. Now you can begin using your Ytria software.
| Note | Remember to record your username and password. If you ever need to register with us again or make further purchases you should use the same username and password. This will save you from the hassle of filling in your registration info again. |
|---|