EZ Suite 26: Time Saving Tools for Domino Admins and Developers

Experience the all new EZ Suite 26, with a modern interface and powerful enhancements for Domino admins and developers.
EZ Suite 26 is all about helping Domino admins and developers see, shape, and trust their data more easily. Across the suite, grids and viewers are more interactive and more visual, which makes it easier to spot issues, validate changes, and understand complex applications.
Whether you are troubleshooting a production problem, refactoring or extending an application, or preparing data for an audit, the new release gives you faster ways to filter, sort and annotate. Features like smarter filters, easier comments, and conditional formatting turn your grids into a working surface where you can investigate data, test assumptions, and prepare bulk changes.
The sections below walk through the most important enhancements in EZ Suite 26 to save time for both day to day administration and ongoing development work in your HCL Notes and Domino environment.
Scroll down to see highlight details or click on the links below:
- Manage Property Columns Directly in the Data Viewer
- Highlight What Matters with Conditional Column Colors
- More Flexible Value Filters for Faster Grid Analysis
- Try the New, Easier Way to Add and Manage Comments in Your Grids
- Quick Formula Search from Selected Fields in scanEZ
- Import Notes Documents from Excel or CSV in scanEZ
Manage Property Columns Directly in the Data Viewer
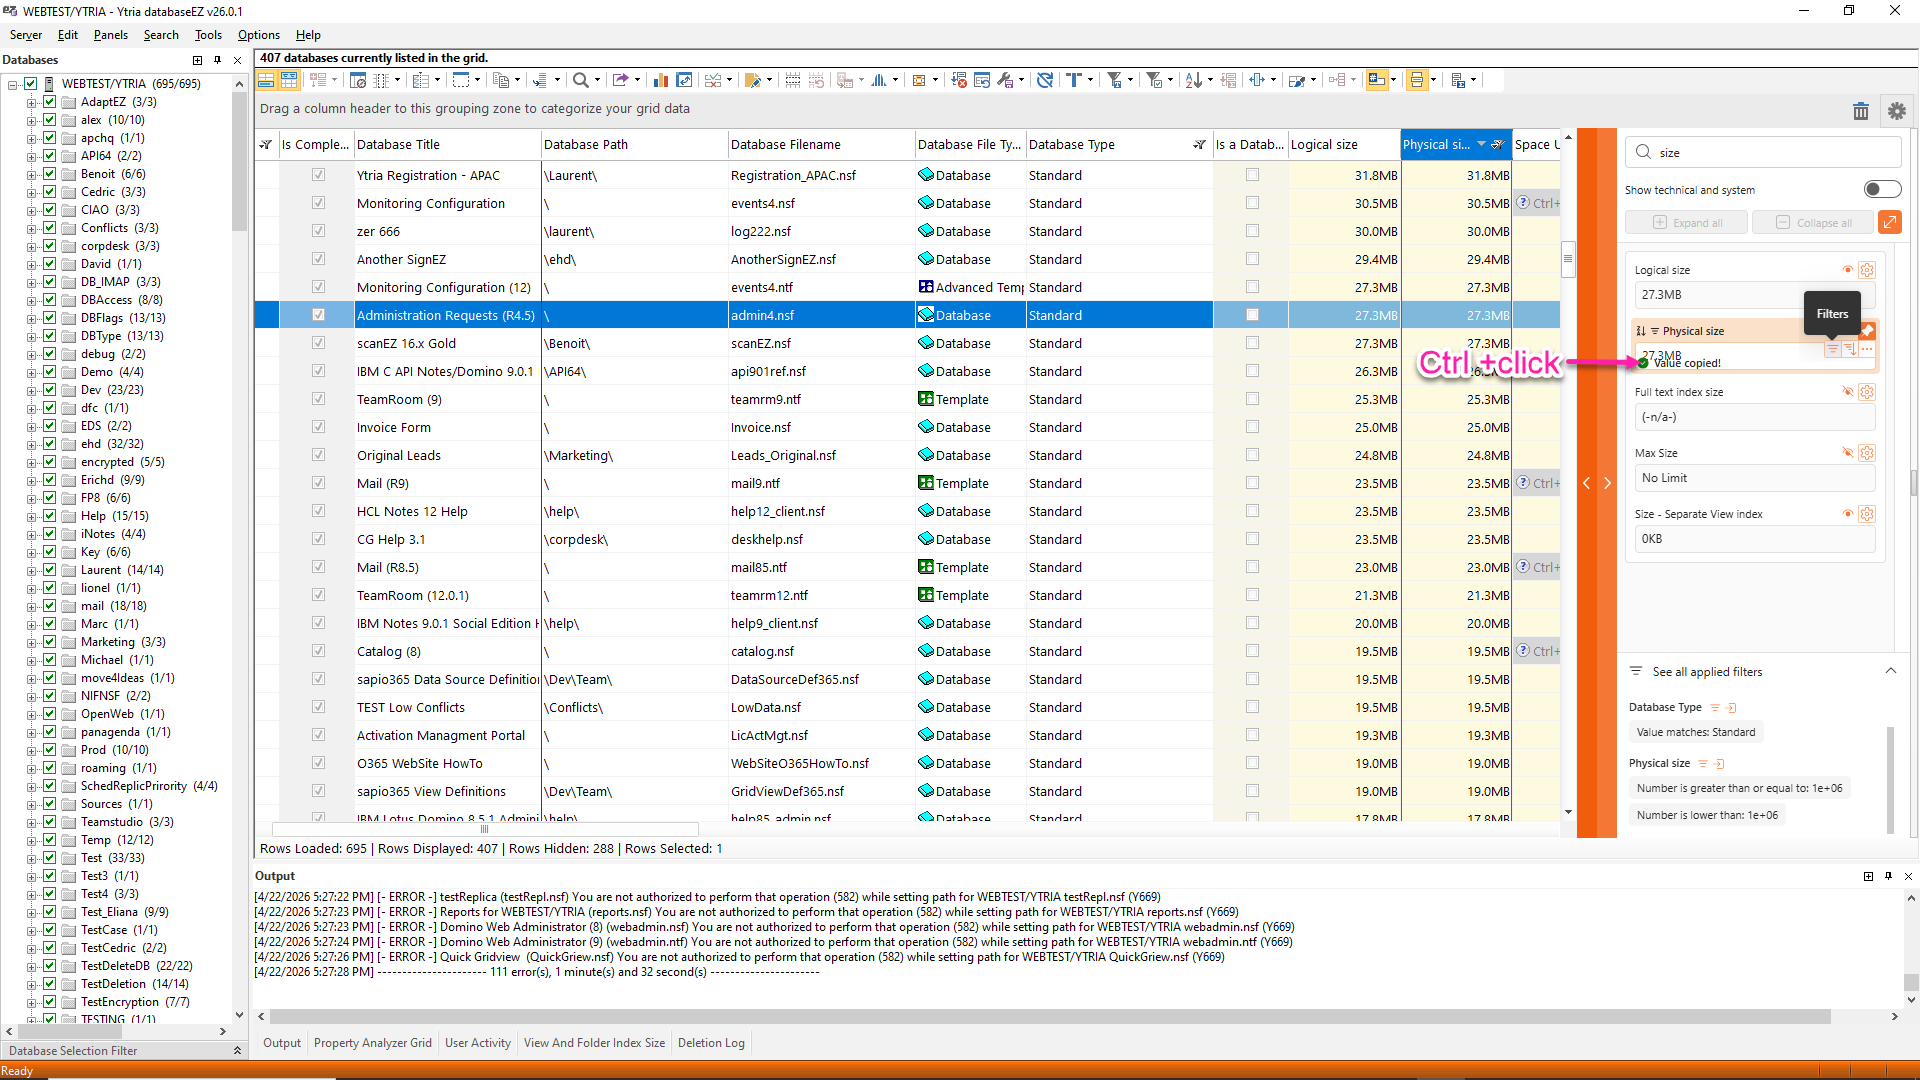
In EZ Suite 26, the Data Viewer becomes your control center for shaping exactly what you see in your grids. Instead of jumping between dialogs, you manage columns, filters, and formatting directly from the orange vertical band on the right side of the grid.
From this panel, you can quickly look up properties to show or hide columns, apply or clear filters, and adjust sorting, grouping, and formatting without leaving the Data Viewer. A summary section at the bottom clearly shows which filters are currently active, so you always know why a given set of data is appearing on screen.
You will also save time by using the keyboard shortcut Ctrl + Click to copy a property value directly from the Data Viewer.
Highlight What Matters with Conditional Column Colors
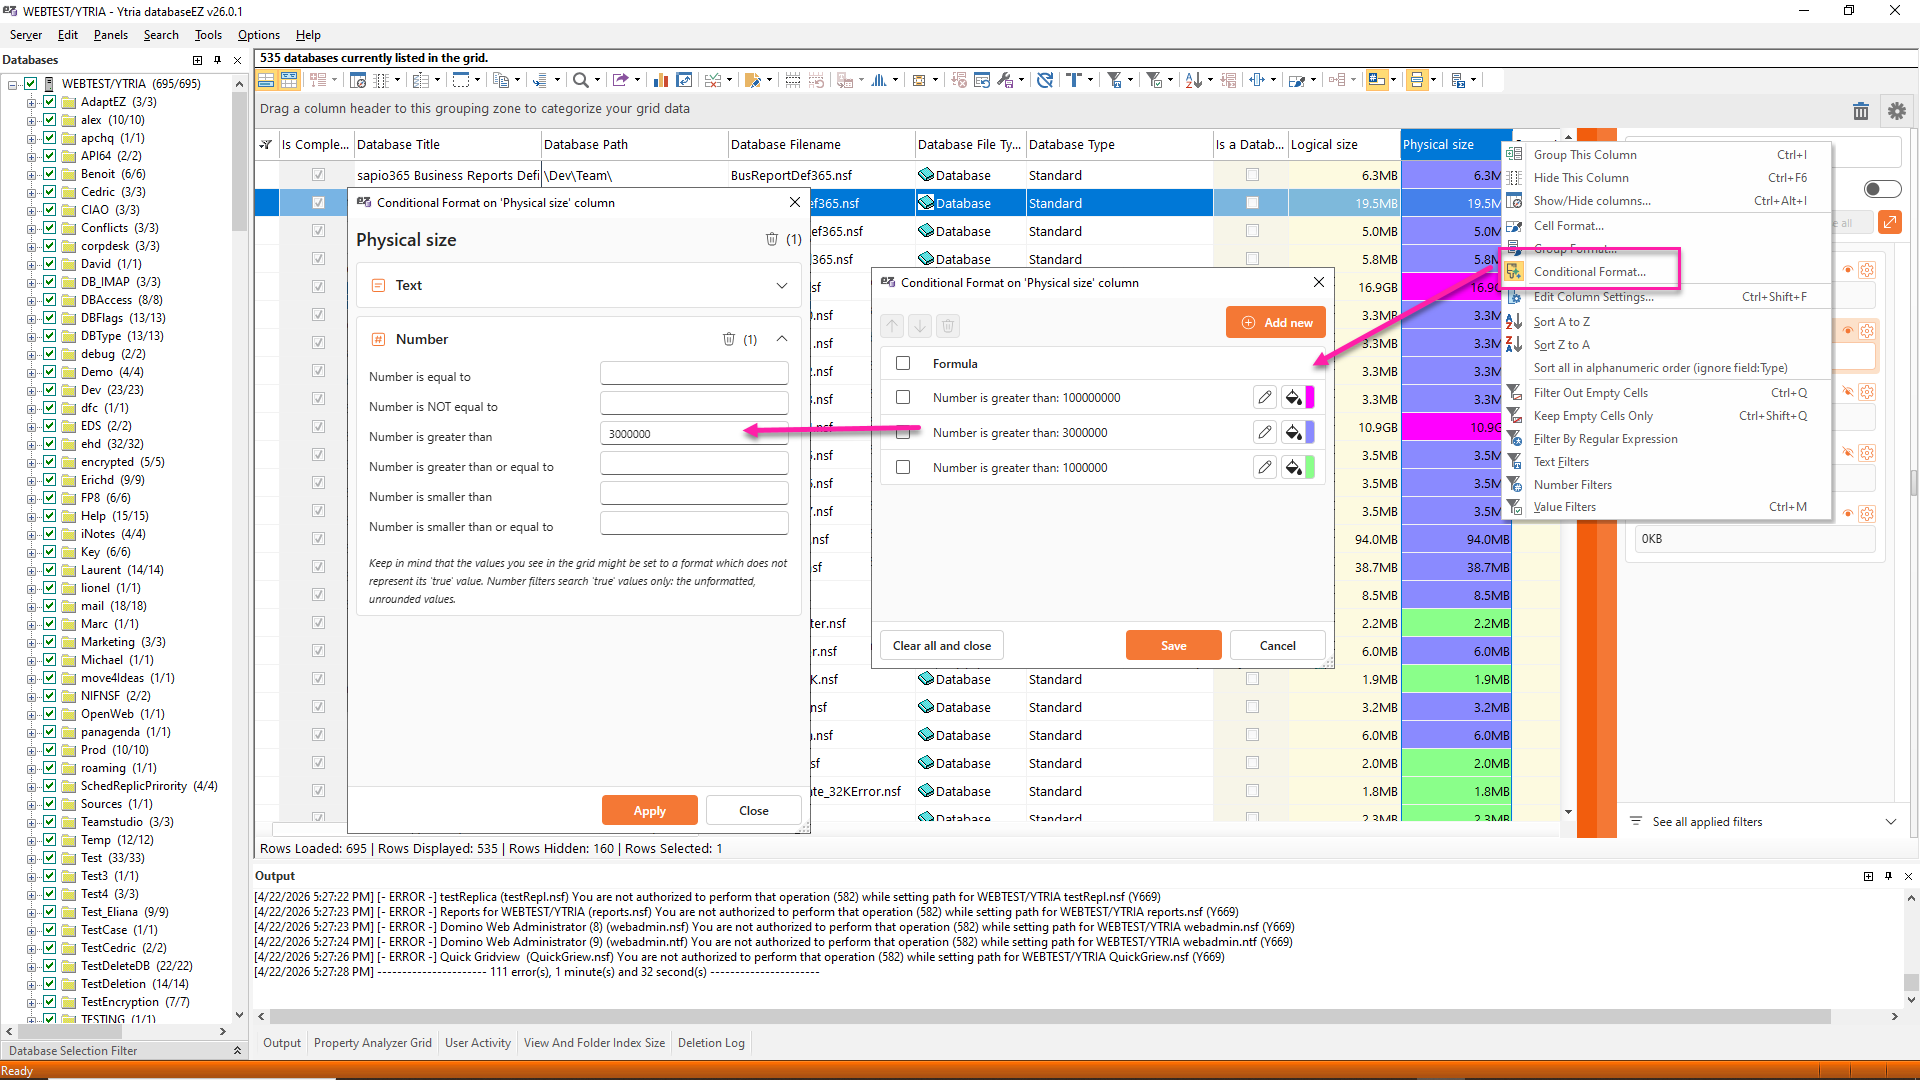
In every grid, you can now use conditional color formatting on any column, so important values stand out visually as you scan a grid.
You define simple rules, for example “if this field equals X” or “if this number is greater than Y,” and EZ Suite automatically applies the color formatting to any row that matches. That means you can quickly spot problem or unusual values without constantly sorting and filtering.
More Flexible Value Filters for Faster Grid Analysis
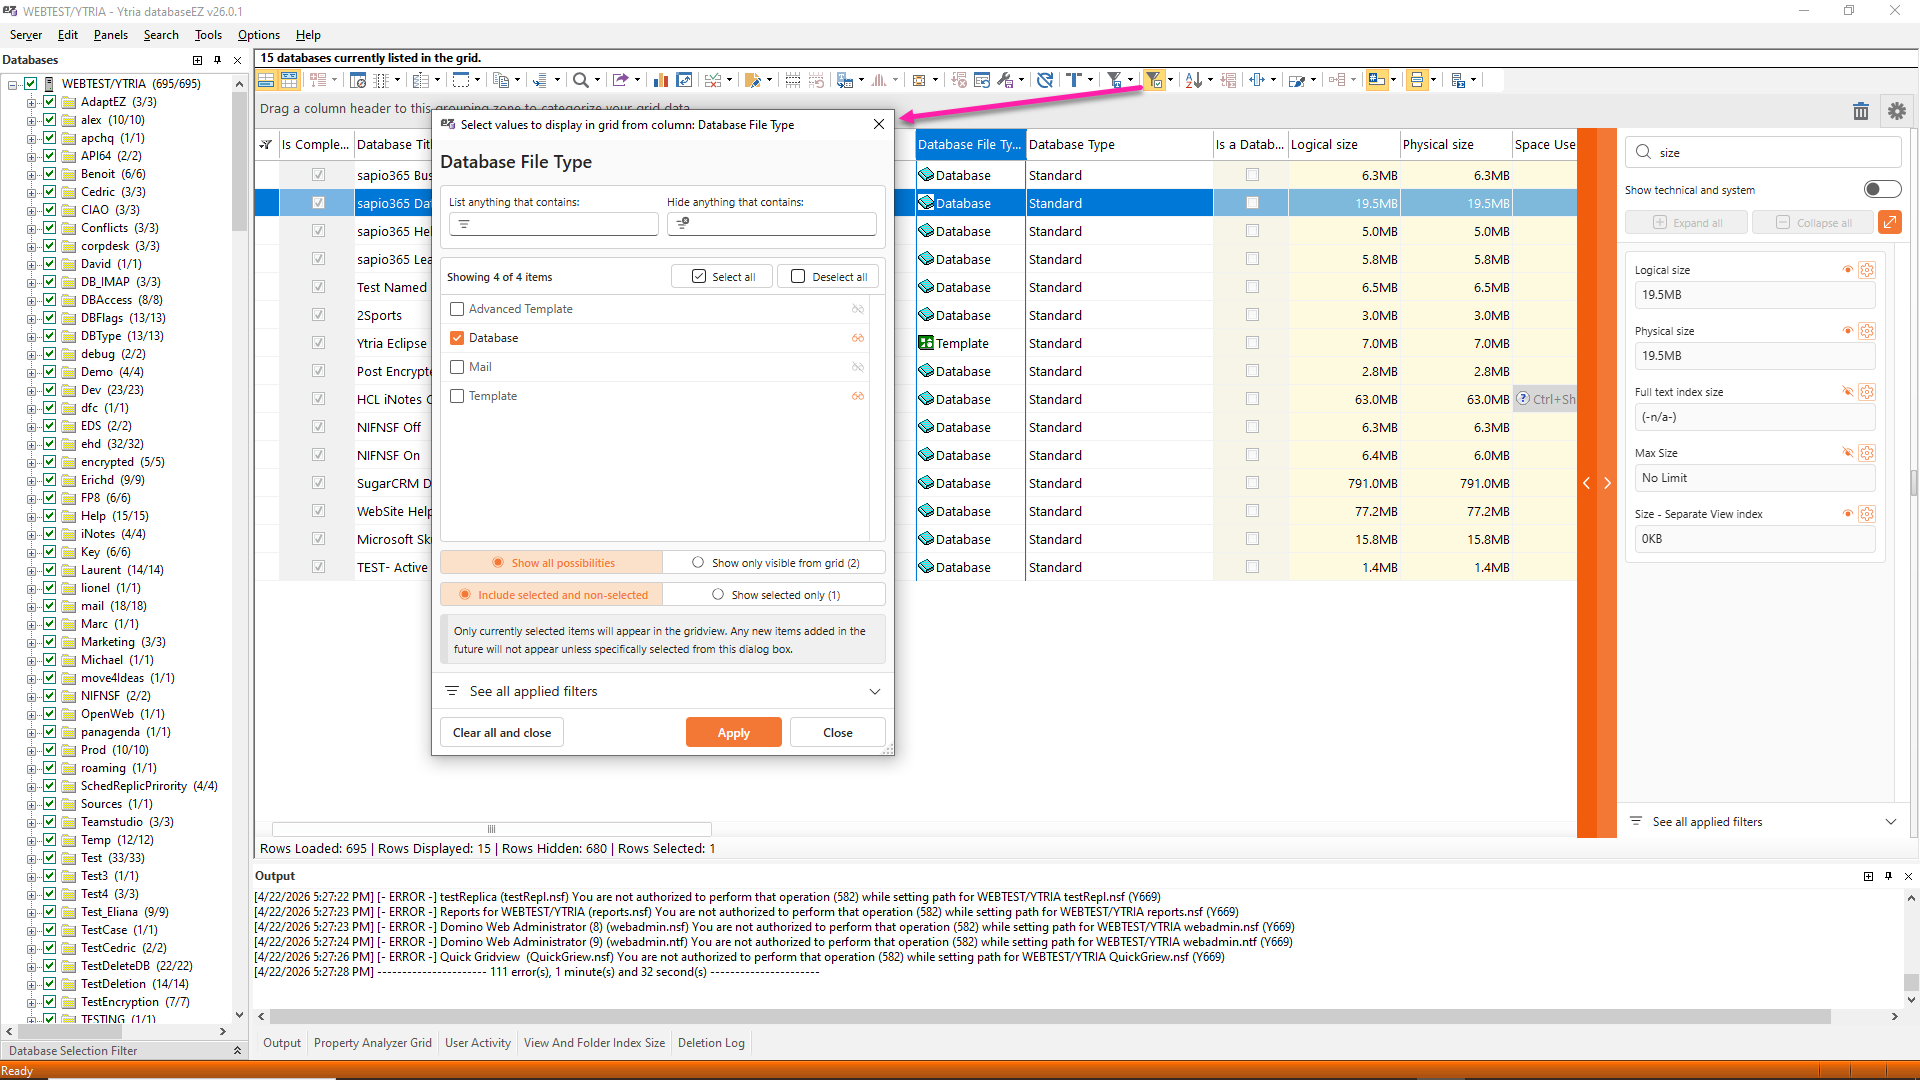
Every filter (except the Regular Expression filter – for now!) just got more flexible and easier to understand. The value filter dialog has been redesigned so you can decide exactly which values you want to see without wrestling with a long list every time.
You can now choose between three clear options: show all possible values, show only the values currently visible in the grid, or show only the specific values you have selected. This gives you much better control when you are drilling into large data sets and do not want clutter from values that are not relevant to your current investigation or test case.
Date based filtering is also smarter. The Cut off filter is easier to use when you need to focus on past dates, such as already expired items or old log entries, and there is a new Future cut off option that is perfect for upcoming expiration dates or future events you need to track. On top of that, a new filter lets you keep only empty cells, which is very helpful when you want to find missing values or incomplete records.
Every filter dialog now also includes a bottom section that summarizes all filters currently applied to the grid, just like in the updated Data Viewer. That means you can always see at a glance why certain grid rows appear or disappear, and you avoid the classic “why is this record missing” mystery when a forgotten filter is still active.
Try the New, Easier Way to Add and Manage Comments in Your Grids
Adding comments to your grids feels much more natural now. Creating custom GridViews with annotations is a smooth part of your workflow instead of a separate chore.
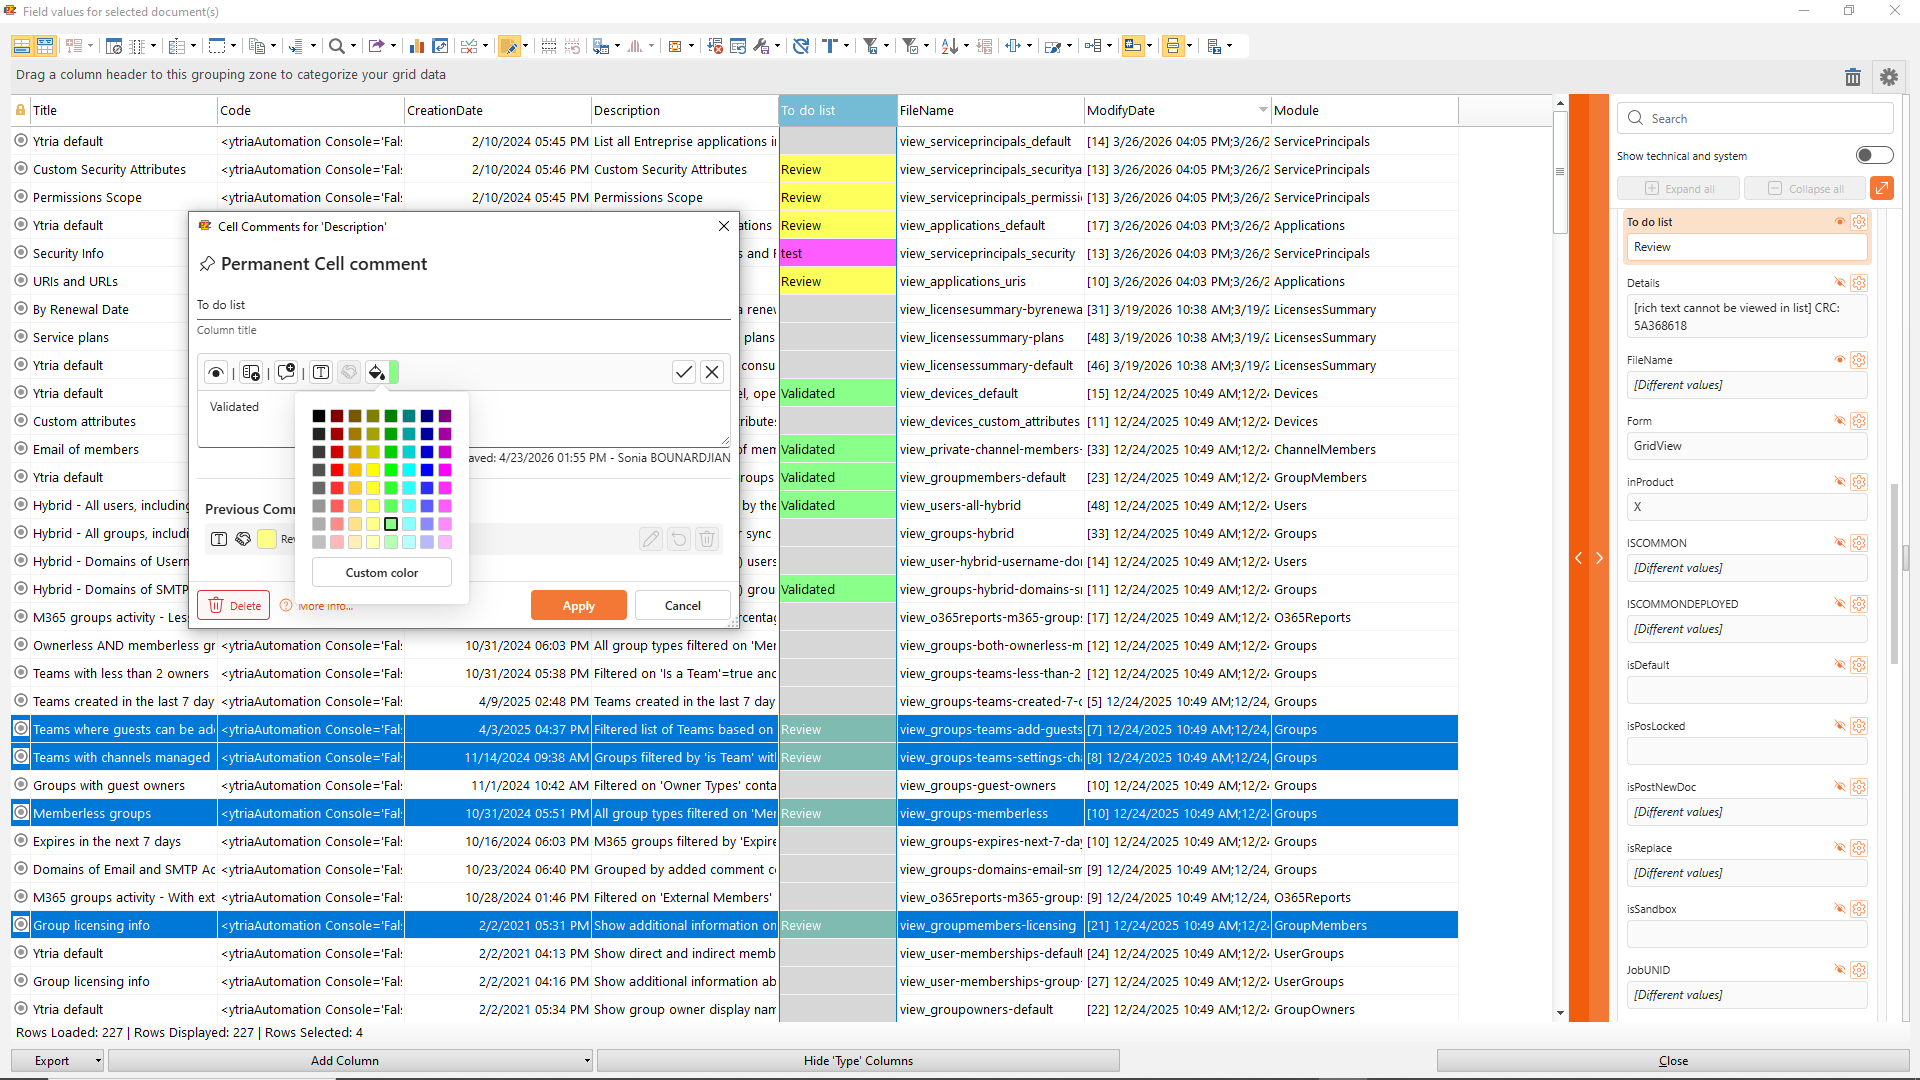
You can clearly see whether you are adding a comment to a single cell or to an entire column, and whether that comment is temporary or permanent. This helps you avoid surprises later when you come back to a grid and need to understand what is meant to stay and what was just a quick note during an investigation or test run.
When you create a new comment, you can give it a title and even reuse a previous value, which is very handy if you often repeat the same remarks or internal codes. For example, you might tag a group of documents as “Needs business review” or “Pending cleanup” and reuse that comment as you move through the grid.
Once your comments are in place, you can bring even more clarity by using conditional formatting to add color to specific values, so both your notes and your data tell the same story at a glance.
Quick Formula Search from Selected Fields in scanEZ
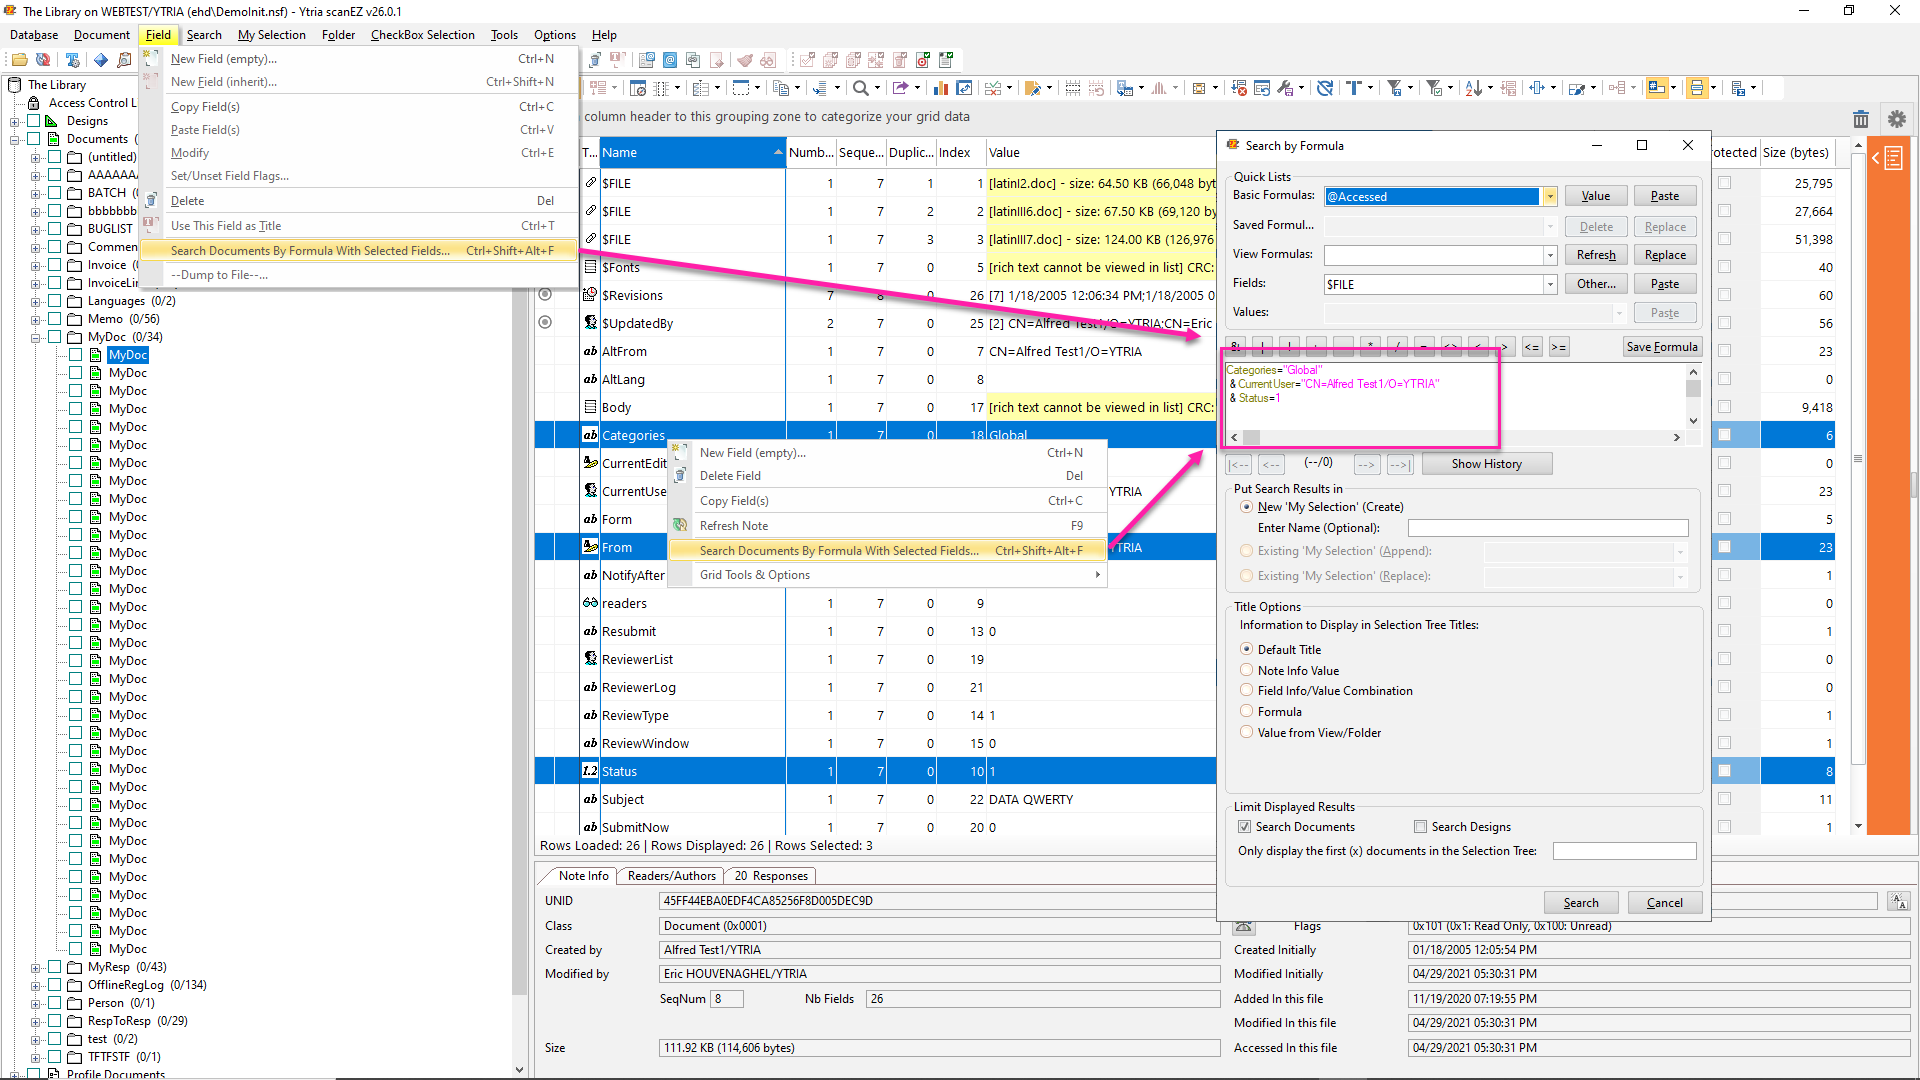
When you are deep in a scanEZ session, the last thing you want is to stop your flow just to build a new search from scratch. You can now launch a quick search directly from the fields you are already looking at, using the new “Search Documents By Formula With Selected Fields” option under the Fields submenu in scanEZ.
In practice, you select the fields that matter for your investigation, trigger the submenu item, and scanEZ builds a search formula based on those selected fields and their values. Instead of manually typing a long formula, you start from what is already on screen and immediately see which documents match across the database.
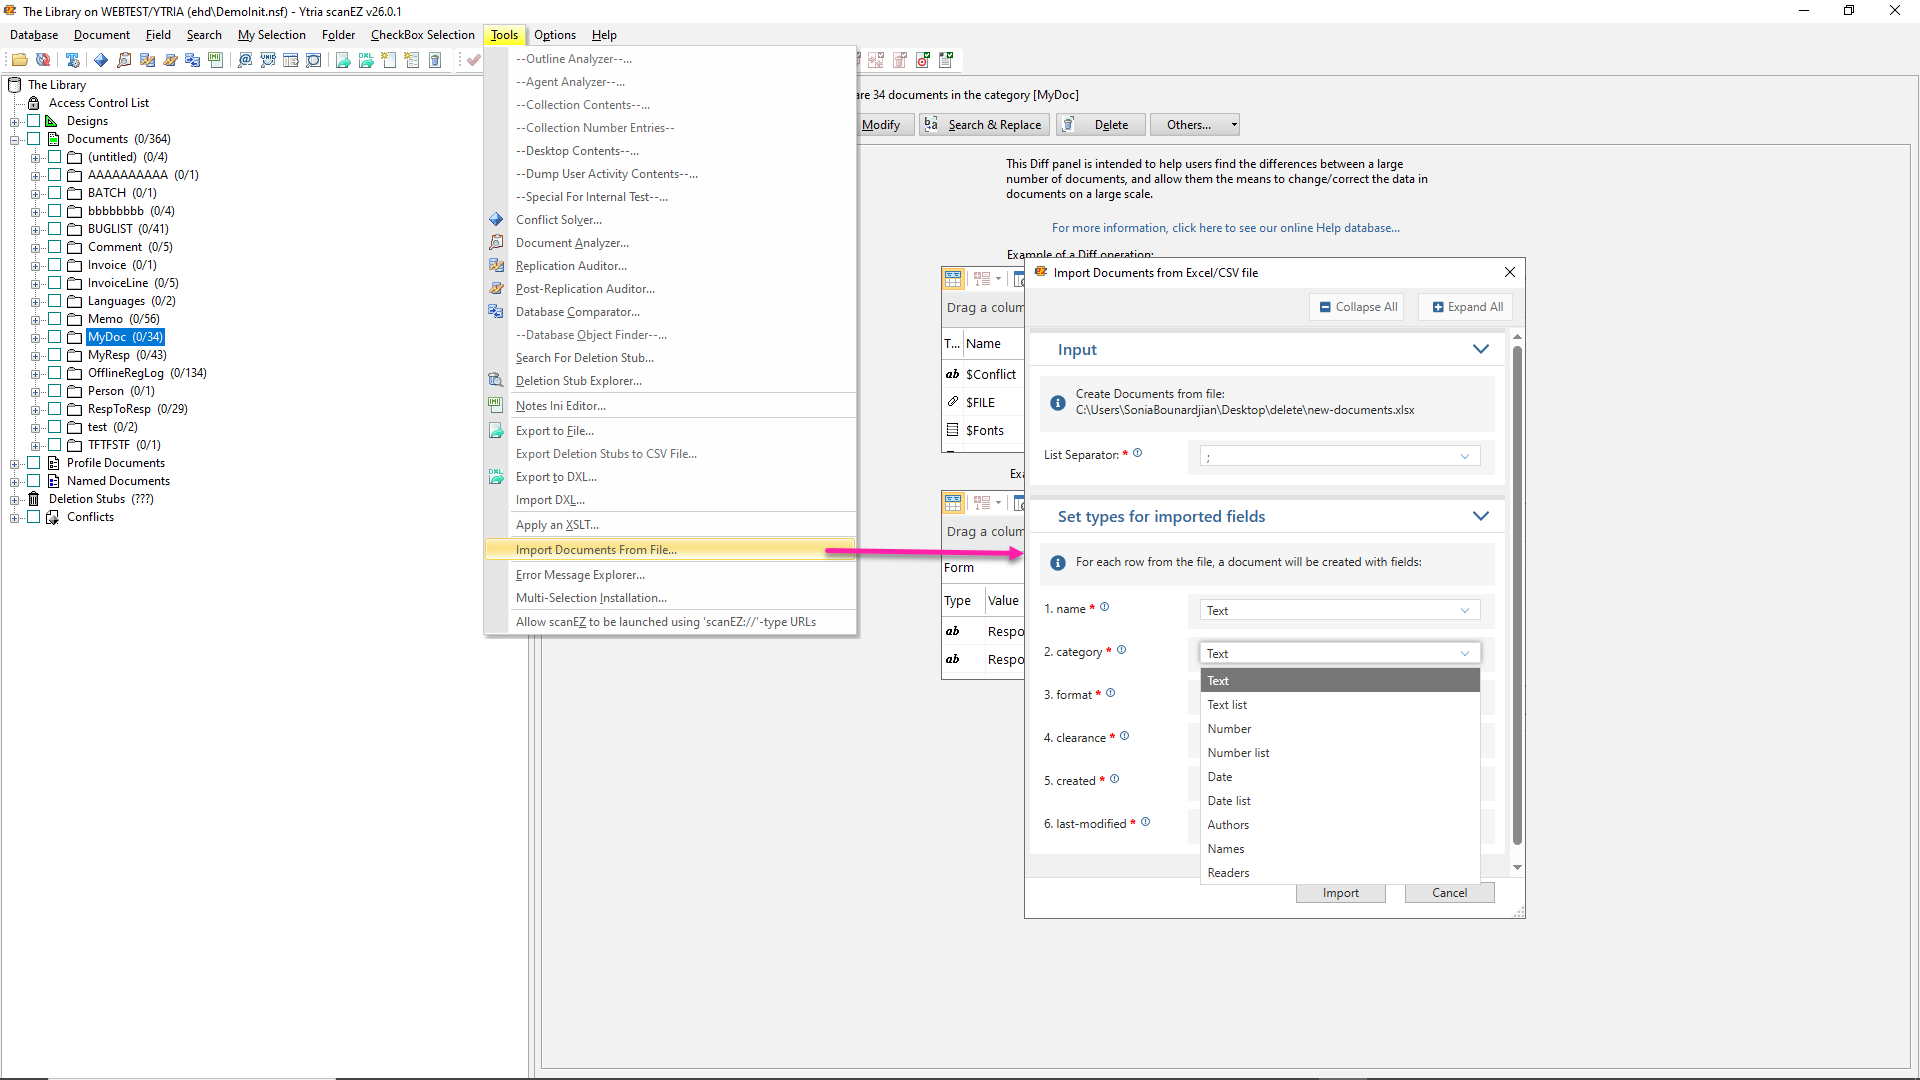
Import Notes Documents from Excel or CSV in scanEZ
If you spend a lot of time in spreadsheets, this one is for you. In EZ Suite 26, scanEZ now lets you create Notes documents directly from an Excel or CSV file, right from the Tools menu.
Instead of writing a one off agent or dealing with a custom import utility, you can take your data in Excel and turn it into real Notes documents in just a few clicks. This is especially useful when you are setting up a new application or seeding test databases.
Submit a comment