Close inspection of the IBM Notes document locking architecture with scanEZ

We’ve recently received several questions from our software users in regards to the native notes document locking feature. Our customers have primarily been interested in how scanEZ could come into the picture to:
- Quickly identify locked documents in a IBM Notes and Domino database.
- Remove or add locks from individual documents or even subsets of documents using scanEZ.
Although we do not presently have a “Lock / Unlock” button in scanEZ, scanEZ has everything you need to deal with locked and unlocked documents. We thought that this could be an interesting topic to discuss in more detail. It’s also a good opportunity to show how combining a few of scanEZ’s current features can solve ANY document-related issue. In this case, we’ll use them to find, analyze, remove or even add locks from and to Notes documents.
In order to better understand how scanEZ comes into play here, let’s take a deeper look at how the native document locking mechanism works in IBM Notes and Domino.
Document Locking 101
What is document locking?
Document locking is a feature that was added in IBM Notes and Domino (formerly IBM Lotus Notes) release 6, which allows the prevention of users from modifying certain documents when these are being edited / locked by other users. Subsequently, this feature, when correctly implemented, is a powerful weapon in the developer’s arsenal to prevent a frequent side-effect of collaboration: the creation of conflict documents.
When someone attempts to edit a document that has already been locked, the user is notified immediately, and he or she won’t be able to proceed with modifying the document until the lock has been removed by either one of the lock holders or by someone with manager access to the database.
Document locking basics
In order to enable / implement document locking for an application, the two most important steps are the following:
1) Specify the administration server for the application. This will be the Master Lock Server where most of the locking / unlocking related modifications will take place, even if the user performs these operations on another machine (server or local).
Tip: you can use aclEZ to oversee and set the administration server settings for not only one, but ALL databases on your server!
2)In the Database Properties Basics tab, select the property “Allow document locking”.
Tip: databaseEZ can let you easily manage and even set this property for all databases on a given server at once.
How do users lock a specific document?
Once the document locking feature has been enabled for an application, there are two main ways for users to lock documents.
1) Having selected a document from a view, using either the pop-up or actions menu, they can apply a “persistent lock“. This will specify the current user as the “Lock Holder”. The document will remain locked until the Lock Holder or someone with Manager access to the database unlocks the document
Note: In order to lock / unlock documents, one needs at least Author access on both the database and the document in question.
2) If document locking has been enabled for the database, when someone puts a given document into “Edit Mode” in the UI, a “persistent temporary lock” will be applied on the document until the editing session is open, and no one else will be able to modify the document during this time.
To apply a persistent or persistent temporary lock, the user needs to be working on the Master Lock Server OR he needs to be able to reach the database replica on the Master Lock Server in order to verify that the current document is in the right status to add or remove the lock. If the user is working on a remote database and fails to connect to the Master Lock Server, a “provisional lock” or “provisional temporary lock” is created that will need to be promoted to the Master Lock Server once the connection is reestablished. We’ll cover this subject later on.
What happens when a lock is applied?
The document locking feature will always attempt to use the replica on the server that has been set as the Master Lock Server in order to determine the document’s current Lock status. In fact, there should ALWAYS be a replica of the database on the Master Lock Server. If everything looks right, the process will modify the document instance in the “Master Replica” (i.e. apply or remove the lock items) and it will modify the document instance in the local database if the action isn’t performed on the Master Lock Server.
Due to this central governance, there are three important scenarios to consider, and each of these will result in different types of locks.
1) When the locking / unlocking action is performed in the Master Replica, two items are added to the back end document*:
- $Writers [Authors]: this item contains the current user’s name.
- $WritersDate [DateTime]: this item contains the date of locking the document.
Depending on the context (whether it’s a persistent temporary or persistent lock), these items are removed once the editing session is over (persistent temporary lock), or when the document is unlocked again (persistent lock).
It’s important to note that when locks are applied on the “Master Replica”, and someone attempts to access an instance of the document in a remote database, the locks are NOT promoted to the local replicas despite Notes Remote Procedure Calls (NRPCs) taking place to determine the central document status. Thus, the back end document will not inherit the $Writers & $WritersDate items.
2) When the locking or unlocking action is NOT performed in the Master Replica, the process will attempt to communicate with the Master Replica through NRPCs to determine if the document’s instance in the Master Replica is in the right Lock status for the Lock / Unlock process. If everything looks right, it will add the $Writers & $WritersDate items to the document in both the Master and local replicas*. Once the master lock instance of the document has been processed this way, the items are also added to the current (remote) version of the note.
When a document that has been locked by someone working on a remote database is unlocked on the Master Lock Server, the next time someone attempts to access the document instance in the remote database that contains the $Writers & $WritersDate items, the unlock action is propagated to the local replica immediately, and the items are removed.
*IMPORTANT: When you apply or remove persistent locks, the document OID (Originator ID that identifies a particular note revision), is NOT CHANGED. This means that there is NO change in the Modified date or in the sequence number, and no entry in the $Revisions item.
3) If the actions are NOT performed in the Master Replica, and the Master Replica is not available, Notes will not be able to apply a persistent lock on the master document, and will apply only a “Provisional Lock” on the local document. The user will get a notification that the Master Lock Server isn’t available.

Provisional Lock Verification
When adding a Provisional Lock, Notes will add the item $PWriters [Authors] to the local document containing the current user’s name. Notes will then attempt to promote this lock to the Master Replica once the server becomes available again (when either replication, or another NRPC attempt happens). In case the document is put into Edit mode, a “Provisional Temporary Lock“ is applied, and the process will add an item to the back end called $PTWriters [Authors].
Contrary to adding the $PWriters item, adding the $PTWriters item does NOT modify the OID and similarly to the case of Persistent Temporary Locks, it is removed as soon as the editing session is over. Since there is no way to determine whether the master-instance of the document is available for locking with Provisional Locks , once the promotion happens there is no guarantee that it will succeed so there is a chance of data loss. The user will get notified either way.
Note: Applying a provisional lock WILL modify the OID, Modified Date, and it will increase the sequence number since the primary way to promote provisional locks is replication.
How to lock documents using programming?
Documents (and even other note classes like designs) can be locked using a variety of the Notes integrated programming languages like Java or Javascript. In this article, we’ll take a look at the two most frequently used methods: LotusScript and @Formula.
LotusScript: a document can be locked using the notesDocument class’s Lock method. This method has the advantage of being able to specify the lock holder(s). You can set a specific name, list of names (including groups) as the lock holder, and you can also make the method raise an error in case the Master Lock Server can’t be reached (thereby preventing the creation of Provisional Locks).
Note: the database must be enabled for document locking. This can be checked using the notesDatabase class’s IsDocumentLockingEnabled property.
Here is the method along with its variables:
flag = notesDocument .Lock( [ name ][, provisionalOK ] )
Formulas: If document locking has been enabled for the database, a document can be locked / unlocked using the @DocLock([options]) @Command, where the [options] will decide what happens exactly:
- @DocLock([LOCK]): This will lock the document, and the lock holder will be set to the current users’ name.
Note: There is no way to specify multiple users / a user group as Lock Holder through formulas.
- @DocLock([UNLOCK]): This action will unlock the document
- @DocLock([STATUS]): This action will check whether the current document is locked. It returns null if the document is not locked, or a text (list) of the user(s) who have locked the document in case it has been locked.
Note: If the back end $Writers item is present but has no value, the document still counts as locked. Users will get a message that says “This document is locked by someone else”, and putting the document into edit mode will be prevented. Sometimes this may be a result of bad coding or tampering with the back end item, and although the document is counted as locked, the @Doclock([STATUS]) formula will return “”. So if you are using a formula like @If(@Doclock([STATUS])<>“” , then there is a chance that you’ll miss these sorts of locked documents. We advise using the @Isavailable($Writers) formula instead. These documents need to be unlocked by someone with Manager access to the database.
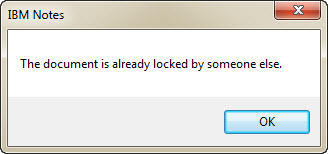
Document locked by someone else message
- @DocLock([LOCKINGENABLED]): This indicates if the current database is enabled for document locking. It returns 1 / @True if it is enabled, and 0 if it isn’t.
At this point, I would like to acknowledge and recommend the extremely insightful article “A Guide to Document Locking in Notes/Domino 6″ written by James Ray. Although it was written in 2004, most of it is very much relevant today. If you would like to read further about the native document locking functionality.
Document Locking & scanEZ
How to find locked documents in scanEZ
- One frequent problem with document locking is that users tend to forget that they have locked certain documents, and unless you implement some sort of a “Lock Decay” agent on all databases where document locking is allowed, you’ll soon be getting phone calls asking for the release on these documents. In order to avoid this, you can use scanEZ to run a quick check and find all locked documents in a given Notes database.There are two possibilities to find locked documents in a Notes database using scanEZ by using the @Doclock([STATUS]) formula function, and by searching for the existence of the $Writers and $PWriters items using the formula search. It’s very important to note that you can’t use the @Doclock() function within a formula search context. We strongly advise that you work with the database replica on the Master Lock Server so that the search returns all documents accurately.As discussed earlier, locks that have been applied on the Master Lock Server directly won’t be promoted to remote replicas, hence looking for the presence of the $Writers & $WritersDate items in remote databases might not recognize these documents as locked.
scanEZ Formula Search
Using the formula search within scanEZ is probably the fastest way to find all locked documents in the database, provided that one uses the database located on the Master Lock Server. In order to find locked documents one can use the following formulas:
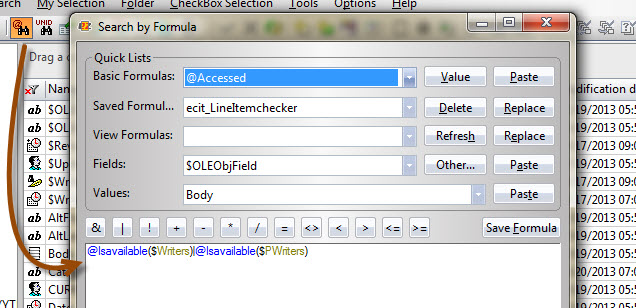
Formula search in scanEZ
1) Find documents that contain the $Writers item.
Formula:
@Isavailable($Writers)
2) Find documents where the $Writers item is not empty. This one is faster than using @Isavailable, but it would disregard the rare situation where a $Writers item is present but empty.
Formula:
$Writers<>””
3) Find documents with persistent OR provisional locks. Although you should definitely not have old provisional locks in the database (this would mean you haven’t been replicating properly), this formula will extend the search to find not only persistent, but also provisional locks in the database.
Formula:
@Isavailable($PWriters)|@Isavailable($Writers)
4) Find documents that have been locked since an x amount of days. Using the $Writersdate item’s value you can quickly find all documents with locks older than a given amount of time. This formula will find documents that were locked for more than 1 day, but it can also be adjusted to use hours, days, years, etc…
Formula:
@Isavailable($Writers) & ( @Adjust($Writersdate;0;0;1;0;0;0)<@Now )
Tip: Using the formula search feature will not let you use the @Doclock([STATUS]) function. Similarly, this formula can’t be used in a Notes view selection formula.
scanEZ Display Titles
Using the display titles in scanEZ will be slower than searching by formulas because in order to set the display titles, scanEZ must build the document tree which requires searching the entire database and evaluating the formula in each document’s context (which is not necessary nor may be possible when using the formula search). However, display titles give you the advantage of being able to use formula functions. This means that contrary to the formula search, you’ll be able to use the @Doclock([STATUS]) formula to determine which documents have been locked on the Master Lock Server regardless of the replica of the database you are analyzing.
In order to set the display titles, right-click a selection or select the Documents section on the left hand side navigator in scanEZ, and select “Change Display Titles”.
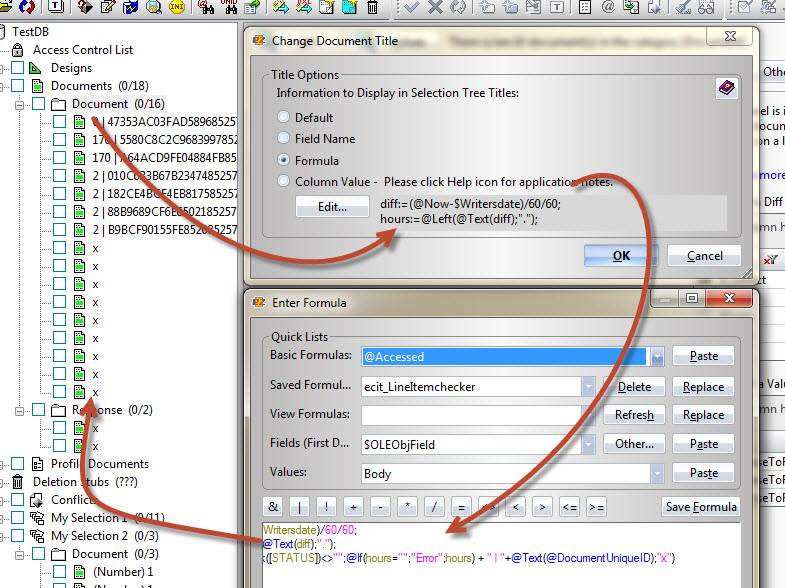
Changing display titles in scanEZ
Here are a few example formulas to use as display titles in order to get a better understanding of the lock status documents in your database.
1) Find all locked documents. Using the @Doclock([STATUS]) function has the advantage of actually reaching out to the Master Lock Server to determine the lock status. However it will disregard documents where a $Writers item is present but empty.
Formula:
@If(@Doclock([STATUS])<>””;”x”;”unlocked”)
2) Find locked documents and the amount of time since the lock was created. Using display titles you can actually find the ‘oldest’ locks in the database. The following formula:
- Marks unlocked documents with an “x”.
- For all locked documents, it calculates the number of hours (rounded) passed since the application of the lock, and prints the document’s UNID.
- Marks documents with “Error” where the $Writersdate item was not found.
Formula:
diff:=(-$Writersdate)/60/60;
hours:=((diff);”.”);
(([STATUS])<>””;(hours=””;”Error”;hours) + ” | “+();”x”)
Tip 1: Once the display titles have been set, you can use the “Select using Regular Expression” feature to checkbox select your locked documents searching for the following expression: ^(?!x).*$
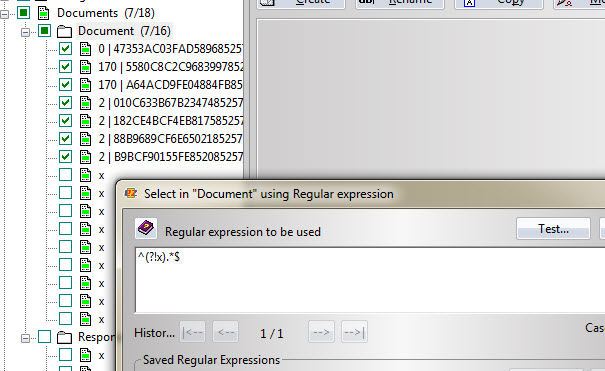
“Select using Regular Expression” feature in scanEZ
Tip 2: Once the locked documents have been moved to a new My Selection for further analysis, you can right-click the selection at any time and choose “Copy Tree Titles”. This will copy the number of days + “|” + @DocumentUniqueID information onto your clipboard for the list of documents in your current selection. You can then use this list, for example, to search for the documents in another replica instance using the “Search by UNID” feature. This in turn will process the list of UNIDs even if there is additional information in there like the number of days.
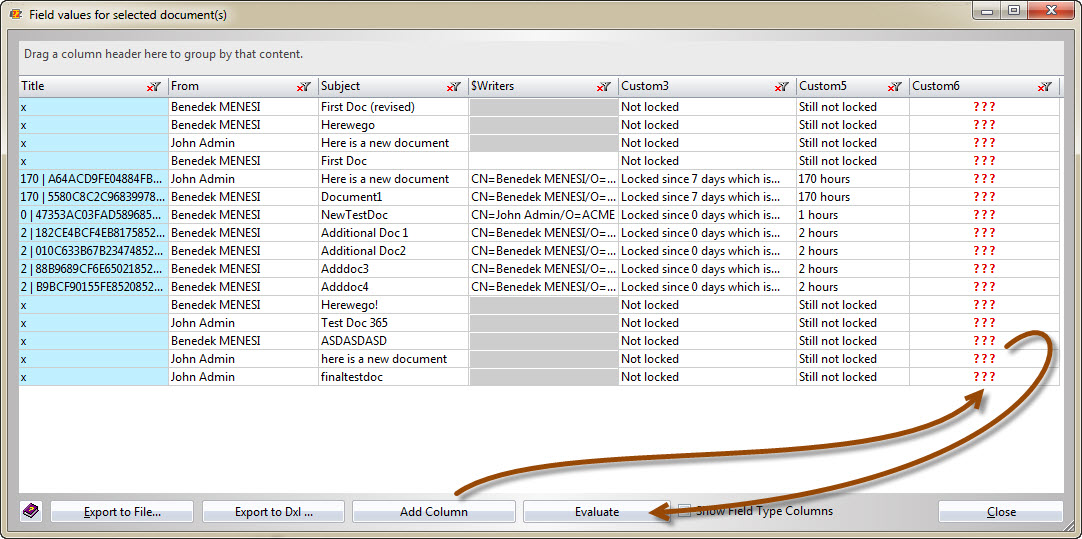
scanEZ Values Custom Columns
Once you selected the locked documents to analyze, using the Diff panel (lists all items across the current subset of documents) you can select items for the “Values” function to display in a grid layout. In this grid, you can not only read out existing item values, but you can also add custom columns (e.g. to evaluate formulas). This will let you use any of the above formulas to get more information on your locked documents in the same grid interface.
You can easily add a column indicating the number of days, hours or even the content of the $Writers item, which is returned by the @Doclock([STATUS]) formula. After adding the new columns, you’ll notice that the values are shown as question marks. You’ll need to hit “Evaluate” to evaluate all column formulas in one go.
Values function and custom columns in scanEZ
How to apply, remove or modify locks
Once you found the locked documents you would like to unlock, there are two main ways to do this from within scanEZ.
Add or remove locks the traditional way
Out of the native ways to manage document locking, you can make use of the @Doclock([UNLOCK]) / @Doclock([LOCK]) function in scanEZ. Once the formula is evaluated in the document’s context, it will proceed to add or remove the lock from/to the instance of the document found in the Master Lock Server’s replica.
Note that according to the lock promotion process, if you are launching the process on a document in a remote database, then both the Master Lock version AND the ‘local’ current version of the document’s back end will be modified. This is the native, and probably the best way to lock or unlock documents, because it will not modify the OID nor increase the Sequence number, and it will ensure that the Master Lock Server is up to date.
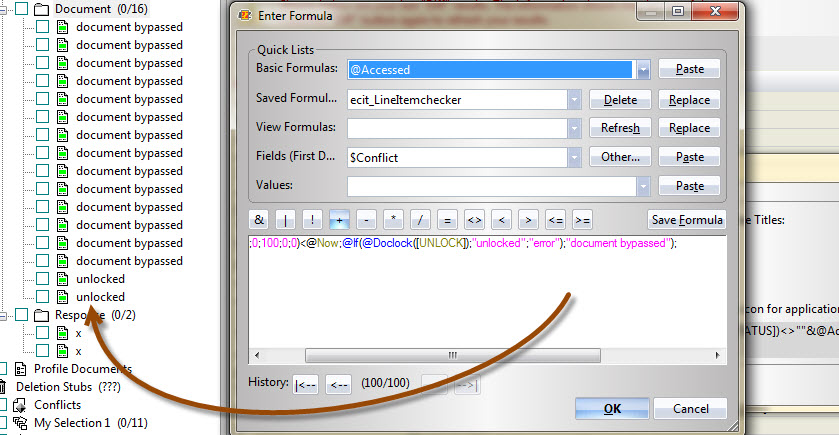
You can evaluate formulas within scanEZ by:
1) Using display titles. You can simply use the @Doclock() formula to lock or unlock all documents in your current selection. You should only do this if you made sure you’ve got the right, locked documents in your selection.
Formula:
@Doclock([UNLOCK])

@Doclock([LOCK])
In the example below, the formula will find and unlock all documents that have been locked over 2 days. Normally, we’d suggest finding and putting your documents into a Selection folder first. Then once you have made sure that they are the ones to be unlocked, you can proceed with the changes. This example is a rapid process, and is useful if you need to repeatedly find and remove locks of a certain age in multiple databases.
Formula:
@If(@Doclock([STATUS])<>””&@Adjust($Writersdate;0;0;0;48;0;0)<@Now;@If(@Doclock([UNLOCK]);”unlocked”;”error”);”document bypassed”);
scanEZ instant lock
2) Using the “Test Formula on this document” feature. This feature only works in one document’s context. Evaluating @Doclock([UNLOCK]) or @Doclock([LOCK]) will unlock or lock the current document.
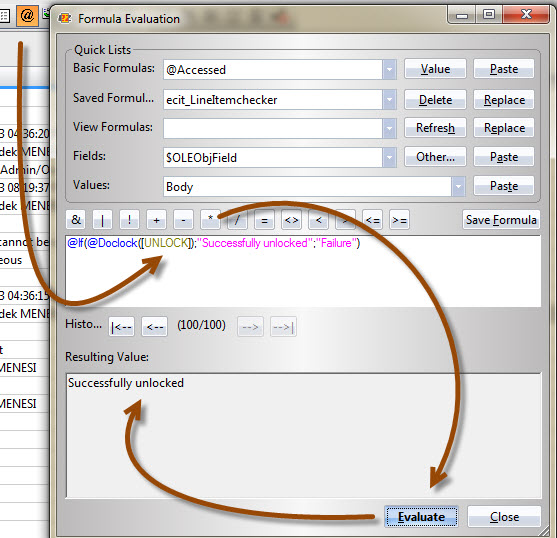
Formula Evaluation in scanEZ
3) Using the Values custom columns. You can use the formula that we used earlier for display titles. Once you hit “Evaluate”, the documents will be unlocked.
Add or remove locks the traditional way
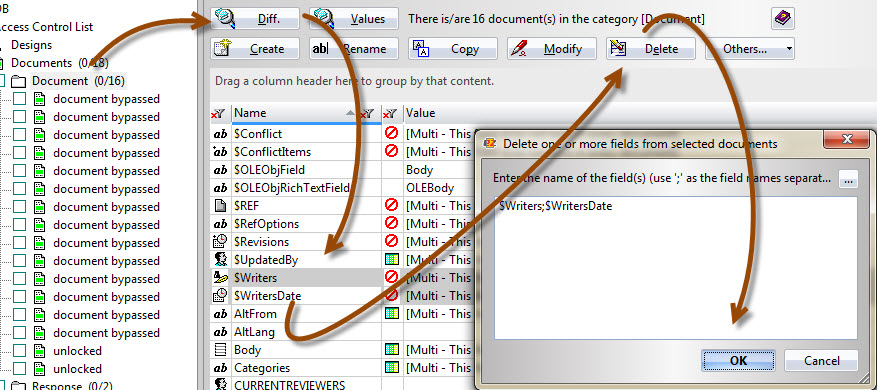
As we discussed earlier, a document is locked if the $Writers and $WritersDate items exist on the back end. Removing these items in the back end / through the API is sort of a brutal way of dealing with locks. This is especially so because contrary to removing the locks using the native methods, removing the items and saving the note will modify the OID and it will increase its sequence number, thus triggering replication. If changing the modification date and OID is not an issue, using scanEZ to get rid of or apply locks on documents can be a powerful option, since you can do it on a mass-scale in the usual scanEZ manner.
1) Unlock documents by removing the items directly. Once you’ve put your documents into a My Selection folder using any of the methods discussed in the “How to find…” part of this article, you can use the Diff function to get a list of all the items that your subset of documents contains. After having selected the $Writers & $WritersDate items, removing them is as easy as pressing the “Delete” button.
Unlocking documents in scanEZ
Note: According to our tests, removing the $Writers item and leaving the $WritersDate item as is won’t have any impact on the document’s properties or future behavior. The document will be considered unlocked and there should be no problems locking it again.
2) Lock documents by adding the items directly. Similarly in the above method, you can add the $Writers & $Writersdate items to the back end documents directly. This will give you the power of specifying users and groups or list of users and groups that will be able to work with the current document manually. This is something you can only do using LotusScript, Java & JavaScript. Once you’ve put your documents into a My Selection folder using any of the above methods, you can use the Diff function to get a list of all items that your subset of documents contains. You can then add the new items by pressing the “Create” button, specifying their values as either static values or values through formula.
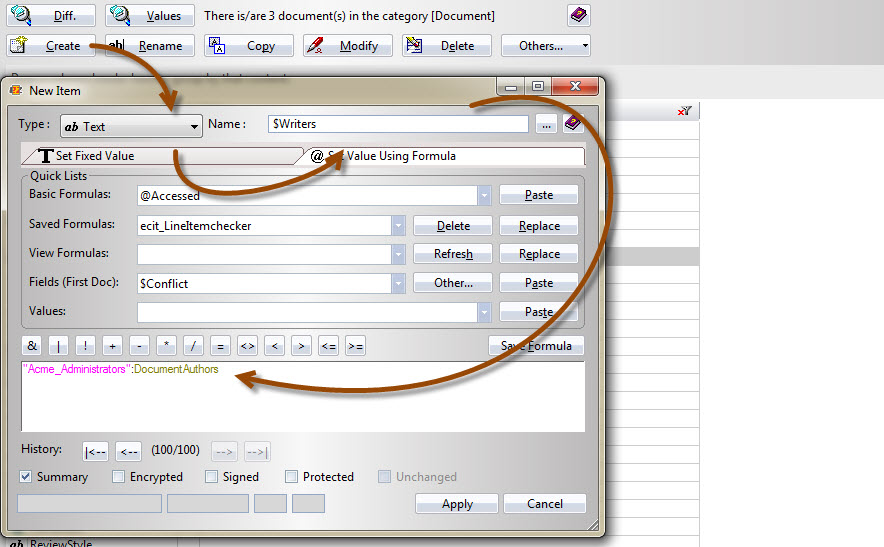
Locking documents in scanEZ
3) Modify lock holders. Adding or removing lock holders can be done by modifying the $Writers item’s value directly. Again, this can be done on either individual documents, or on a mass-scale by using either a static value or value through formula.
The idea behind this article was to provide an in-depth explanation of the mechanism behind locking or unlocking Notes documents. Once you grasp how this feature relates to back end items, you’ll realize that you don’t need a “Lock / Unlock” button since scanEZ has everything you need to make the necessary modifications in no time flat.
Submit a comment