Access rights enigmas explained—new tools for modern, server-wide ACL effective access administration

Proper access rights management is a crucial aspect of security and compliance in any IT environment, yet the reality surrounding IBM Domino is that most of us are stuck relying on the Access Control List (ACL) dialog box and whatever data we may be able to mine from catalog.nsf. In this article, we’ll examine why it’s just not enough to rely solely on ACL entries when you’re trying find out “who has access to what” on a global scale; we’ll reveal a few little-known ACL facts and then discuss better ways to get a handle on your ACL configuration.
There are several challenges when trying to find out why a given individual does or doesn’t have the proper access rights and roles, but a primary one is that large companies tend to use heavily nested groups, making it harder to oversee who can access the application.
In IBM Notes, other than the Effective Access feature (which is only available on a per user, per database basis), or the Security taskbar button (which only shows the current user’s access rights on the currently opened application), we don’t have much to go on (see fig. 1).
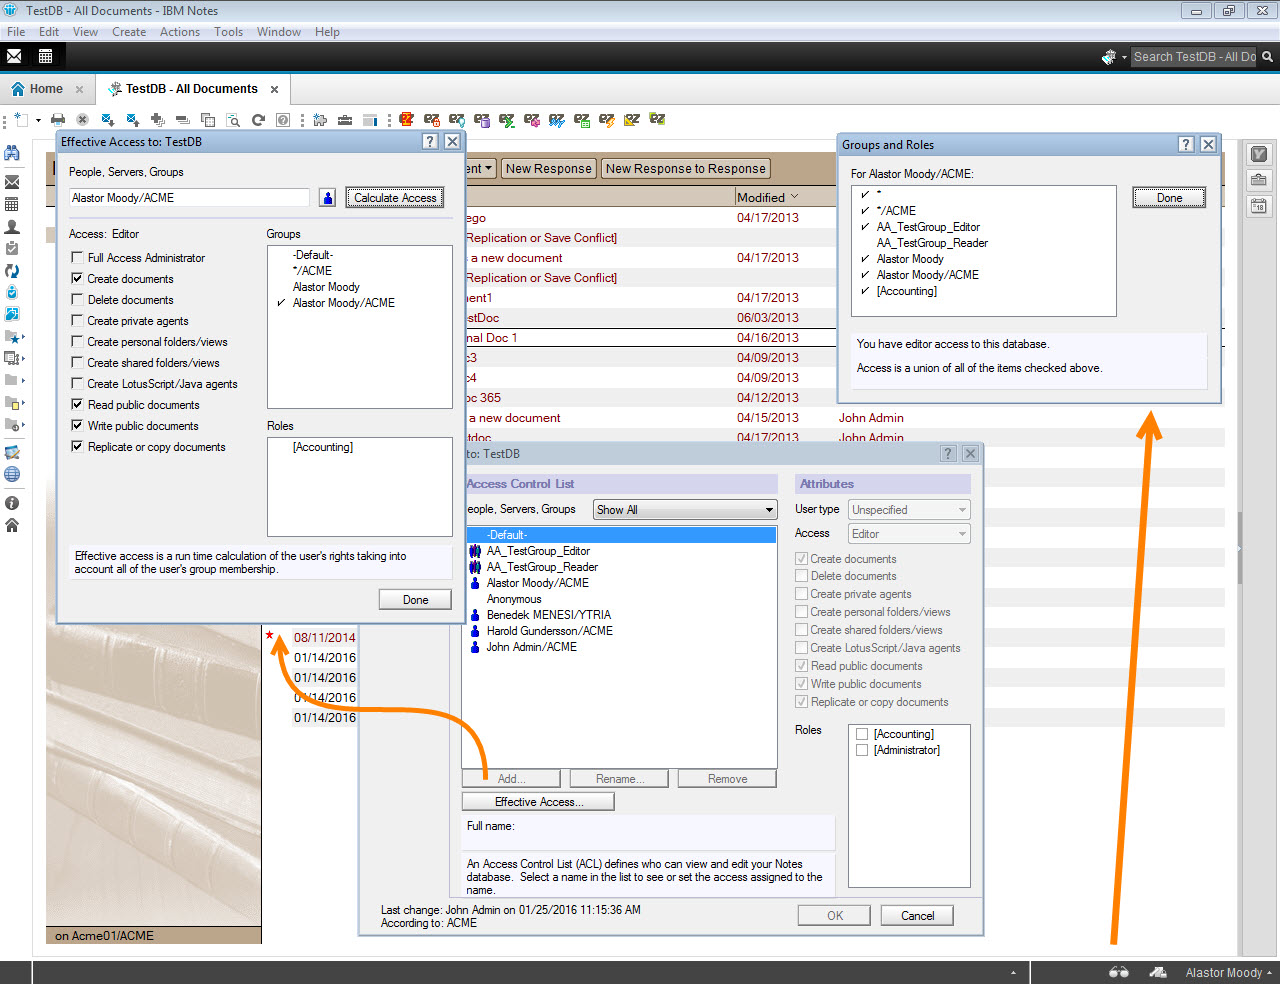
Fig. 1 In Notes, there just isn’t much else other than the Effective Access feature, or the Security taskbar button when you’re trying to break down the true access situation.
ACL Tricks & Bottlenecks
At first glance, it’s easy to come away with the impression that ACL entries or group memberships are enough to determine user access rights on a given application. But even without considering the difficulties created by the way Group type ACL entries are managed in a database ACL (have you ever had to click Rename on an ACL group simply to copy its name so you can search for it in the Names and Address Book…?), just because a given user may be a member of a group that has Editor access, that alone does NOT guarantee that they’ll have Editor access on the application. Let’s look at a few points to better understand how the effective access is calculated:
1) Anonymous web access: The default, Anonymous user access for web applications is usually regulated using the Anonymous ACL entry. However, this ACL entry is not added to all ACLs automatically, it needs to either be created manually, or added to Template files (in an [Anonymous] entry format) so that when a new database is generated from them, they’ll inherit an Anonymous entry. If no Anonymous ACL entry is present, anonymous web user access will be determined according to the Default ACL entry.
When conducting security assessments, it is therefore important to ensure that
Anonymous ACL entries do not provide access rights to applications where it isn’t necessary; and
all database ACLs contain the Anonymous ACL entry—even if this is not the case, the Default ACL entry shouldn’t allow access than necessary.
2) Person vs. Group type ACL entries: It is possible, whether intentionally or unintentionally, to provide a given user (or even multiple users) with access rights to a database through various types of ACL Entries. For example, an administrator might be part of an administration group that has a Manager access ACL entry in ALL database ACLs on a given server. Let’s say, then, that we want to reduce their access rights on one particular application (which they currently have Manager access to). This can be done by adding a Person or Unspecified type ACL entry for his name—regardless of their Manager access through the administration group, the Person/Unspecified type ACL access will prevail.
3) Group vs. Group type ACL entries: Unlike in the previous scenario, if a given user is a member of two or more groups that are added to a database’s ACL, it’s the group with higher access rights that’ll prevail, even if the group with lower access rights is of the type Unspecified.
4) Default vs. Person or Group type ACL entries: It may seem logical to think that the Default ACL entry sets a universal access level for everyone and thus frees us from worry about ACL entries. This isn’t the case, as the Default ACL entry only determines the access level for everyone who isn’t listed in the ACL. From this point on, there are two possible scenarios:
The user can access the database through a Person or Group type ACL entry that grants him higher than Default access to the database—it’s the Person or Group type ACL that wins.
The user has lower access rights to the application through Person or Group type ACL entries than is defined via the Default ACL entry. You’d be forgiven if you thought that, on the basis of Default, their access level would be set by the Default level, but in fact they’ll end up with the restricted access defined via Person or Group type ACL entries.
Looking through these scenarios, it’s clear that what happens under the hood is more complex than immediately meets the eye. When it comes to pulling security reports from your server, would you want to do ALL of these calculations yourself? Let’s look at how quickly this can be done with aclEZ!
Group type ACL entries
Managing global access control via Group type ACL entries has major benefits, but it also comes with setbacks. It’ll save you from having to add/remove Person type ACL entries, but you’ll still have to precisely manage groups, subgroups, and members. Environments where access controls are managed through ACL groups are extremely hard to audit in terms of who has access to what. Imagine looking at an ACL dialog with 10 ACL groups, to try and establish a list of users—by access level—that have access to the application!
Discover ACL groups on demand: With aclEZ you have all the tools you need to get a quick but thorough understanding of access rights through group memberships. Whenever you’re looking at a Group type ACL entry, the aclEZ grid offers you the ability to expand groups at the click of a button, instantly uncovering all group members for the current ACL group.
Tip: Should this group contain any deeper groups within it, aclEZ will let you get to the bottom of this (or any) nested group hierarchy quickly and discover all group and sub-group members simply by checking the Enable group navigator (explore nested groups and not only the top level) checkbox (see fig. 2).
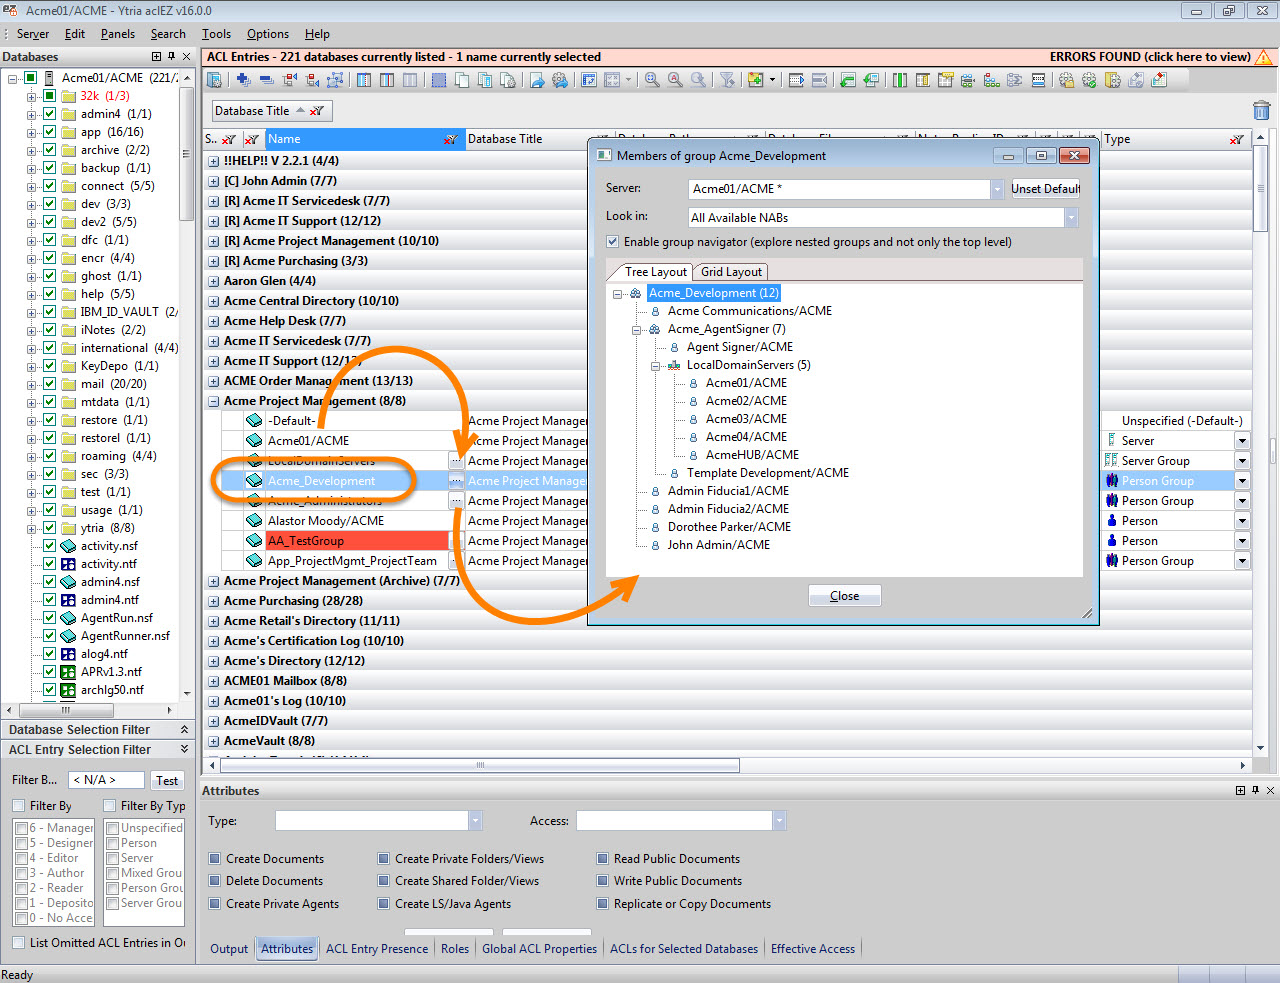
Fig. 2 Checking the box marked Enable group navigator (explore nested groups and not only the top level) will allow you to see the hierarchy of nested groups.
Expand ALL ACL Groups on your server: For a more thorough understanding of access rights on your server, you can enable the Expand Nested Groups mode from the Options > Group Expandermenu. This will look up every single Group type ACL entry in your NAB(s), displaying all of their members, as well as their access rights on given applications (as defined by the ACL group they belong to) in one interface. This analysis option allows you to look at your access rights from various vantage points:
1) Categorize your group memberships by Database Title to display every single person or server with access rights to all loaded databases (see fig. 3).
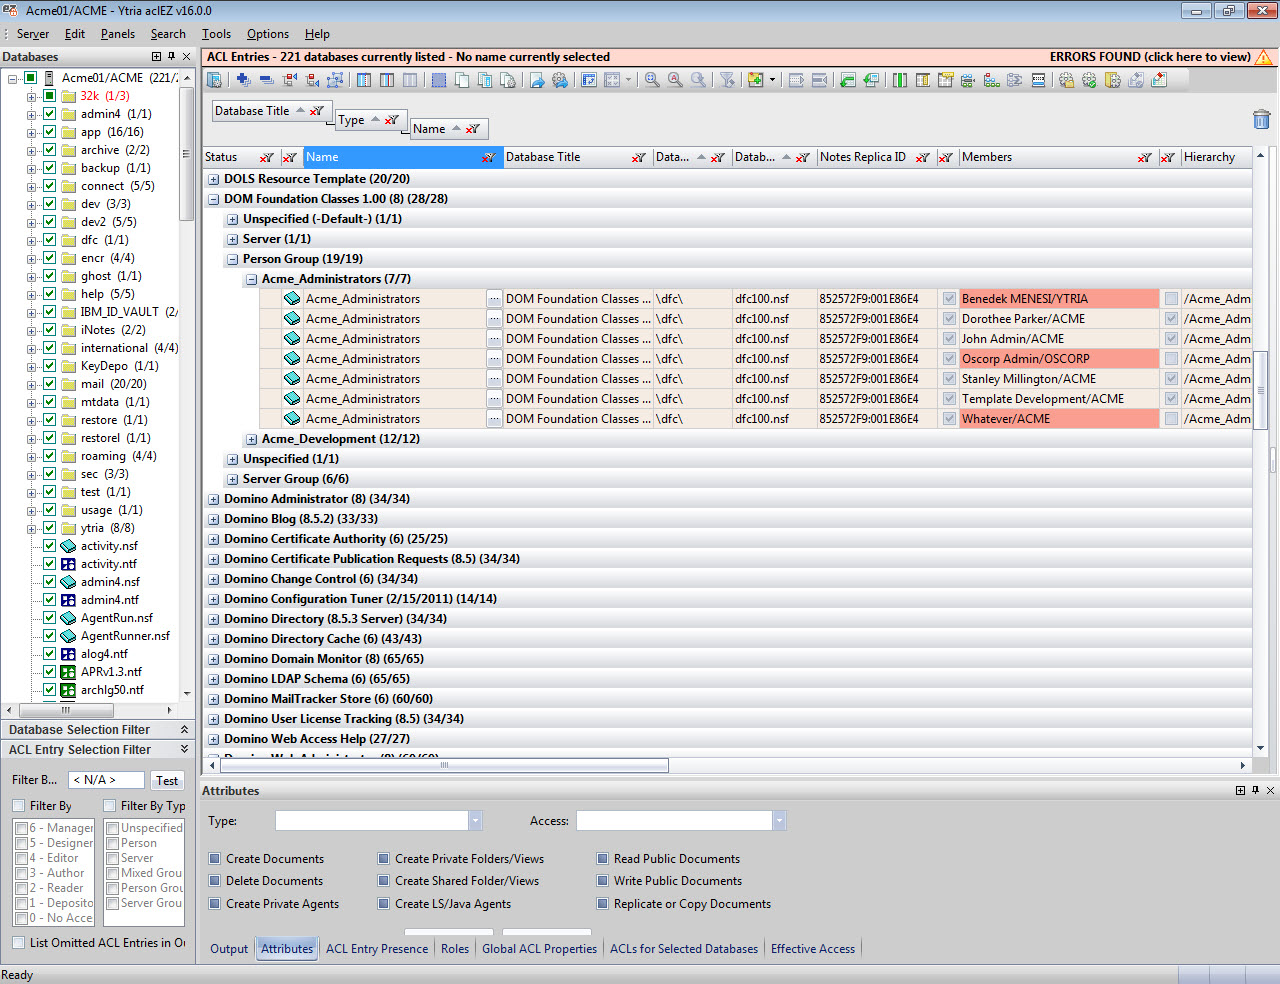
Fig. 3 Categorize group memberships by Database Title to display every single person or server with access rights to all loaded databases.
2) You can then see a breakdown of access rights by Member entry (see fig. 4), thereby establishing an overall list of users with any access at all on your server, including a list of databases they can access and their access levels.
Fig. 4 By looking at access rights according to Member entry, you can establish a list of databases users can access and the levels at which they can access them.
The Expand Nested Groups mode offers you something truly unique, and makes it extremely easy to create exhaustive reports on what your users can access. Remember, it only takes a Ctrl + C & Ctrl + V to export what you see in the flexYgrid!
But what if you want to go deeper for a more precise understanding of what level of access your users have? By looking at all group memberships, you could easily stumble upon situations like the one shown below (see fig. 5).
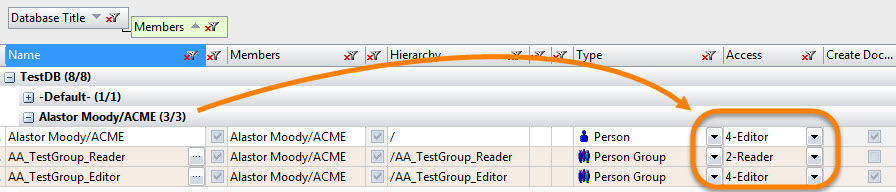
Fig. 5 Looking at all of your group memberships can often reveal surprising situations.
What we see above is a user that has 3 different levels of access to the “TestDB” application. This won’t take long to figure out by applying what we’ve learned above. Based on the following three access levels and types
- Person type with Editor access;
- Group type with Editor access & Delete Flag; and
- Group type with Reader access,
Alastor will effectively end up with Editor access, but no Delete rights.
We’ve seen this in various customer environments during the Health Checks we provide as part of our On-site Workshop offering (Sound interesting? Check it out here).
It’s quite common for users to end up with multiple access paths to applications (in most cases this is unintentional), and this makes it harder to rely on the Expand Nested Groups feature alone for a full understanding of who can access what and at what access level. Which is why we’ve implemented a brand-new tool in aclEZ version 16—something that’ll make reporting on security and compliance faster, better, and more accurate than ever before.
Unleashing the Effective Access feature across an entire server
To try and provide insight into situations like those we’ve discussed above, Notes ships with the Effective Access feature (available from the ACL dialog box) to do the precise access level calculations for us. However, this feature (just like many others in Notes) is only available for one selected user at a time, and only on the currently selected database.
What if you want to retrieve a report of multiple users’ effective access across multiple databases?
The server-wide Effective Access tool is here!
In aclEZ version 16 (set to ship in just a few weeks), you can extend the functionality of the Effective Access feature to your entire server!
Think of this new development like the Notes Effective Access functionality on steroids: not only will you be able to select multiple users and retrieve their effective access rights and role assignments, but you can also do this across multiple databases!
In fact you can check the effective access for ALL users across ALL loaded databases in just a few clicks (see fig. 6):
- Select databases in your main aclEZ grid (selecting all ACL entries will make this feature process ALL loaded databases).
- Click Show Effective Access in your right-click menu.
- Select either one or multiple users, including Anonymous or Default entries (you can even select ALL users in your Names and Address Book(s)).
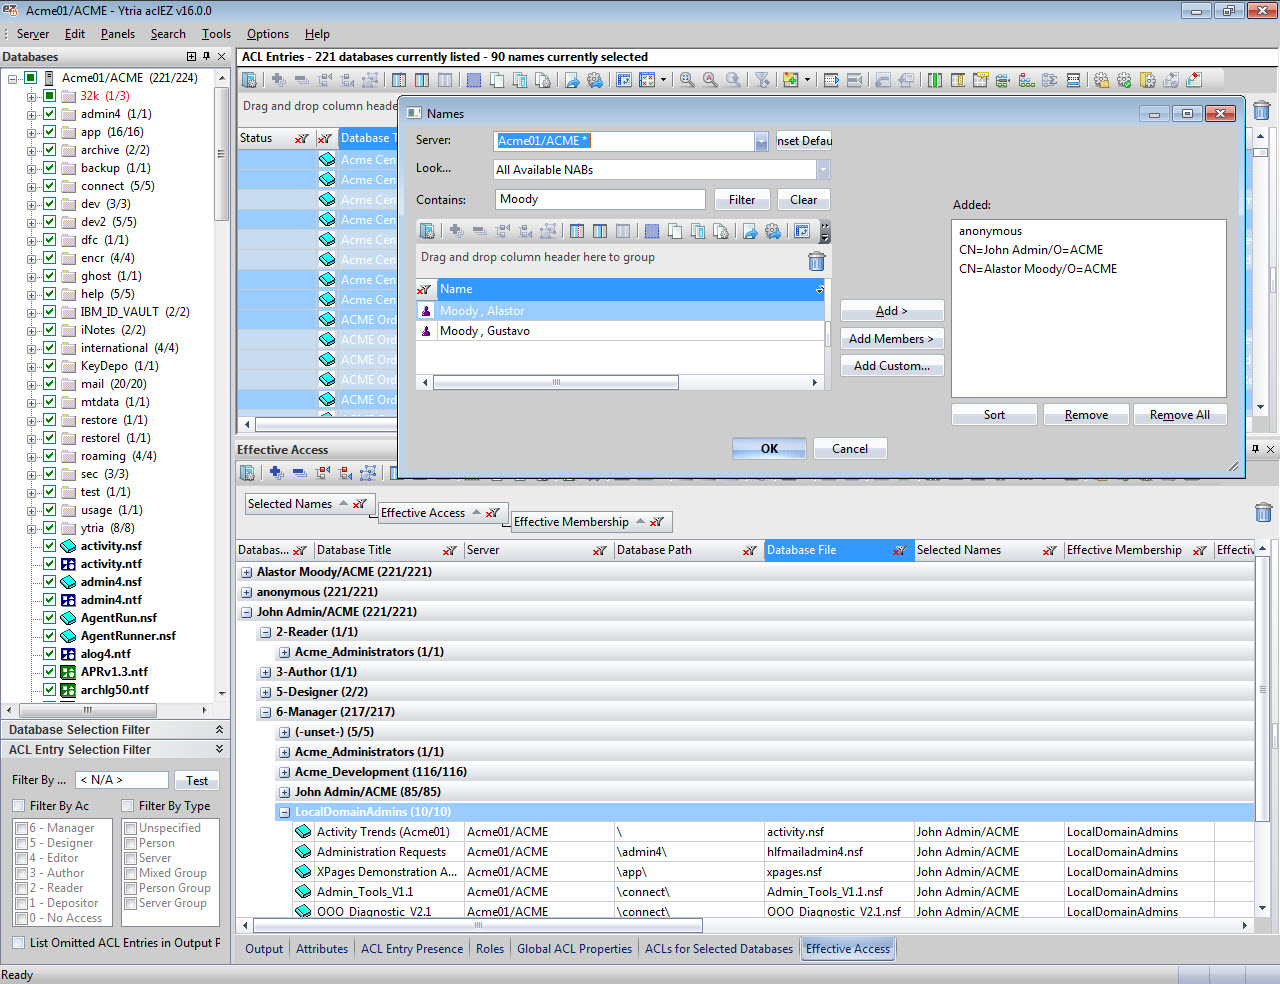
In the results pane grid, you’ll see not only the Effective Access and Role assignments of all selected users across all selected databases, but also the “winning” ACL entry, through which the prevailing access levels and Roles are granted.
With this feature, you can now create an extensive Access Control Report of every single user across all databases, whether it’s for general security or compliance.
To learn more about aclEZ, you’re invited to check out this in-depth webinar on the ins and outs of modern IBM Domino Access Control Management.
Submit a comment