Live from IBM Connect 2017: Long-awaited @formulas announced for FP8 and an in-depth guide on how to use them

A hot announcement at IBM Connect 2017 was the news that Feature Pack 8* includes support for two new formulas: @ModifiedInThisFile and @AddedToThisFile. In this article, we’ll explain what they mean and how they’ll help you as an administrator or developer. We’ll even give you some pointers on how you can apply these new formulas as soon as you get your hands on them.
[*Update: This article originally stated that the new formulas would be available in FP9. However, it turns out they are indeed available in FP8. All the better to be able to use them sooner! Both client and server-side must be updated to include this latest package for the formulas to work.]
How IBM Notes handles date-related attributes in documents
The way that Notes manages date information in documents is actually quite thorough: for each property such as Creation Date, Modification Date, or Deletion Date (in the case of deletion stubs), there are two date stamps stored in the background. For example, let’s look at the document Creation Date: While the Official Creation Date value tells us when a document was first created (or “born” if you’d like to think of it that way), the Added in this file value lets us know when the document was first created in the particular database (replica) we’re looking at.
Now, this relationship can reveal two possible scenarios:
-
- Creation Date = Added in this file date. This means the document was created in this particular replica.
- Creation Date ≠ Added in this file. This means that the document was created outside this replica. The difference between the two date values tells us how long it took to replicate the document or design.
The two scenarios above are true for both Modification and Deletion date values.
Longstanding access issues
The ability to access these attributes, or more specifically the lack of access, has been an issue within Notes for a long time. While getting to the official creation or modification date information has always been possible by using @Created or NotesDocument.Created and @Modified or NotesDocument.Modified respectively, retrieval of the ‘In this file’ date information (Added in this file, and Modified in this file etc…) has only ever been available through a set of API calls. The result being that there has never been any way to display these values in a view column. But with the new developments right around the corner, this will no longer be a problem. So, let’s look at two practical ways these formulas can make your life a bit easier.
Case #1
“What happened in this database in the last X days/hours?” This seems like a simple enough question, but it has always been extremely hard to answer with regards to Notes databases. However, these new formulas give you the means to easily create a view that highlights any documents modified and created in the specific replica you’re working with, and even changes that have replicated within a given period of time.
To do this, simply add the following columns to a view that displays everything:
A note before we begin: You might want to specify a selection formula to only include documents created or modified in the last 1-2 days to limit the documents displayed (and thereby the view index). This is ok, but keep in mind that a selection formula that specifies a period of time using the present time (as in: @Now) as a variable will have the effect of refreshing the view every time it is opened because Notes will consider that the view is never up to date.
• Created Initially (using the @Created formula)
• Added in this file (using the new @AddedToThisFile formula)
• Modified Initially (using the @Modified formula)
• Modified in this file (using the new @ModifiedInThisFile formula)
• Modified By (using the formula @Subset($Updatedby;-1)
You could even use this new view as your go-to administration interface when faced with the need to determine things such as what documents were modified in the database concerned or why your document count is significantly larger than yesterday—even finding out where a given set of documents comes from becomes clear.
Your new view will look something like this (see fig. 1):
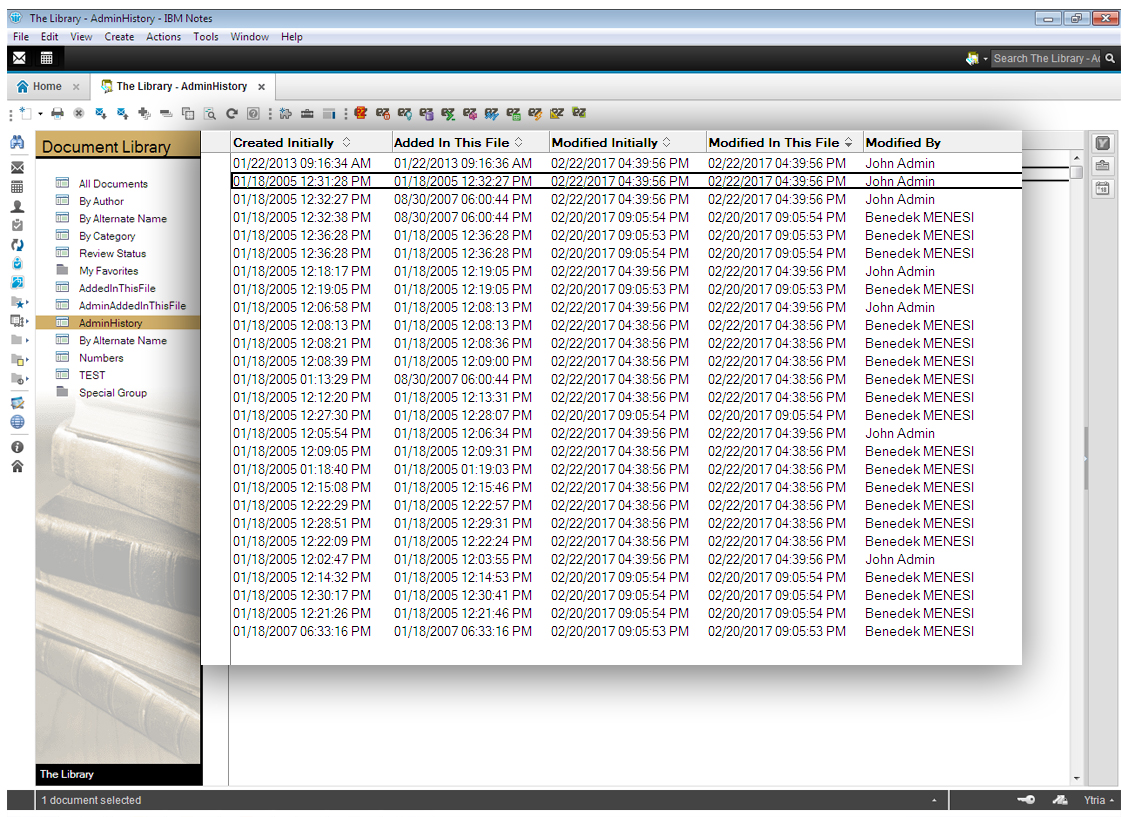
Fig. 1 View of document history.
In the past, we’ve had a few discussions about resurrected (or “ghost”) documents and how to prevent them (check out this blog post for insights into figuring out the origins of ghost documents). And while we’ve been touting how scanEZ lets you access these dates (which can in turn be used to locate resurrected documents) for some years now, the new FP8 release with allow you to find these documents simply by creating a view in the database in question.
Here is an example set of columns that’ll let you discern documents that were created outside the database and documents that may be resurrected due to the lack of PIRC (Purge Interval Replication Control):
Column 1: Categorized–differentiates between documents created inside and outside the replica
@If(@Addedtothisfile=@Created;"Created in this replica";"Created elsewhere")
Column 2: Non-categorized–calculates the difference between initial and in this file creation dates
tmp:=@Addedtothisfile-@Created;
days:=@Integer(tmp/60/60/24);
hrs:=@Integer(tmp/60/60-days*24);
minutes:=@Integer(tmp/60-hrs*60-days*60*24);
seconds:=@Integer(tmp-minutes*60-hrs*60*60-days*3600*24);
@Text(days) + " days, " + @Text(hrs)+ " hours, "+ @Text(minutes)+ " minutes, " + @Text(seconds) + " seconds"
Column 3: Non-categorized–set to display values as icons with width 1—displays exclamation mark if document is potential ghost
@If(@Addedtothisfile-@Created > 90*24*60*60;150;"")
Column 4: Non-categorized–displays text to identify potential ghosts
@If(@Addedtothisfile-@Created >90*24*60*60;"Potential Resurrection";"")
In this column, we’re looking for documents where the difference between the initial creation date and in this file creation date is larger than the deletion stub lifetime–usually set to 90 days by default. Feel free to modify this and update it according to the actual deletion stub lifetime setting found under the space savers tab of replication options (see fig. 2):
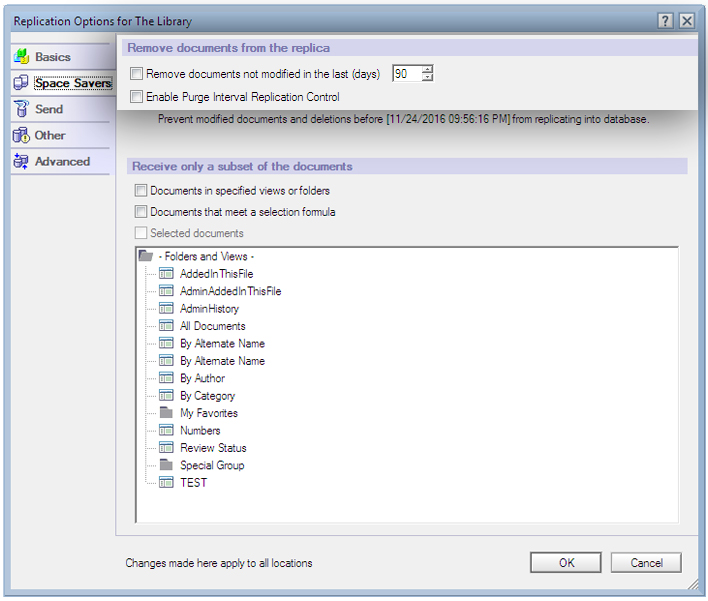
Fig. 2 Find documents based on the set deletion stub lifetime.
Your resulting view incorporating the above 4 columns will look something like this (see fig. 3):
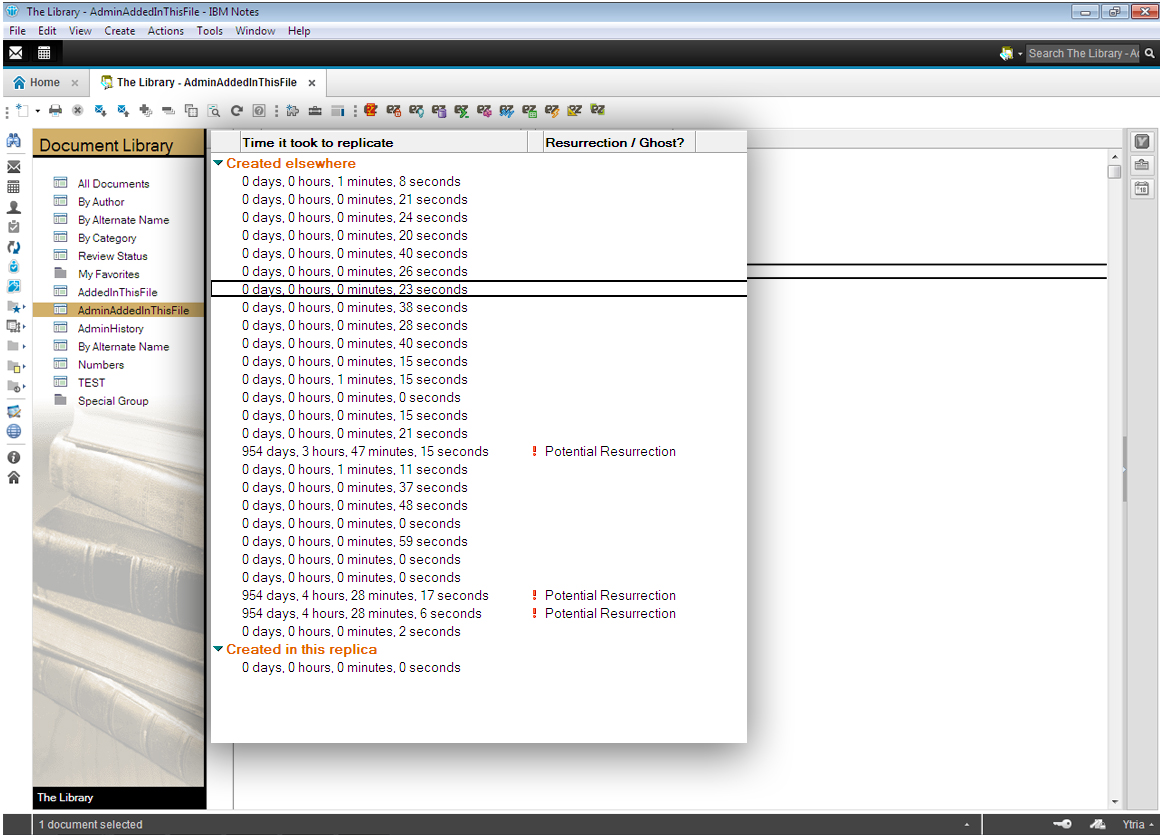
Fig. 3 Identify ghost documents in this new view.
It’s important to note that just because the difference between these two dates (Created elsewhere and Created in this replica) is larger than the deletion stub lifetime, it does not necessarily indicate that a given document is a “ghost”. For example, think about an application that was created two years ago, and whose documents were also created two years ago. Now, if you were to create a NEW replica of this database today, all documents will be indicated as potential resurrections based on the simple fact that the date of their initial creation is two years ago, but they were only just now created with the new replica. Ideally, you’d want to factor in the database creation date too. However, there is no way to retrieve this date via formulas. Of course, there are always manual workarounds, in this case through manual input or by looking up catalog.nsf.
scanEZ as a workaround for manual workarounds
If the view explained above does leave you with a desire for more precision, there is a still easier way to include the database creation date in your calculations. Thanks to scanEZ’s built-in Post-Replication Auditor tool, pinpointing document resurrection is literally only a few clicks away, and with all factors included.
With proper application of the Feature Pack 8 release, IBM Notes and Domino users will finally have a native solution for the long-standing dilemma of resurrected documents—and that’s definitely something to be happy about. Cheers to the good stuff, here’s to more releases like this, IBM!
Great articles, good to have the new API, took a long time since 2014 where IBM promised to add it to the product.
Two things:
1. I think the formulas will already be available in FP8, but the views may probably need to be created programmatically.
2. Another use case is view based data synchronization. When you create views sorted by @modified to check what has been changed since the last synchronization, you might miss documents modified before that date in other replicas coming in via replication.
Thanks for your comment Karsten,
Indeed, as it turns out both formulas shipped with FP8 – we’ve modified the article to reflect this. Thank you for pointing that out!