Longstanding IBM Notes Database Unread ID Table Replication Issues, Now Solved!

In talking to hundreds of IBM Domino administrators and developers every week over a good many years now, we’ve frequently heard of problems that revolve around unread marks, their structure, and their replication (or lack thereof). In this article, we’ll examine how the very mechanics behind unread marks could be the reason why they are likely to cause issues, and then we’ll take a look at how easy it is to sort these problems out using scanEZ‘s unique, and easy, unread marks management process.
Architecture of Unread ID Tables
Every Notes database that doesn’t have the ‘Don’t maintain unread marks’ option enabled—essentially an “opt-out” from unread marks—maintains an Unread ID table for each active user, and this table keeps a list containing the NoteIDs of each unread document. When a database is opened, the Unread Marks ID table is transferred to the local file; all updates are performed locally during the current session in which the database is opened.
Unread Marks Replication
Provided that the ‘Replicate Unread Marks’ database property is enabled, the Unread ID table does replicate, and is thus supposed to be identical across replicas.
Note: Unread marks were originally designed for Mail databases, and their replication can significantly slow database performance. For optimal performance, consider reviewing both the ‘Don’t maintain Unread Marks’ and ‘Replicate Unread Marks’ properties across your all of your databases by using databaseEZ.
Replicating the Unread Marks ID table entails first a conversion of NoteIDs to UNIDs in order to locate the appropriate documents in the other replica, and then a second conversion of those UNIDs into NoteIDs in order to update the foreign replica’s NoteID table (see fig. 1). This is all for the sake of space economy; NoteIDs are much smaller (4 bytes) than UNIDs (16 bytes).
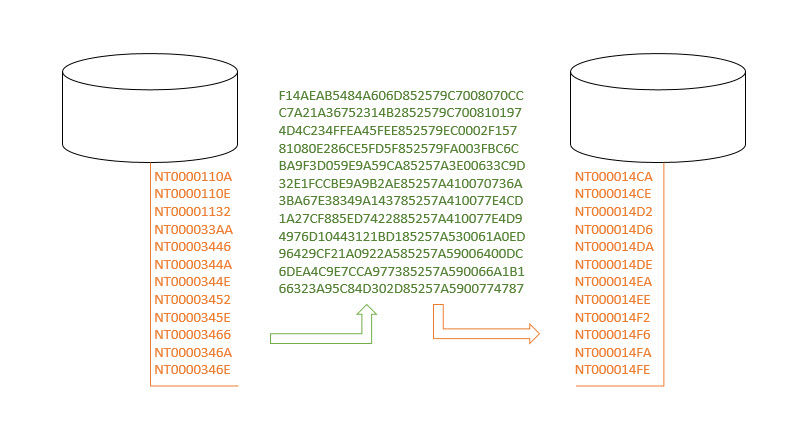
Fig. 1 The conversion that takes place during an Unread ID table’s consists of two major steps: 1.) The NoteIDs of all the unread documents in the source replica are converted to UNIDs in order to locate the proper documents in other replicas. 2.) These UNIDs are then converted into NoteIDs in order to properly update the foreign replica’s NoteID table.
Thus, Unread ID table discrepancies likely arise from a combination of circumstances: the two-step conversion, the fact that the tables aren’t updated live during a current session, and occurrences of interrupted sessions, client crashes, etc. mix to provide just enough of an opening for errors to occur.
The Heart of the Problem
When using the native IBM Notes or Domino Administrator clients, a user is only allowed to view/manage their own Unread ID table. This makes it impossible for administrators to verify (much less remedy) unread marks discrepancy issues reported by users.
The Ytria Solution
In contrast to the native IBM Notes toolkit, scanEZ allows administrators to view AND manipulate not only their own, but also any user’s Unread Marks table in any given database. This unique feature, first introduced in EZSuite V12, finally gives administrators the means to debug and resolve any issues pertaining to unread marks. And using scanEZ’s capabilities, they can easily perform a “manual synchronization” of the state of unread marks across replicas.
Here is how to do it:
Manually Synchronizing the Unread Marks ID Table Using scanEZ
Picture this all-too-common scenario: a user calls in and complains that while their replica on server A has all the correct documents marked as unread, it won’t properly replicate this information to their replica on server B.
Using scanEZ, you can sync those databases in 5 steps or less:
Note: For the sake of brevity, and to illustrate a linear process, the method shown here will use Checkbox Selections. The flexibility of the tools allow you to take a few different paths to arrive at the same results.
1) Find the correct documents that are currently unread for a given user
Open scanEZ on the user’s mailbox on server A, select the option Search for Unread< Documents/strong> from the Search menu, and then select the user’s name. Once the unread documents have been found, create a new My Selection virtual folder containing these documents (see fig. 2).
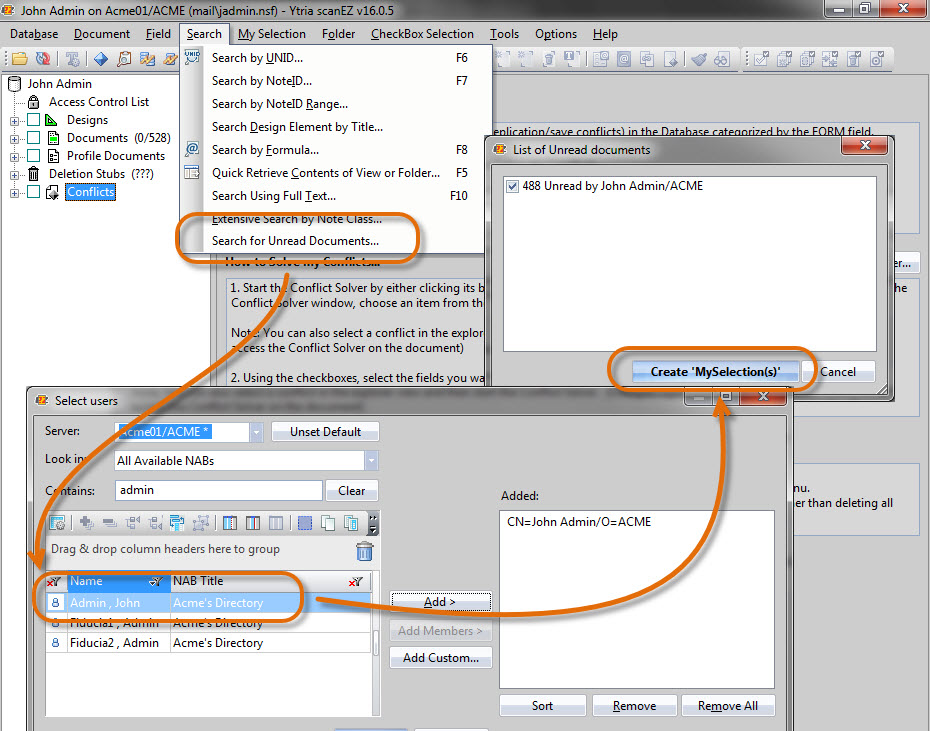
Fig. 2 Gather the correct unread documents for a given user in just 3 clicks.
2.1) If your new My Selection folder contains up to—but not more than—990 documents, checkbox select your My Selection folder, and choose the Copy UNID(s) to Clipboard option from the Checkbox Selection menu (see fig. 3). Now you have all of the currently unread documents’ UNIDs on your clipboard. If you have more than 990 documents, skip directly to step 2.2.
Please proceed to step 3.1.
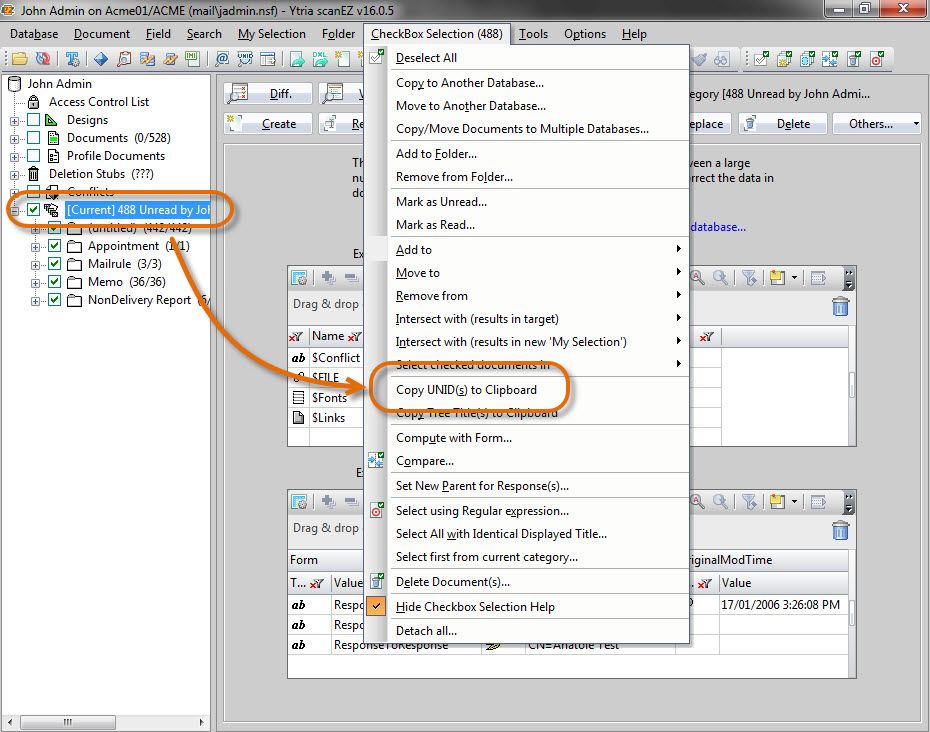
Fig. 3 Checkbox select the entire contents of your resulting unread document search My Selection virtual folder, and choose the option ‘Copy UNID(s) to Clipboard’ from the Checkbox Selection menu. You’ll now have all of the currently unread documents’ UNIDs on your clipboard.
2.2)If your resulting My Selection virtual folder contains a very large amount (many thousands) of documents, you won’t be able to work with UNIDs, unfortunately, as scanEZ’s Search by UNID function currently supports search input of a maximum of 990 UNIDs at a time (contrast this to the IBM Domino Administrator client, which only allows for searching one UNID). But don’t worry; all you’ll need to do is checkbox select your My Selection folder’s contents, and then select the ‘Add to Folder’ option from the Checkbox Selection menu. Create a new temporary folder called “TmpDocSelect” and add all relevant documents to it (see fig. 4). This is a real folder, as opposed to a virtual My Selection folder. Let this folder replicate over to server B.
Please proceed to step 3.2.
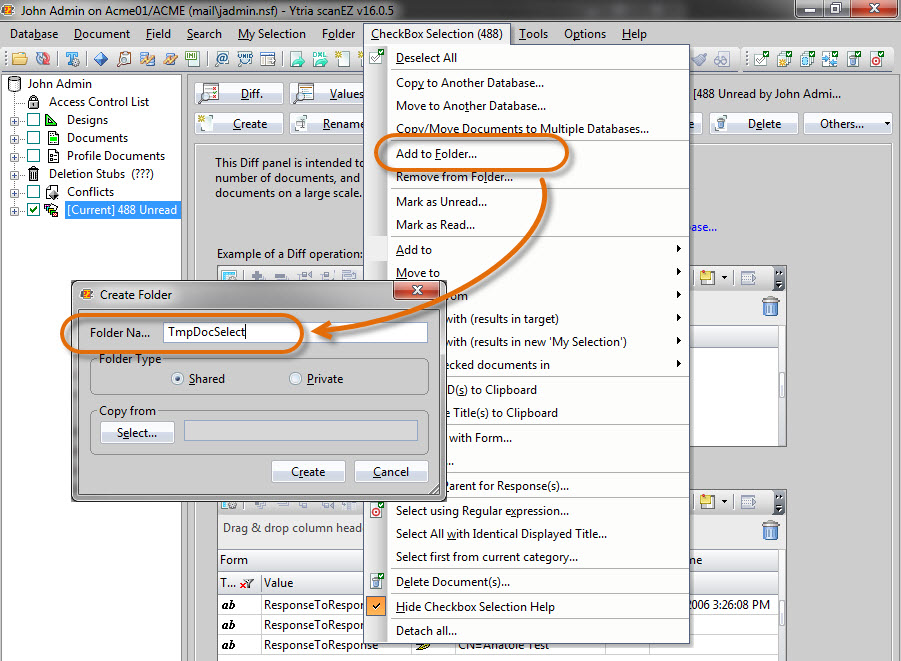
Fig. 4 With your desired documents selected using a CheckBox Selection, choose the option ‘Add to Folder’ from the Checkbox Selection menu to add those documents to a new folder called ‘TmpDocSelect’.
3.1) With the document UNIDs on your clipboard, open scanEZ on the database’s replica on server B and select Search by UNID in the Search menu. Paste all UNIDs from your clipboard into the input field and create a My Selection folder called “All Unread”. Next, checkbox select all documents by putting a check mark next to the Documents tree entry and add them to a new My Selection folder called “All Documents” using the Add to > New ‘My Selection’ option from the Checkbox Selection menu (see fig. 5).
Proceed to step 4.
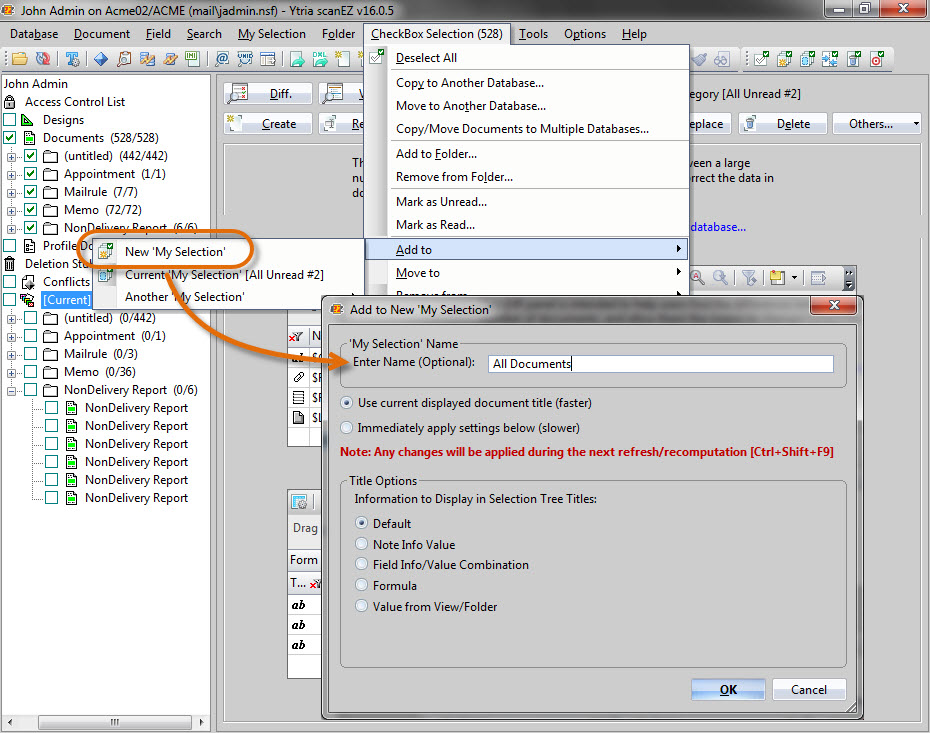
Fig. 5 Once you have checkbox selected all documents, create a new My Selection folder containing these documents by using the Add to > New ‘My Selection’option found in the CheckBox Selection menu.
3.2) Once your newly created folder “TmpDocSelect” has replicated over to Server B, open scanEZ on the database’s replica on server B, and use the Quick Retrieve Contents of a View or Folder feature found in the Search menu to select the “TmpDocSelect” folder. Specify the name “All Unread” for the new My Selection to which all of these documents will be added. Checkbox select all documents by putting a check mark next to the entry Documents in the tree, and then add them to a new My Selection folder called “All Documents” using the Add to > New ‘My Selection’ option from the Checkbox Selection menu.
Proceed to step 4.
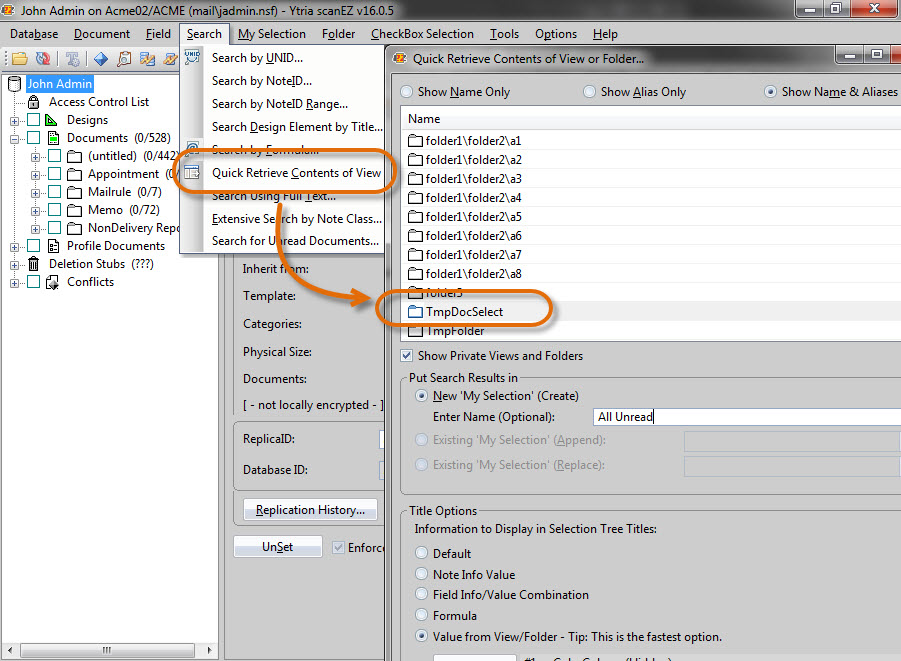
Fig. 7 After your new folder ‘TmpDocSelect’ has replicated over to server B, open scanEZ on this replica and use the option Quick Retrieve Contents of a View or Folder, found in the Search menu, to place the contents of this folder into a new My Selection folder
4) After making sure nothing is selected in the tree, go ahead and checkbox select your “All Unread” My Selection folder. Use the Remove from > Another My Selection > All Documents option path from the Checkbox Selection menu to remove all of these unread documents from the “All Documents” My Selection folder (see fig. 8). Essentially, this will leave all read documents in the “All Documents” My Selection folder.
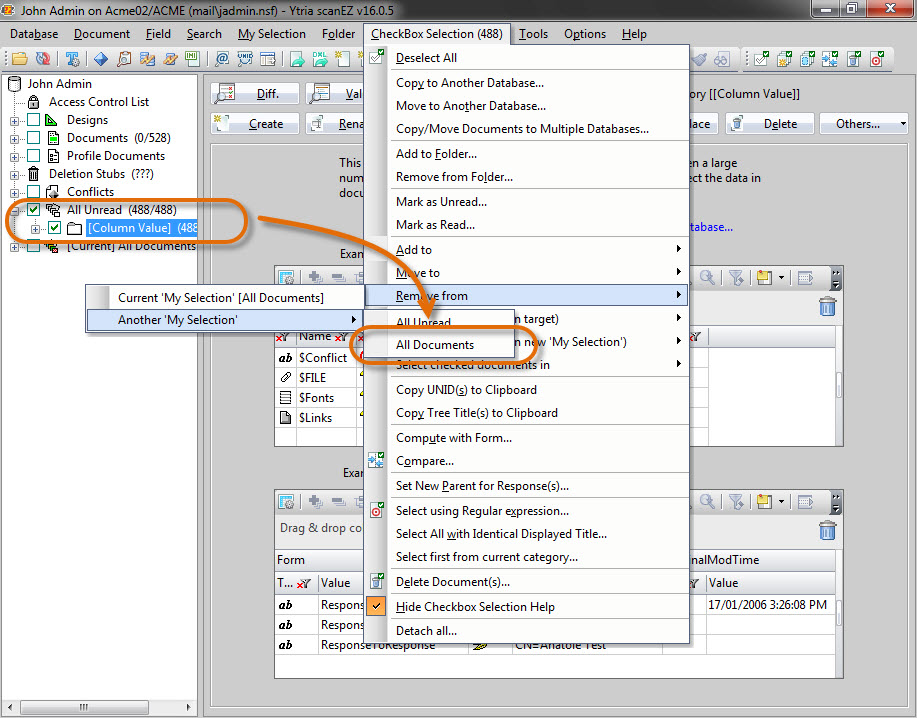
Fig. 8 Once you have made sure that nothing is selected in the tree, go ahead and checkbox select your My Selection folder titled “All Unread”. Use the Remove from > Another My Selection > All Documents option path from the CheckBox Selection menu to remove all of these unread documents from the My Section title “All Documents”.
5) The “All Documents” My Selection folder should now contain all of the read documents. Now, the only thing left to do is to make them officially read for the user. This can be done by simply highlighting the “All Documents” My Selection folder, and selecting the Document menu’s Mark as Read function. Select the user’s name and click OK (see fig. 9). The Unread Marks table has now been manually synchronized.
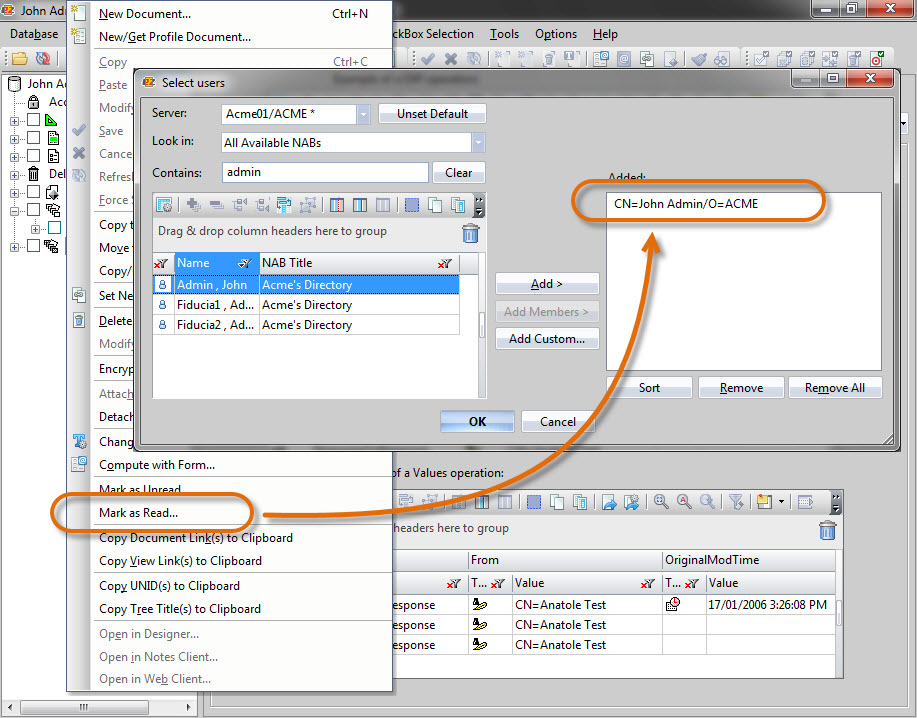
Fig. 9 Highlight the “All Documents” My Selection folder to use its document content, and then simply select the Mark as Read function from the Document menu. Select the user for whom you wish to mark the documents as read, and click OK. The Unread Marks table has now been manually synchronized.
Replication issues have long plagued Unread ID tables and, consequently, annoyed administrators. We have seen the probable behind-the-scenes reasons why mix-ups can happen, but that comes as cold comfort to those who still need to approach these problems in the traditional method. scanEZ‘s easy unread marks management process gives administrators the power to finally remedy these issues across replicas, as well as providing much-needed time savings and gains in accuracy.
Thank you! Great solution!
do you know if running that tool is it possible to fix the notes error unable to extend an id table – insufficient memory?
Hi Luis,
The corruption of an ID table is something that is deep in the structure of a database.
Usually, the only way out of this error is to run a fixup on the database. Some tech notes suggest that you should try to use the command compact -replica.
Unfortunately, scanEZ won’t be able to help you here since it needs to be able to open the database using the core Notes API, and this may not be possible when such an error is encountered.