How to standardize Microsoft 365 user deactivation or offboarding
Deactivating users in the Microsoft 365 portal
Everyone has their own process for offboarding users, but certain steps are common to most organizations. In fact, Microsoft 365 has a document that details best practices. The first step is usually about taking action to prevent further access to the company environment by blocking the accounts’ ability to sign in, changing the password and revoking access to Microsoft 365 applications.
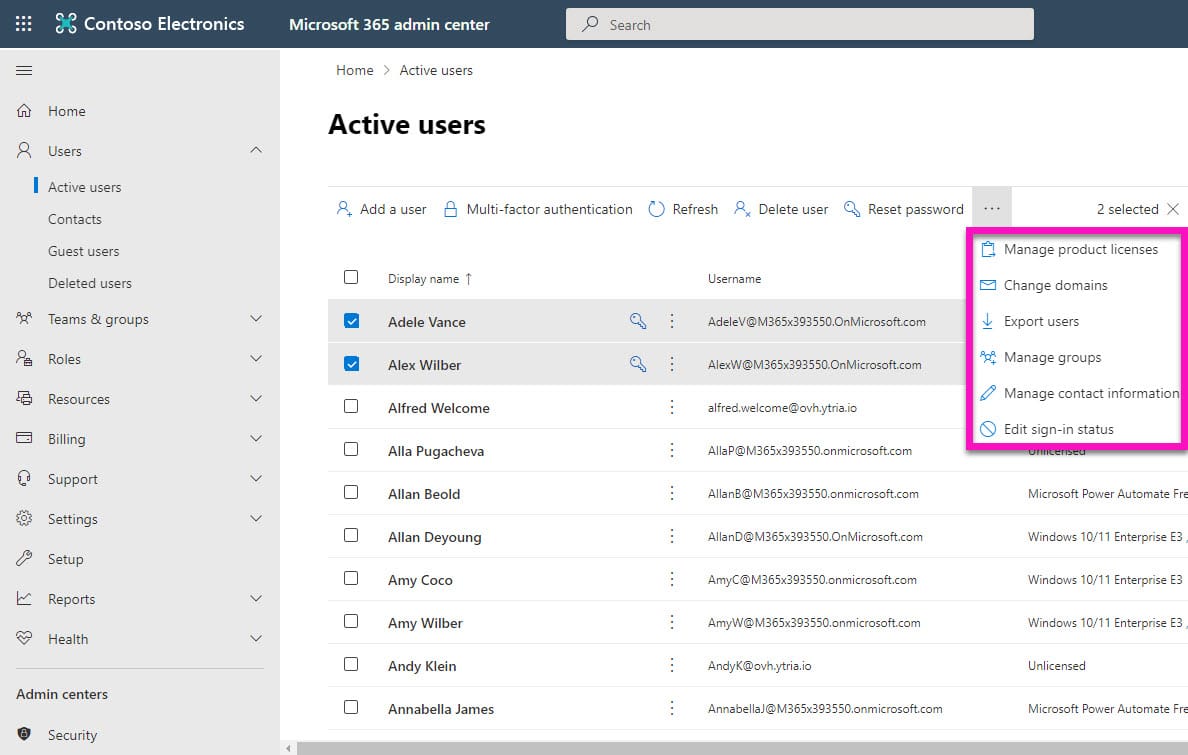
Blocking sign-in and resetting passwords are individual buttons found in the top menu of the users view in the main admin center of the Microsoft 365 portal, while revoking tokens that keep users signed into their Microsoft 365 sessions requires drilling to level of the user, which means forcing users to sign out from active Microsoft 365 sessions can only be done one user at a time.
The next step is often about retaining business intelligence in the users’ documents and communication. Microsoft 365 has a wonderful process in place that gives OneDrive access to a user’s assigned manager once the user is deleted or deactivated. To check if your users have managers set, you’ll need to check each profile view.
Limited bulk actions in the Microsoft 365 admin portal
Let’s not forget the expensive practice of leaving licenses assigned to disabled users. Granted this is usually done for a good reason such as retaining everything in case the user comes back, like in temporary layoffs. Most of the time, admins remove users’ licenses to reallocate to someone else and convert their mailboxes to a “shared” state to keep access to those mailboxes’ content and give access to a manager. Luckily shared mailboxes don’t need licenses!
The license removal is an all or nothing action in the admin center, so if you’re ok with the “all” aspect, it’s easy to remove them in bulk once users are selected, though you may need to keep moving through the pagination process to find each user. Giving access to mailboxes is another all or nothing event but for ALL Exchange Online mailboxes if you are looking to push a single button. Therefore, assigning a manager to a mailbox must be done one at a time in main admin center as you click on each user.
An important security step is removing users from various groups and Teams. If you did all the previous steps, disabled users won’t be able to access the content of Teams anyway or any messages sent to them via group lists. However, it’s good practice to remove group memberships from deactivated users. While adding a membership to several users is possible in the admin center, removal is not. So, this step can only be executed one user at time. Hence admins resort to risky Googling or spending precious time creating a PowerShell script which they modify based on what they want to accomplish.
More complications with hybrid Microsoft tenants
Deactivating user accounts synced from an on-premises Active Directory render certain of the previously mentioned steps invalid since managers and group memberships can only be set on-premises.
It’s even more complicated if you have a mix of on-prem only accounts, cloud-only accounts, and synced accounts. Let’s say that you are given a mixed list of users to deactivate. Normally you would need to find them in the Microsoft admin portal or in Azure Active Directory to identify those that are synced or cloud-only. You’ll need to do the same for the on-prem accounts in your local Active Directory before you even decide which steps to take!
Let’s look at how to make things easier, regardless of the state of your Microsoft 365 environment.
Offboarding all account types in sapio365
sapio365 was designed for making bulk changes easy and safe. But before describing to you how simple it is, note how sapio365 lets you see the entirety of your users categorized as cloud-only, synced and on-premises-only. This is something that is not possible with any other tool.
sapio365 also includes all the actions needed (based on our users’ feedback) all in one place. But that’s still too manual. Let’s fast track user offboarding with an automated task in sapio365 that you can execute on selected accounts. Make your selection of users and click on “USER OFFBOARDING” listed with other automated jobs on the left side of the grid.
Choosing options to offboard users in sapio365
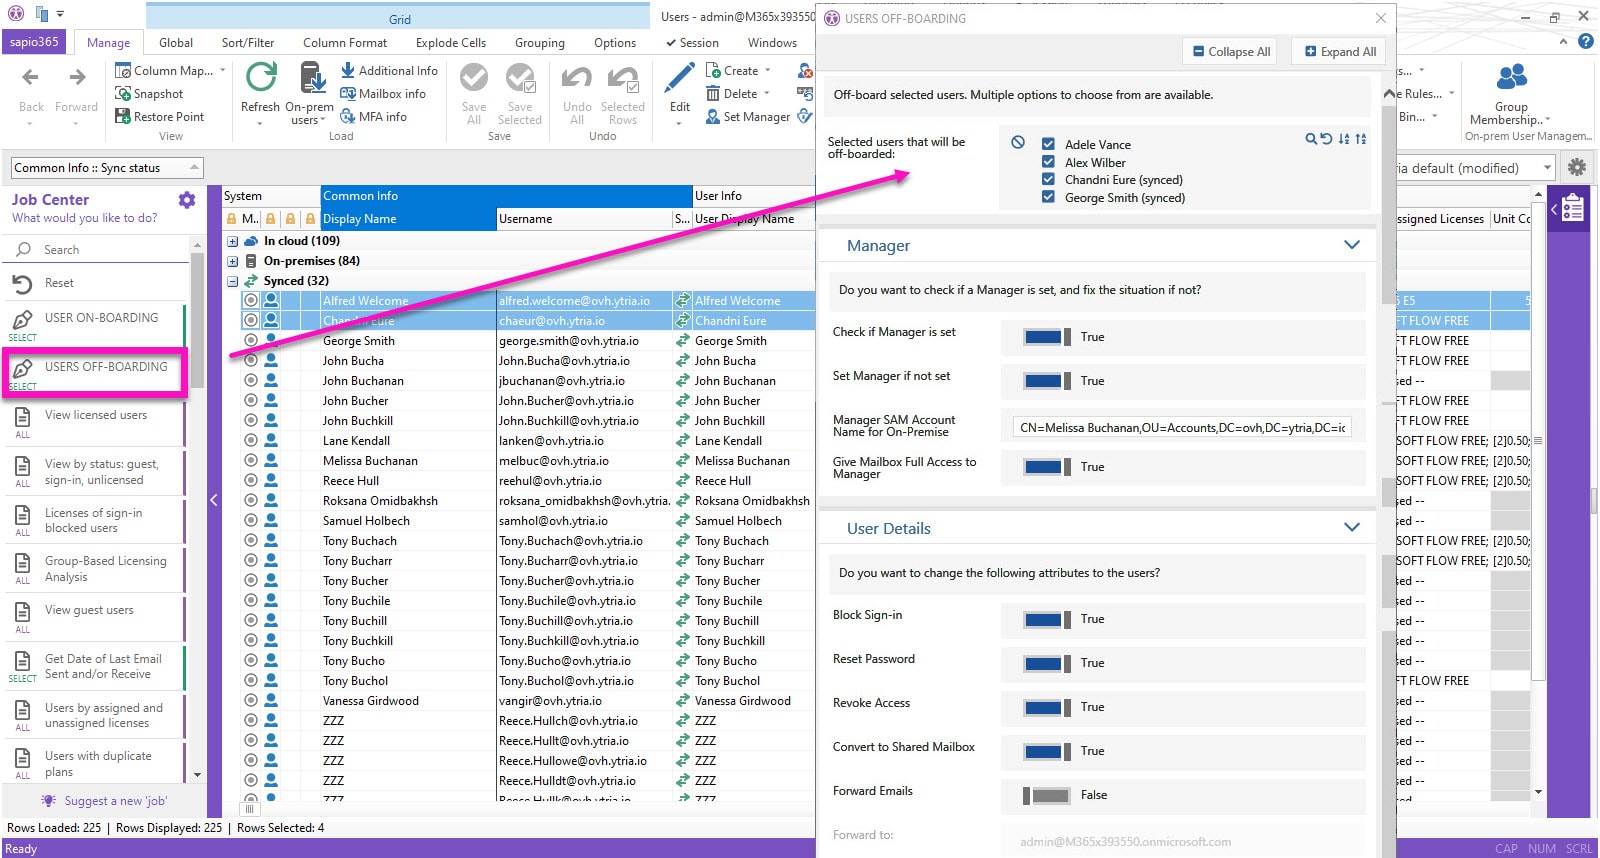
The full list of options couldn’t fit in this screenshot so here is a summary of the options to choose from once you hit that button.
- Assign a manager to accounts without one.
- Give mailbox access to the manager
- Block user from signing into Microsoft 365
- Reset the password
- Convert the mailbox to a shared one to save on license costs
- Set a forwarding address on the mailbox
- Add a prefix to the user’s display name to indicate deactivation status
- Remove directly assigned licenses
- Move on-prem or synced accounts to another Organization Unit in the local Active Directory
After you’ve selected the options to apply as part of your user offboarding process, sapio365 will then begin executing each step on all the user accounts you initially selected, regardless of the number. You can deactivate 5 or 100 users using the same standard procedure that YOU decide on from the start. Once the task is completed, sapio365 will display a ‘Done’ dialog box with a detailed summary of what has been done.
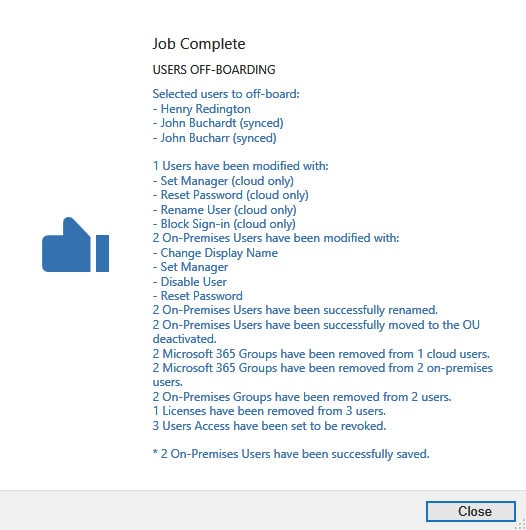
Note that changes in group memberships and user properties for accounts syncing from on-premises will become visible in Azure Active Directory after a proper sync. You can easily force sync changes directly in sapio365. Then, a quick data refresh and you’re ready for your next task!
Enabling your staff to use this automated job will ensure that offboarding happens in a controlled and consistent manner – no PowerShell required.
In fact, the next time you find yourself resorting to PowerShell scripting for this or any other task, check out sapio365 and its list of automated tasks and reports. If by chance what you need is not there, send us a request or leave a comment below, and we’ll make your admin dreams come true!
Submit a comment