Manage thousands of profile documents easily with EZ Suite and three pre-made scripts
In a recent blogpost, you got a walkthrough of one of Ytria’s recent customer cases where we helped out with a massive (and successful!) renaming operation. Renaming 80 meeting rooms across 3000+ mail files is no small job, but we got it done using Ytria’s XML automation API.
But, there was another part of that job that was deliberately left out of the post: once the rename was completed, we needed to modify all the users’ calendar profiles to remove the old rooms names from their preferred lists. Why? Because it’s an important step that seemed worthy of a separate article. But beyond that, it involves another subject our customers ask about quite often: mass-reading/editing profile documents.
On their own, scanEZ’s profile document management capabilities offer a number of advantages over the native tools. First, we’ll take a look at what can be done on a single database and how because that forms the basis of everything done through Ytria automation: the principle of our XML Automation API is that most UI actions can be recorded, coded and repeated across multiple databases and or servers using a simple XML automation file. Once we have that down, we’ll move on to its large-scale application.
Working with profile documents in a single database
If you’re already a Ytria user, chances are you’ve used scanEZ to work with profile documents before. It’s tempting because the interface really is intuitive and offers a great deal of flexibility: administrators and developers can basically work with profile documents as if they were regular Notes documents.
Just open scanEZ on a database, and expand the ‘Profile Documents’ section in the selection tree on the right-hand side of your session screen. Click the profile document you want to view, and you’ll see all the information your selected profile document contains in the items grid (see fig. 1).
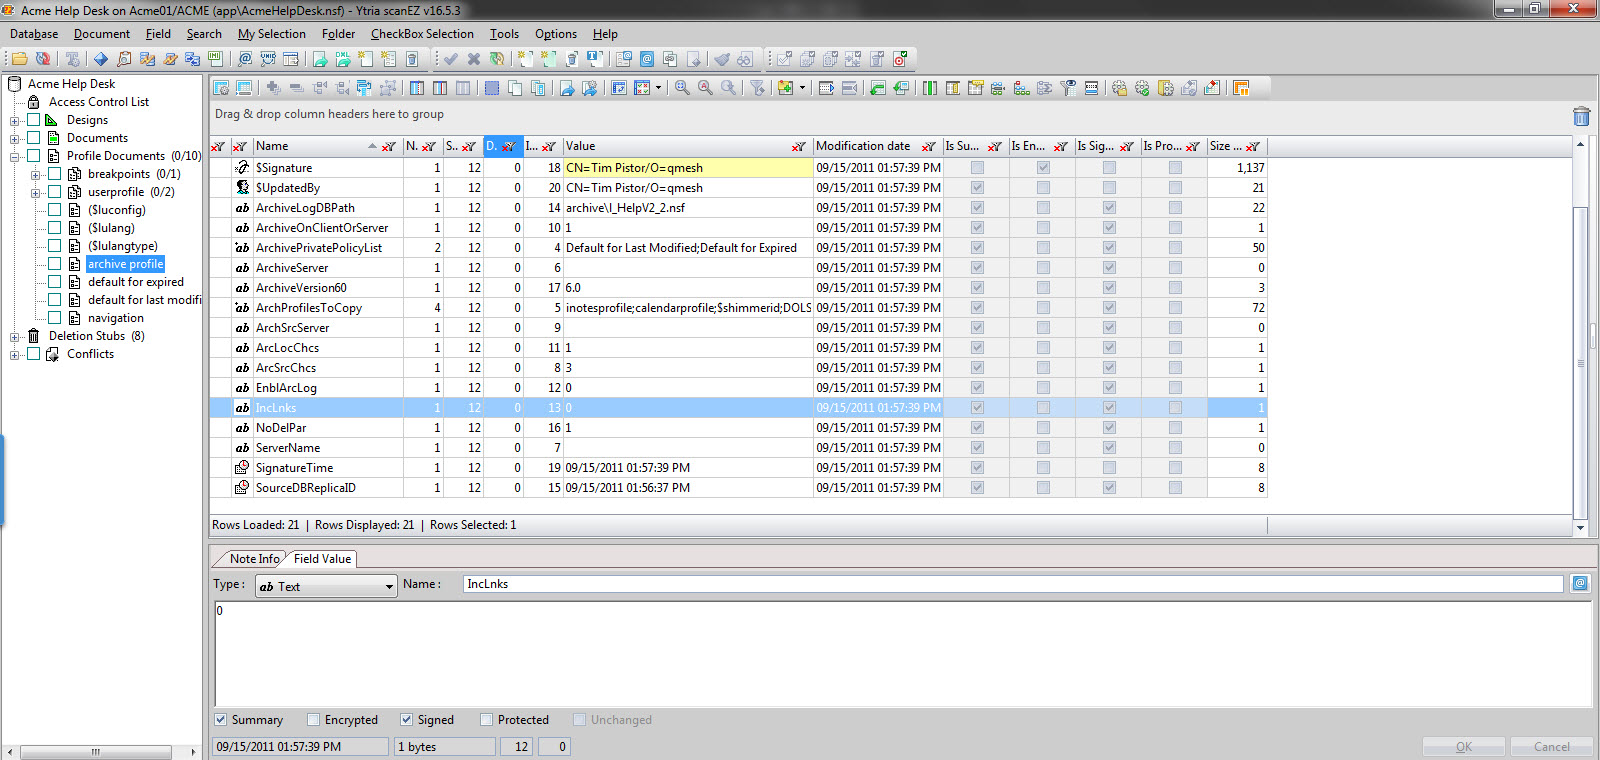
Fig. 1 Clicking on a profile document of your choice will bring up the items grid, where you can see everything the profile document contains.
Now, what can you do with profile documents in scanEZ? And how?
1) Create a new profile document directly in the back end. Just go to the ‘Document’ menu and select ‘New/Get Profile Document…’, or use Ctrl + Shift + N (see fig. 2).
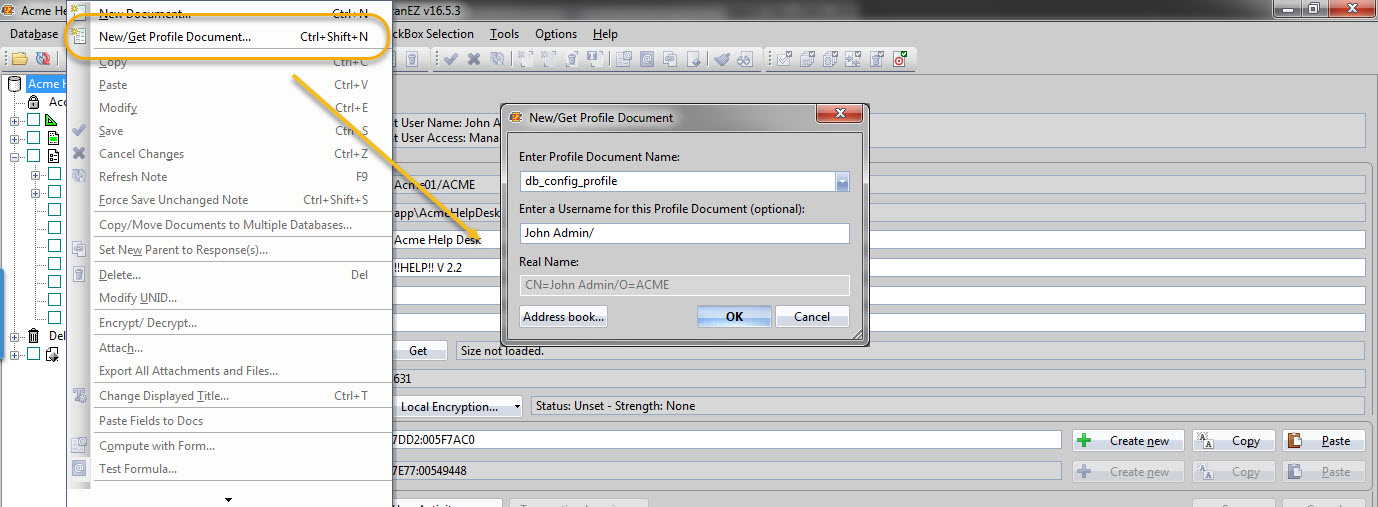
Fig. 2 Creating a new profile document is only a matter of clicks. Simply select ‘New/Get Profile Document…’ from the Document menu, or use Ctrl + Shift + N.
2) Edit profile documents. Open your desired profile document and right-click in the items grid. From the context menu, you can choose to add new items, modify item values, or delete items. Once you’ve reviewed your changes, save them to make them final (fig. 3).
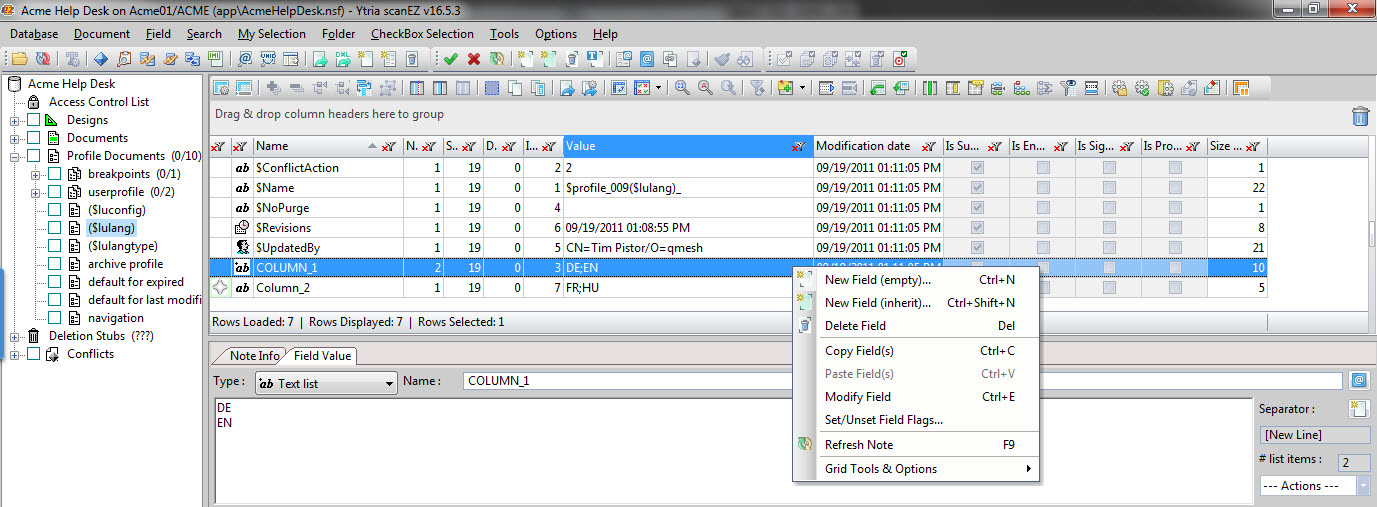
Fig. 3 You have a bunch of edit options in the item grid’s context menu, including adding new items, modifying item values, or simply deleting items.
3) Delete profile documents. In the selection tree (on the left-hand side of your session screen), right-click on the profile document to delete and select ‘Delete’ from the context menu. Or, just select the document and use the Del key (see fig. 4).
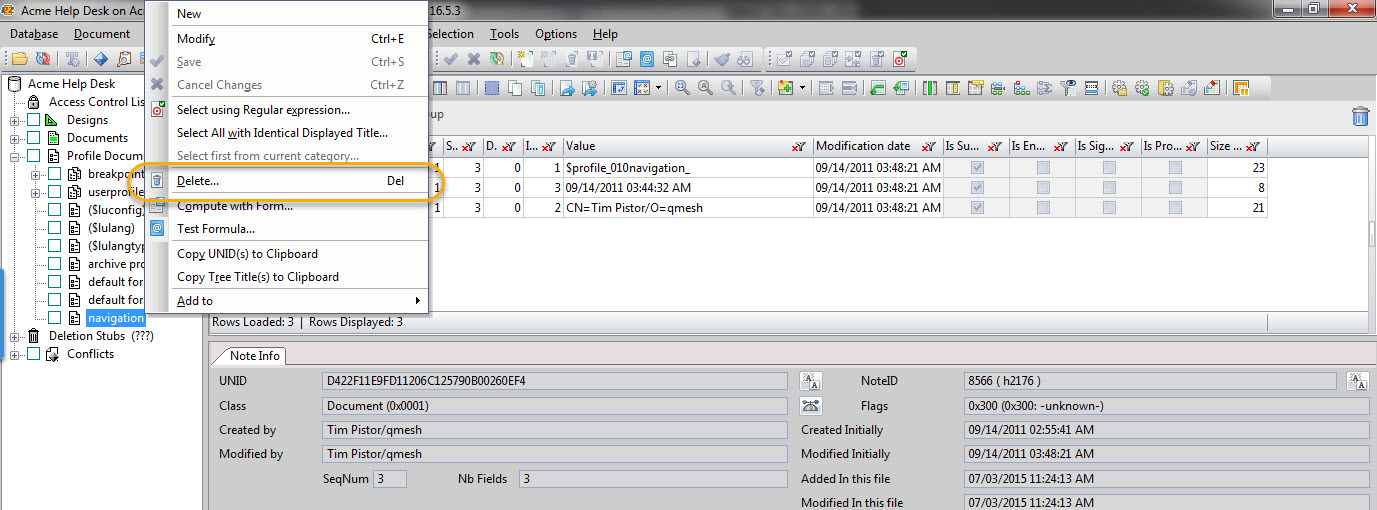
Fig. 4 Deleting profile documents in scanEZ couldn’t be easier. Just right-click on the profile document and select ‘Delete’ (or use the Del key).
Moving beyond single-database work using Ytria’s automation API
Now that we’ve briefly covered what sort of profile-related capabilities scanEZ offers and how we use them, let’s see how you can extend these capabilities to multiple databases, or even across different servers.
See our API documentation for a full list of tag definitions and detailed information about their uses.
To run our script over multiple databases, there are two options: 1.) manually run the script on each database in scanEZ or 2.) use databaseEZ’s ‘Execute Automation File on…’ option to run the script of a current selection of databases. Let’s choose the second option.
Note: In order for a script to be executable in this way, the script must include an IF statement that allows the script to be run over a list of databases. See the detailed comments in the scripts provided for more information.
The following are the basic steps required to get to the point where your specified profile documents are isolated and ready to be worked on. You’ll notice that they are present in all the scripts provided here. See the script comments for more information about each of these basic steps.
- Expand the section ‘Profile Documents’. (Make sure nothing is selected yet.)
- Place the focus on the same category.
- With focus on the category ‘Profile Documents’, perform a ‘Select by Regex’ using the name of the profile document (specified in the list). This will make a checkbox selection of the profile documents in question.
- Add any selected profile documents to a My Selection folder. If none are selected, you can move on to the next name. If there are no remaining names, you’re done.
- Set the focus to the new My Selection folder.
Now, let’s look at what you can do from this point.
Processing profiles across multiple databases
The following are a few different example scenarios that involve working with profile documents on a large scale. You can use the scripts provided as is, or tweak them to meet your own needs. Simply copy/paste them into any text editor, make your modifications, and then save them in XML format.
1) The burning question from the beginning of this post: How did we remove all preferred rooms from each users’ calendar profile document—a task that spans over 3000 mail files? Here’s how.
The underlying method that used to accomplish this is to open each database in scanEZ, and expand the ‘Profile Documents’ selection tree node. Then do a regex search for a profile containing “calendarprofile” (keep in mind that a simple regex, as written here in the script, will find any profile whose name contains “calendarprofile”) within that section and, once found, select it and add it to a new My Selection folder. After that, navigate to that newly created virtual folder, select the profile document, and remove the item called “PrefRoomsList”.
Important: This will not work on Personal Profile documents, as these are stored in a different way, and thus require a different method to find and select them.
 <?xml version="1.0" encoding="UTF-8"?>

<ytriaAutomation Application="scanEZ" ApplicationVersion="16.5">

<!--This will set the script's behavior when encountering an error. In this case, it will continue.-->

<onerror continue="true"/>

<if target="var" test="{%ListSize%}" mode="NotEquals" Value="">

<!--This will allow the script to run if called from databaseEZ by using the option 'Execute Automation File On...'-->

<ExecuteListAction/>

</if>

<!--TO SET: This variable defines the profile you are looking for. Change the value as needed.-->

<SetVar vProfileName="calendarprofile"/>

<!--You may change the values to suit your needs, and even add in more lines to the list keeping the format shown.

Note: Personal profile documents are arranged in a level further down in scanEZ's selection tree and must

be selected in a different way.-->

<Expand target="tree" Category="Profile Documents"/>

<UnSelect Target="tree" name="All"/>

<!--This will place the focus on the Profile Documents category so that the SelectByRegex action can be used

on the first-level entries within.-->

<Focus Target="Tree" Category="Profile Documents"/>

<!--The following line will enact a regex search on the first-level profile documents to find any profile

documents that contain the name set in the variable at the start of the script.-->

<SelectByRegex Regex="{%vProfileName%}"/>

<!--As stated early on in this script, Personal Profile documents are arranged at a deeper level in the

selection tree. You will need a different method to search for them than provided here.-->

<MySelection>

<Setparam Field="MySelectionName" Value="{%vProfileName%}"/>

<Setparam Field="TitleOptionType" Value="Default"/>

</MySelection>

<!--Then the focus is placed on the newly created My Selection folder.-->

<Focus Target="Tree" Category="{%vProfileName%}"/>

<!--The following If condition declares that if the My Selection does exist,

(meaning that something has been found) the nested child actions will be enacted.-->

<if Target="Tree" Test="FocusRoot" Mode="NotEquals" Value="True">

<DeleteItems>

<SetParam field="Source" value="PrefRoomsList"/>

</DeleteItems>

</if>

</ytriaAutomation>
On its own, this script only carries out the above actions on a single database. That’s where databaseEZ comes in.
Open databaseEZ and load the folder where the mail files you want to modify are located. Then select all the mail files in databaseEZ’s main grid, and from the context menu select ‘Execute Automation File on… > scanEZ’. When prompted to select an automation file to run, select the proper XML file (see fig. 5).
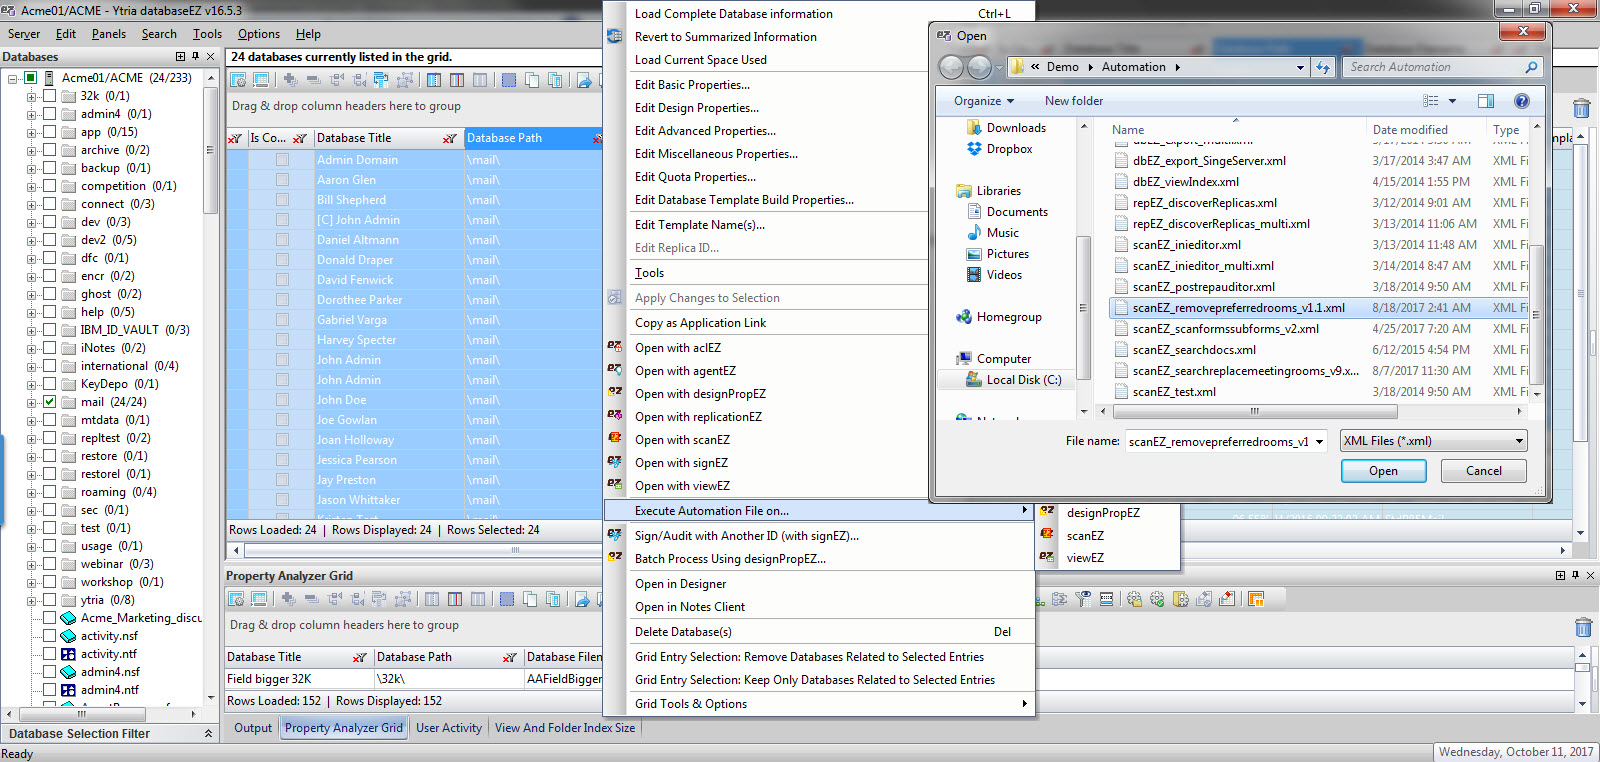
Fig. 5 To run this single database script on multiple databases, we load the mail files needed, select them in databaseEZ’s main grid, and select ‘Execute Automation File on… > scanEZ’ from the context menu. Then we select the proper XML file to run.
2) An XML script to export all mail related profile document contents from multiple mail files.
Over the years, we’ve learned that getting a handle on mail profiles is extremely important to anyone looking to migrate their mail from Notes (or to Notes, in which case this would be a good diagnostic to run after the migration). When we say this, we mean extracting archive settings, determining out of office status, and more. But how can you do this without having to build a robust framework and a set of LotusScript agents? Well, with scanEZ, databaseEZ, and automation.
You’ll need to provide the names of the profile documents to process and these names must match what you would see in the scanEZ selection tree exactly. The script below to ‘Scan Profile Documents’ uses a List to define these names. Once you have the list, you can change out names fast, and even add names to the list by just copy/pasting a new line in.
<List name="allProfileName" Action="SetVar" vProfileName="NAME OF PROFILE TO FIND"></List>
Once you’ve specified the names, all you need to do is describe the same steps that you would use in the UI.
You can remove profile documents, or add more as needed. If you need to add in more lines, just copy/paste and follow the pattern.
<List name="allProfileName" Action="SetVar" vProfileName="calendarprofile"></List>
<List name="allProfileName" Action="SetVar" vProfileName="archive profile"></List>
<List name="allProfileName" Action="SetVar" vProfileName="ENTER PROFILE DOCUMENT NAME"/>
<pre>

<ytriaAutomation Application="scanEZ" ApplicationVersion="16.5">

<!--This will set the script's behavior when encountering an error. In this case, it will continue.-->

<onerror continue="true"></onerror>
<if target="var" test="{%ListSize%}" mode="NotEquals" Value="">

<!--This will allow the script to run if called from databaseEZ by using the option 'Execute Automation File On...'-->

<ExecuteListAction></ExecuteListAction>

</if>

<!--The script uses Loop and List actions. The Loop itself can be modified to fit your needs.-->

<!--TO SET: these variables define the profile you are looking for.

You may change the values to suit your needs and even add in more lines to the list keeping the format shown.

Note: Personal profile documents are arranged in a level further down in scanEZ's selection tree and must

be selected in a different way.-->

<List name="allProfileName" Action="SetVar" vProfileName="calendarprofile"></List>

<List name="allProfileName" Action="SetVar" vProfileName="archive profile"></List>

<List name="allProfileName" Action="SetVar" vProfileName="archive database profile"></List>

<List name="allProfileName" Action="SetVar" vProfileName="default for last modified"></List>

<List name="allProfileName" Action="SetVar" vProfileName="default for expired"></List>

<!--This line will expand the Profile Documents section of the selection tree.-->

<Expand target="tree" Category="Profile Documents"></Expand>

<!--Beginning here, the rest of the script is the Loop setup.

All actions within this Loop section will be carried out in turn on all the lines in the List section (above)

that use the specified name. The Loop is set to call on the List name "allProfileName".-->

<Loop list="allProfileName" OnError="Next">
<!--This next action is mandatory in order for the action within the List lines referenced to be carried out.

In the case of the lines in the List "allProfileName", the SetVar action is to be executed.-->

<ExecuteListAction></ExecuteListAction>

<!--Then, everything in the tree will be deselected.-->

<UnSelect Target="Tree" name="All"></UnSelect>
<!--This will place the focus on the Profile Documents category so that the SelectByRegex action can be used

on the first-level entries within.-->

<Focus Target="Tree" Category="Profile Documents"></Focus>
<!--The following line will enact a regex search on the first-level profile documents to find any profile

documents that contain the name provided.-->

<SelectByRegex Regex="{%vProfileName%}"></SelectByRegex>
<!--As stated early on in this script, Personal Profile documents are arranged at a deeper level in the

selection tree. If you want to be able to search through both of these levels at the same time to find

both the first level profile documents and personal profile documents with this name use this line in place

of the regex search above <Select Target="Tree" Category="Profile Documents" Type="{%vProfileName%}"></Select> -->
<!--This will create a new My Selection folder containing the found documents.

By doing this the displayed titles can be set to your desired form (titles cannot be set within the

Profile Documents category).-->

<MySelection>

<Setparam Field="MySelectionName" Value="Selection of {%vProfileName%}"></Setparam>

<Setparam Field="TitleOptionType" Value="Formula"></Setparam>

<Setparam Field="TitleOptionFormula" Value="@Implode(@DbName;"!!")"></Setparam>

</MySelection>

<!--Then the focus is placed on the newly created My Selection folder.-->

<Focus Target="Tree" Category="Selection of {%vProfileName%}"></Focus>
<!--The following If condition declares that if the My Selection does exist,

(meaning that something has been found) the nested child actions will be enacted.-->

<if Target="Tree" Test="FocusRoot" Mode="NotEquals" Value="True">
<!--A Values function is carried out on the focused My Selection folder.-->

<Values>
<!--All items within the Values grid are selected.-->

<SetParam Target="SelectDocumentItems" Field="All" value="true"></SetParam>
<!--And finally all the findings are exported to an Excel file; the results for each profile name

will be placed on its own sheet within the file. The file will be saved in the same location

as the this Automation file.-->

<Export>

<SetParam field="FilePath" value="Report_MailProfiles.xlsx"></SetParam>

<SetParam field="SelectedRowsOnly" value="false"></SetParam>

<SetParam field="ExportType" value="Excel"></SetParam>

<SetParam field="Mode" value="AppendRows"></SetParam>

<SetParam field="ExcelSheetName" value="{%vProfileName%}"></SetParam>

<SetParam field="OpenFileOnceGenerated" value="False"></SetParam>

</Export>

</Values>

</if>

</Loop>

</ytriaAutomation>

</pre>
If they are any of the profile documents specified are present, they will be found, and their contents exported (see fig. 6).
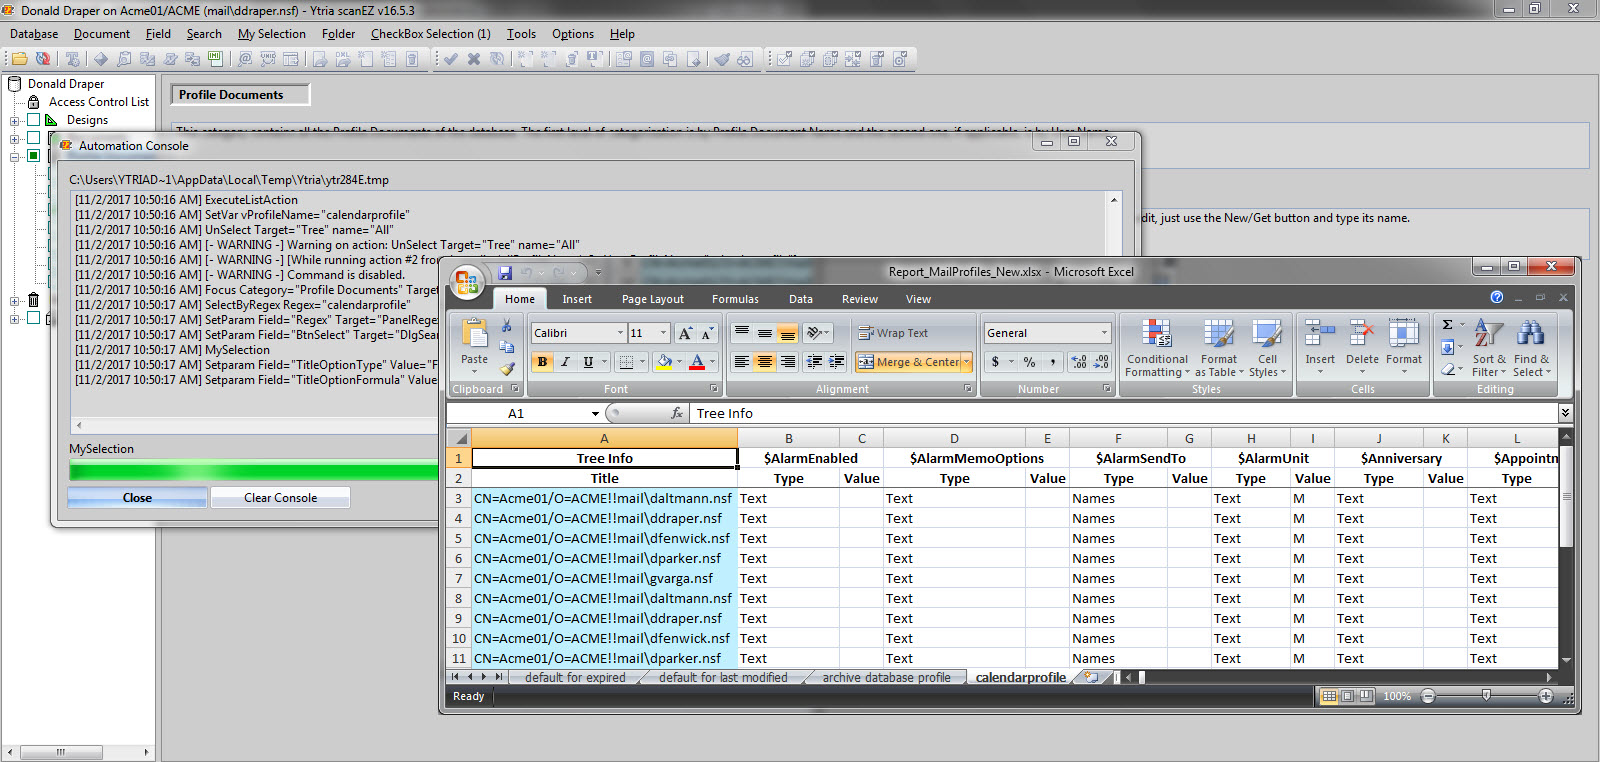
Fig. 6 A screenshot of the mail file exporter script in action, along with its output.
3) Creating a report of all your users’ mail rules
A need that we hear about from a lot of users, is that of getting a better overview of users’ mail rules. Because these mail rules are set for each database individually, there is no central interface to manage them. There may be times where you need to figure out if, for example, any mail rules are set to forward emails to external addresses—among other things.
How can automation help? Back in this article we explained that mail rules are stored in both the calendar profile, and documents. So, you could go about scanning these using a process like the one used for profile documents. But because of the way mail rule data is structured in the calendarprofile, it’s best to approach this via actual mail rule documents.
The following script runs a formula search using the formula SELECT Form=”Mailrule” & Enable=”1”.
<ytriaAutomation Application="scanEZ" ApplicationVersion="16.5">

<!--This will set the scripts behavior when encountering an error. In this case, it will continue.-->

<onerror continue="true" />

<!--Use the following variables to adapt the script to your own needs.-->

<!--TO SET :: this is THE FORMULA used. Note that the formula follows the general XML rules of "escaping". -->

<SetVar vSearchFormula="SELECT Form="Mailrule"&Enable="1""/>

<!--TO SET :: This is the item to use as a main "key" for the report.-->

<SetVar vItemToUseAsKey="ActionList"/>

<!--This script block will perform the search for the documents.-->

<SearchBy Type="Formula">

<Setparam Field="SetFormula" Value="{%vSearchFormula%}"/>

<Setparam Field="SearchDocuments" Value="true"/>

<Setparam Field="SearchDesigns" Value="false"/>

<Setparam Field="PutSearchInSelCreateName" Value="All Enabled Mailrules"/>

<Setparam Field="TitleOptionType" Value="Formula"/>

<Setparam Field="TitleOptionFormula" Value="@Implode(@DbName;"!!")"/>

</SearchBy>
<!--The following Focus line will place the focus on the newly created My Selection folder named "All Docs Found".-->

<Focus Target="Tree" Category="All Enabled Mailrules"/>
<!--The following If condition declares that if the My Selection exists (i.e. something has been found),

the nested child actions will be carried out.-->

<if Target="Tree" Test="FocusRoot" Mode="NotEquals" Value="True">
<!-- This opens the Values grid and immediately adds a column to display the value of the item set in the key variable: "ActionList".-->

<Values>

<SetParam Field="AddItem" Value="{%vItemToUseAsKey%}"/>

<!-- This will remove the Type column.-->

<ShowTypeColumns value="false"/>
<!-- And this adds a custom column where the UNID will be displayed.-->

<AddCustomColumn name="UNID">

<SetParam field="TitleOptionType" Value="System"/>

<SetParam field="TitleOptionSystem" Value="UNID"/>

</AddCustomColumn>

<Evaluate/>
<!--Finally, the results of the search will be exported into a report titled report_DeleteDoc.xlsx.

If this script is to be executed as part of a Loop/List, the newly found information will be

exported and appended to the same file.-->

<Export>

<SetParam field="FilePath" value="Report_Mailrules.xlsx"/>

<SetParam field="SelectedRowsOnly" value="false"/>

<SetParam field="ExportType" value="Excel"/>

<SetParam field="Mode" value="AppendRows"/>

<SetParam field="ExcelSheetName" value="Enabled MailRules"/>

<SetParam field="OpenFileOnceGenerated" value="False"/>

</Export>

</Values>

</if>

</ytriaAutomation>
You’ll notice that formulas can’t simply be copied and pasted as plain text. Characters like quotes and ampersands need to be “translated”—escaped—so that they can be interpreted correctly in XML. If you’re interested in modifying formulas, read more about escaping characters in XML: https://stackoverflow.com/questions/1091945/what-characters-do-i-need-to-escape-in-xml-documents
Once the documents are in a new My Selection folder, the script will grab a few item values such as the ActionList item which provides a nice description of the action performed and … voila (see fig. 7)!
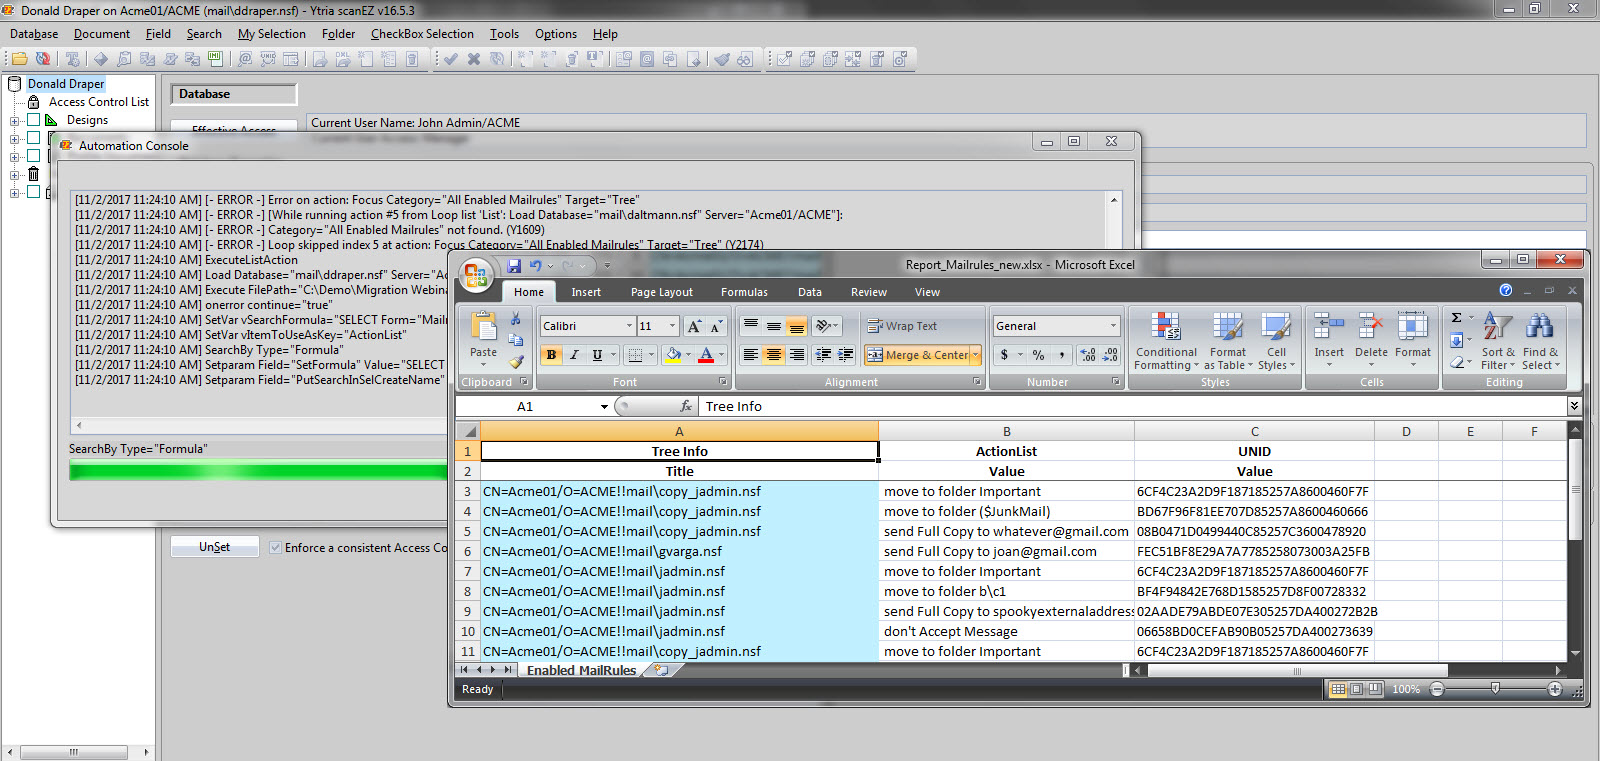
Fig. 7 The script to check mail rules in action, along with sample output
As you can see, the basis of all Ytria automation scripts is defined by what you can do in the UI. Once you know what you need to do manually, just follow the steps to build your the script. And once you can process one database with scanEZ, you’re only a few steps away from being able to extend that to multiple databases, even across an entire server.
If you are interested in automation or have a specific requirement we might be able to help with, or to find out more about Ytria XML Automation API, contact us today!

coin