The resolution of resurrections: Tracing the replication journey of ‘ghost’ documents to find out who brought them back

Incidents of “ghost” (aka “zombie”) documents mysteriously re-appearing into IBM Notes and Domino databases have been reported since the very beginning; over the years, they have been responsible for many a white hair on unsuspecting administrators’ and developers’ heads. In fact, we wrote an article that shed light on how, and why, these apparitions come about (and how easy it is to find them using scanEZ) a couple of years ago. Yet the problems (and their causes) remain…
We recently received a support query from a customer who told us of roughly 15,000 documents re-appearing in a database that just so happened to be replicated across over 100 servers. While simply finding these documents wasn’t an issue, thanks to scanEZ’s Post-Replication Auditor, the customer also wanted to identify the end-user responsible for replicating the old documents back into their environment.
Administrators have long desired the ability to hunt down users who conjure up these so-called “ghost” documents; however, two main obstacles have prevented them from being able to do so:
1) Although scanEZ’s Post-Replication Auditor can identify “ghost” documents on any given database, this tool alone will not reveal which server originally received these old documents. In the case of a database replicated across more than 100 servers, identifying this “gateway” server (an imperative step in the process) poses a formidable challenge.
2) Even when we’ve been able to identify the server that these documents were first resurrected to, it’s tricky to identify who the end-user was. These documents are usually replicated back in from local replicas, and thus don’t leave any trace in the server’s replication history. Although the Replicator and Cluster Replicator server tasks DO generate replication history entries in both of the participating replica’s replication history, local to server replication is an exception; it’s only documented in the local replica’s replication history.
But you’re in luck! By using replicationEZ and scanEZ in tandem, you can seek out the server that first received these resurrected documents, as well as identify the local user responsible for bringing them back from the dead.
Trace documents back to the first server.
EZ Suite v12 saw the introduction of a new tool into replicationEZ’s Swiss-army-knife repertoire: the Note Tracker. Once you’ve discovered and loaded all replicas of a given database into the workspace grid, using this feature allows you to track a multitude of notes (documents or designs) based on their UNIDs, across all replicas(see fig. 1).
The tracking process will locate each note in each replica and gather numerous key properties:
- Created (In this file)
- Modified (In this file)
- Sequence Number
- Difference between Note added and Database Created
- Difference between Note Initially Created and Added in this file
- And more…
Fig. 1 The Note Tracker feature allows you to track a multitude of notes based on their UNIDs.
Using this tool, we can track a selection of documents and sort the results by the Created (In this file)column. This allows us to find the originating server instantly (either the server the documents were created on¬—in which case the Created (Initially) and Created (In this file) dates will be the same—or the server those documents were first replicated to).
Tip: When analyzing the Note Tracker‘s results, you can confirm whether your replication settings are set up correctly by looking at the time it took for your documents to replicate between each server node. If you find unreasonably long periods of time between replications, you might want to check your connection documents!
Understand local replication from the server’s perspective.
Even though local to server replication does NOT leave a trace in the server’s replication history, there are a few other ways to pin down what your end users have been up to—the recorded user activity, recorded by default, is a great resource for this (check out another Tech Lab article on this subject).
Unlike the replication history, the recorded user activity accurately logs, in its entirety, whatever a local user replicates. It’s important to note, however, that this usage activity data is unique to each replica. Thus, it isn’t truly helpful unless the originating server has been found.
When a local user replicates, the replication session (including data about the number of documents and designs read, written, updated, or deleted depending on the database’s ODS—also discussed in the article mentioned above) is logged in the user’s name. Unfortunately, the native User Activity Log doesn’t distinguish between changes that happened in the server’s replica and the user’s local machine. However, this data is available, and it proves quite useful when analyzed through the User Activity Analyzer (found in both scanEZ and databaseEZ). This tool also offers you various filters and grouping options to better interpret this data (see fig. 2).
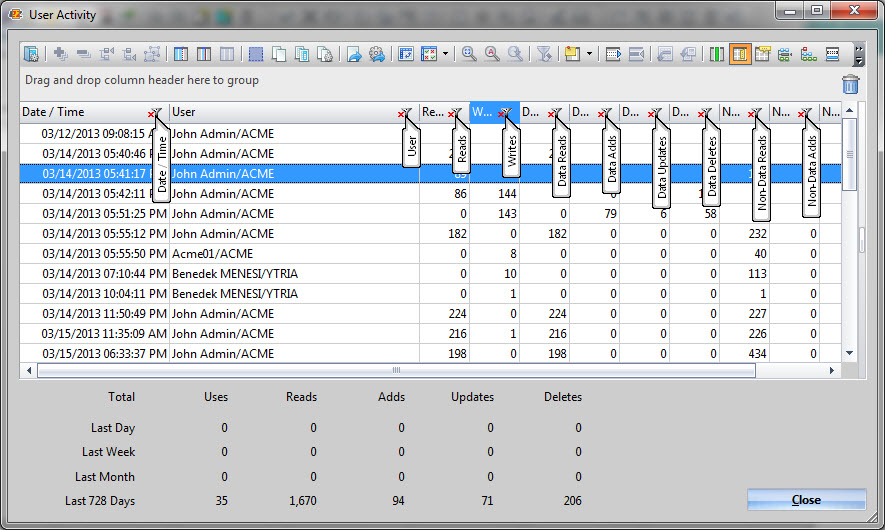
Fig. 2 The User Activity Analyzer offers you many ways to interpret user activity data.
So… How do I track down the person responsible?
This brings us back our initial support query: we’ve successfully identified roughly 15,000 “ghost” documents using scanEZ’s Post-Replication Auditor tool. Using this situation as an example, here’s how you can track down the user responsible for creating them:
1) Grab a small sample of those documents—about 15 or 20—from the Post-Replication Auditor, and copy their UNIDs using the option in the right-click menu (see fig. 3). Remember, we can track about 1000 notes in replicationEZ; but in this case, you suspect that the documents have been created in the same replica and in the same general time frame—a small sample will do just fine.
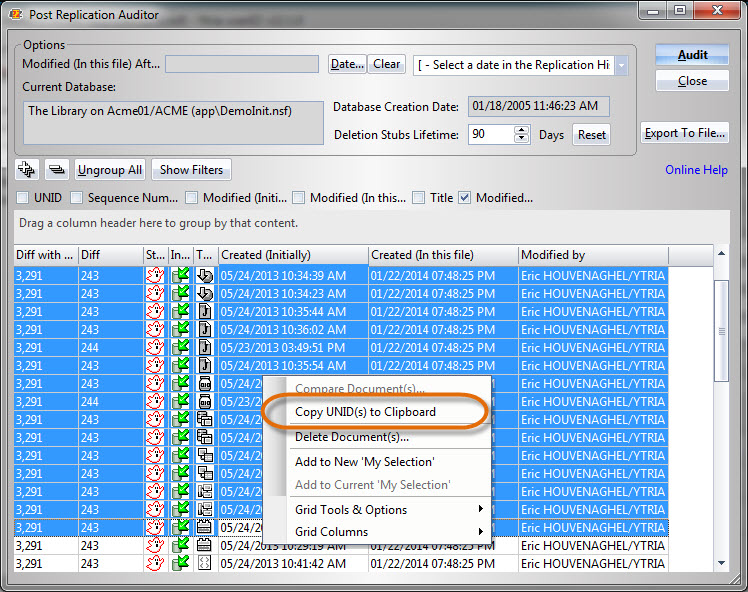
Fig. 3 Copy UNIDs through the Post-Replication Auditor’s right-click menu options.
2) Select the database icon from the workspace and launch replicationEZ. Once the database is partially loaded, use the right-click menu’s Discover Replicas option to scan for replicas of the given database across all of your servers (see fig. 4). This should display all of the found replicas in separate columns; their host servers will be displayed on the left hand side of the column header.
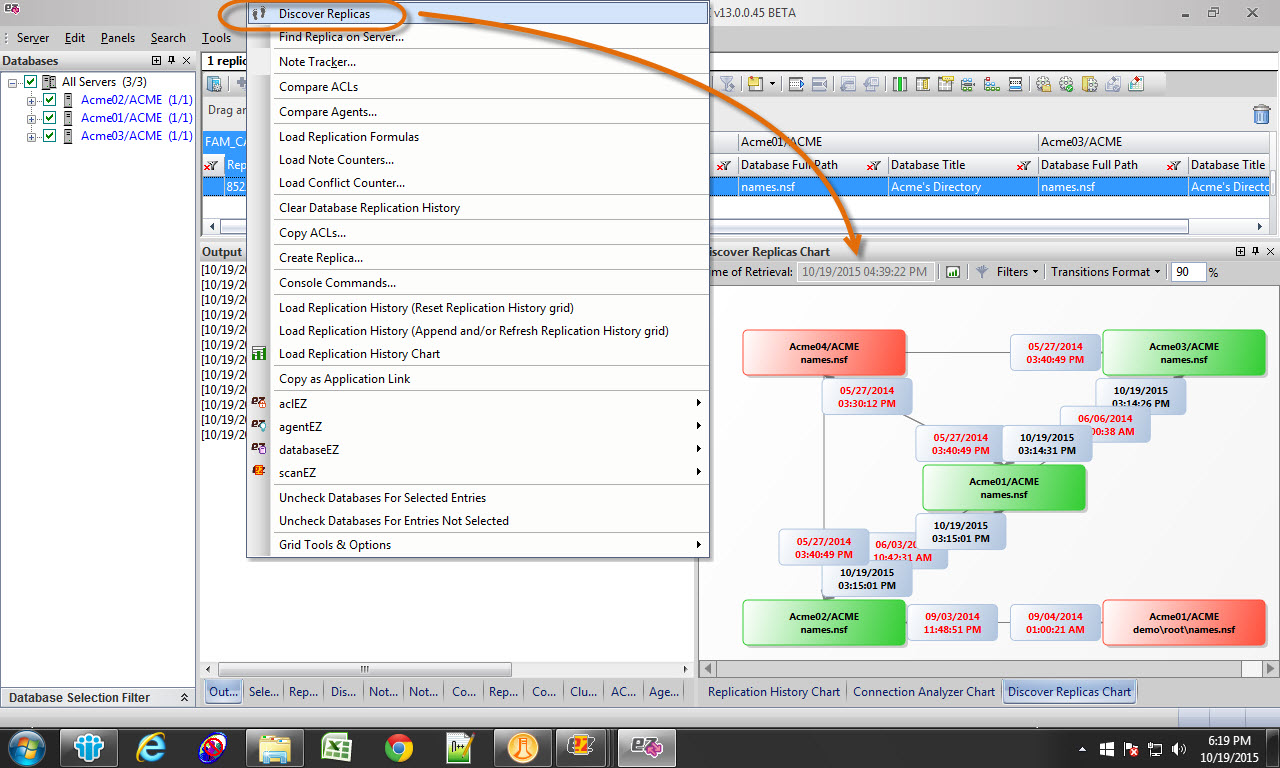
Fig. 4 Click the Discover Replicas option to find all replicas of a given database across all of your servers.
3) Open the right-click menu on the database (this will automatically select all replicas), and then open the Note Tracker dialog box. Paste the UNIDs that you have stored on your clipboard into the box, and then click Track Notes (see fig. 5).
Fig. 5 In the Note Tracker dialog box, paste the UNIDs you want to track and click Track Notes.
You will now see your results displayed in the Note Tracker panel; by default, they are categorized by UNID for easy review.
4) Click an entry in the Server column, go to Grid Tools & Options in the right-click menu, and then select Freeze Up To “Database Path” in order to freeze the Server column (allowing you to keep track of which server you’re looking at).
5) Sort the data using the Created (In this file) column. You’ll want to look at the server with the earliest date & time (see fig. 6). This is the perfect time to confirm that most of your documents—from across this sample—originate from this particular server.
Fig. 6 After sorting the Created (In this file) column, look for the server with the earliest date & time.
Now that you’ve found the origin server (the first one to receive the resurrected documents), you can use the right-click menu to open scanEZ on this server’s replica, and then, by loading scanEZ’s User Activity Analyzer, retrieve the user activity data.
6) Click the Sort icon on the Writes column, select Number is greater than from the Number Filters option, set this value to 10000, and then push Enter (see fig. 7).
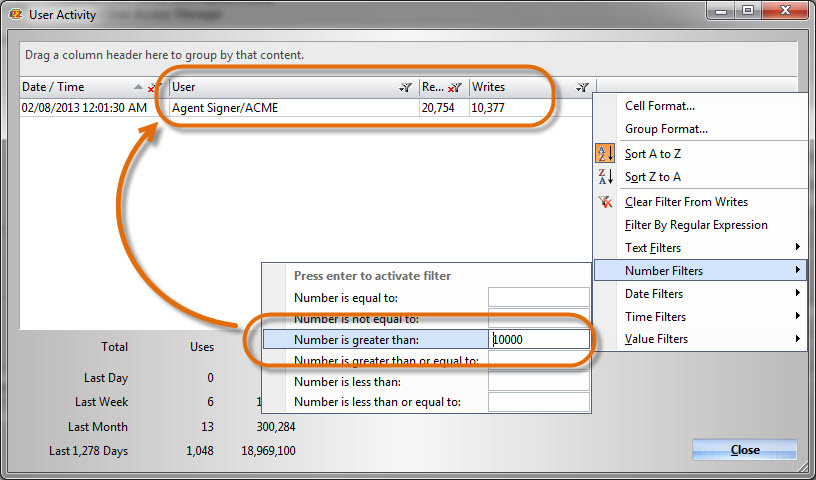
Fig. 7 By setting the Number is greater than field on the Writes column, you will display only those entries that contain more than your given amount.
The culprit has been unmasked!
Is there a way to prevent documents from resurrecting?
Resurrections of “ghost” documents have been scaring even the most seasoned IBM Domino admins for years. Luckily, the Purge Interval Replication Control (PIRC) setting—introduced in Domino Release 8.5.3 —allows you to prevent removed documents from replicating back into your productive databases.
This database level setting must be set individually for each replica (this setting does not replicate). When replication happens with PIRC enabled, each incoming document/design is “examined,” and the replica won’t receive anything unless the element’s Created Initially dates are within the date range of the database’s Deletion Stub Interval time (default of 90 days).
This feature is just what the doctor ordered. Yet, because one needs to enable it for each replica individually, it remains a cumbersome option for protecting your environment from these unwanted documents. Luckily, Ytria’s EZ Suite tools can help you with both the prevention AND resolution of any “ghost” document related issues.
Through replicationEZ, you can discover all replicas across multiple servers (whether your goal is to find a given database’s replicas, or obtain a global snapshot of replicas across all servers). You can then set PIRC across one or multiple databases—even across multiple servers—without ever having to open them in your Notes or Administrator client.
Even though prevention is important, mistakes DO happen. Thanks to Ytria’s EZ Suite tools, you can now track these documents down, uncovering their origins AND those responsible for bringing them back. You’ll be all set to take the necessary measures to put these documents to rest.
Submit a comment