How to clean up a Lotus Notes out-of-office agent mess with agentEZ

One of our customers recently used our agentEZ tool in an interesting way to deal with a big out-of-office agent problem. We realize that the Out of Office agent is already ancient history to folks who’ve switched to the Out of Office service (introduced in R8). But we still talk to a lot of people who have at least one pre-R8 server in the cluster where their mail files reside, and thus continue to rely on the Out of Office agent. Bearing this in mind, we thought we’d share this one customer’s story with you:
First, a little background on his problem:First, a little background on his problem:
His company wanted to upgrade all the employees’ mail files to the latest template. He thought this was a great idea on the surface, but from experience, he knew that this upgrade would revert all the out-of-office agents to their default status—disabled. This is a large organization, so at any given time a significant number of employees are either working on the road or on vacation. Blindly disabling the out-of-office agents for these people would have been a serious faux pas.
So what would you have done if you were in his situation? He could have gone through the HR department and tried to wrangle a list of employees who were out of the office—but by the time that got done it probably would have been out of date. And even if he did manage to procure this list of names, he’d still have the unenviable task of painstakingly going through their mail databases to see if the out-of-office agents were enabled and then re-enable them where necessary after the mail template update was completed.
What’s more, re-enabling these agents would also have the effect of signing them with his name–that means any mail messages sent by these out-of-office agents would say they were sent by him rather than the person who was actually away. The only way around this would be for him to open all the affected mail files one-after-another in Domino Designer and set the agents to ‘Run on behalf of’ the mail file owner.
There must be a better way…
And there is a better way
Fortunately, he owns agentEZ and he used the tool in a clever way to work around this problem with minimal effort. Here’s what he did (Warning: if you need a refresher on Out of Office agents, you might want to check out our recommended reading on Out of Office agents before trying to follow along):
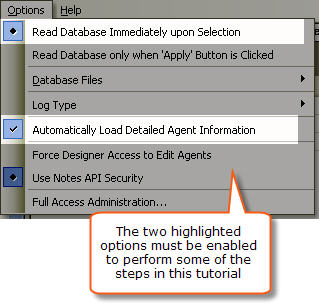
1) First he opened agentEZ and selected the server that contained the mail files. Before doing anything else he made sure the two highlighted options were enabled in the Options menu.
2) Then he selected all the databases by clicking the top-level checkbox in the tree. (Note if all your mail files are in a single directory it can be faster just to load the databases in this specific directory).
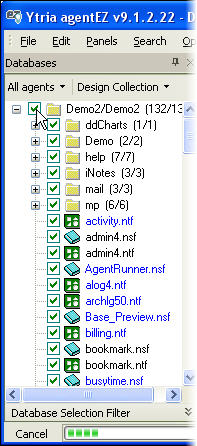
After doing this, all the agents in all the selected databases were displayed in the grid.
3) Next, he applied a Text Filter to the ‘Name‘ column so that only agents matching the name “OutofOffice” were listed.

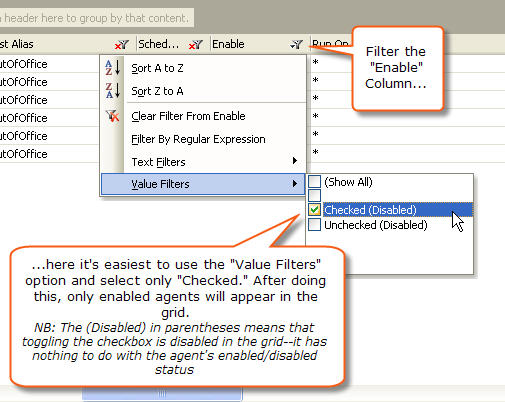
4) Along the same lines, he applied a Value Filter on the ‘Enabled’ column to show only enabled agents. After this, the grid only displayed enabled Out of Office agents—in other words, the particular agents he expected trouble from when he performed the mail template upgrade.
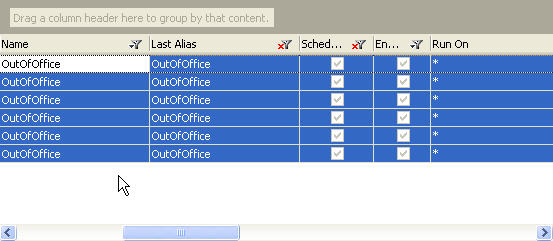
5) Now, only the enabled Out of Office agents remained in the grid. He needed to select them all by clicking Ctrl + A.
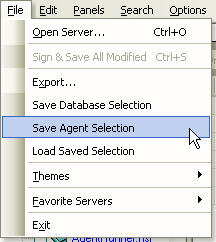
6) At this point he didn’t actually change anything with agentEZ, but he wanted to use the File>Save Agent Selection feature. This feature lets you save your database/agent selection to an XML file for future use.
7) After this, he closed agentEZ and updated the end-users’ mail templates.
After the mail template upgrade…
8) Next, he opened agentEZ once again and set a Text Filter on the ‘Name’ column to match “OutofOffice” (just like in Step 3).
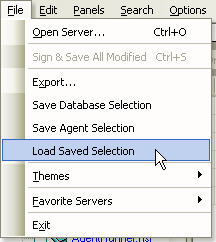
9) After this he chose File > Load Agent Selection to re-select the agents that were enabled prior the update.
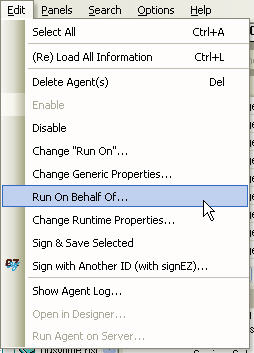
10) As expected, all these previously enabled agents were disabled by the mail template update. So next he clicked Edit>Enable to re-enable these agents.
Getting out of office agents to run on behalf of the mail file owner
The agents were set to be re-enabled at this point, but he wasn’t quite done yet. As we mentioned earlier, by default, notifications sent by the Out of Office agent will be ‘sent by’ the the name of the signer. And he definitely didn’t want all these end-users’ out of office notifications to be sent in his name. Thankfully agentEZ let him fix these very quickly by mass-applying the ‘Run on behalf of’ setting. The next couple of steps show how he did it:
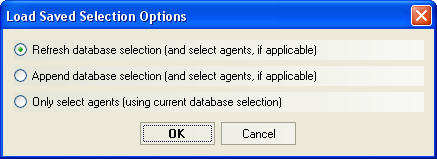
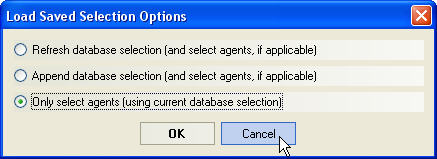
11) Performing the previous step got rid of the active agent selection, but that was not a problem. To restore the selection he just needed to click File>Load Agent Selection and choose his saved selection XML file once again. And this time he could choose the ‘Only select agents (using current database selection)’ radio button in the dialog box (this is a speedier option).
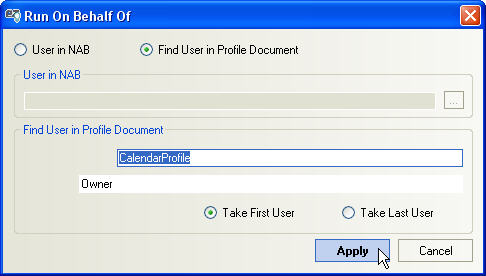
12) Now the proper agents should be selected once again. Next, he needed to set the agent to run on behalf of the mail file owner. To do this he clicked Edit>Run on behalf of… then chose the ‘Find User in Profile document‘ radio button in the resulting dialog and kept the default settings (the default Profile document is “CalendarProfile” and the default Field is “Owner”). To enact the changes he clicked Apply.
13) Next, he enabled the “Allow user Activation” on these agents (this allows end users to activate the Out of Office agent without a delay). He did so by selecting all the agents in question again then applying this setting in the Generic Properties dialog (right-click>Change Generic Properties).

The ‘allow user activation’ setting is normally set by the adminP after the first time a user enables the Out of Office agent. This setting allows users to instantly activate the agent.
14) Lastly, he needed to sign and save all the modified agents to apply these changes on the server. The only snag was that his own ID did not have the right to sign agents that were set to run on behalf of someone (see the Security tab of server document in Domino Administrator for this setting). His solution was to select the agents in question and right-click and choose Sign with Another ID (with signEZ). In the resulting dialog he chose to sign using the company’s dedicated application signing ID (he had been given delegated access to this ID in signEZ). Please note that signing agents with another ID requires that you also own Ytria signEZ.
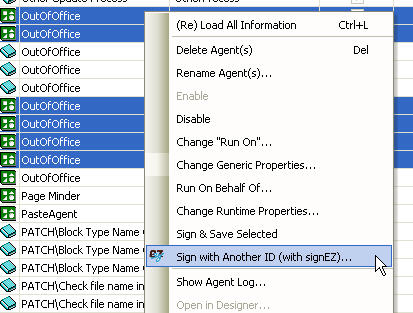
agentEZ and signEZ work together seamlessly in cases where agents must be signed with a particular ID
And that was all he needed to do.
Just to recap: by following the steps above, he was able to update all the the mail files in the company to the latest Lotus Notes template without disrupting any active Out of Office agents.
Submit a comment