Here’s how to modify an item value in a whole bunch of documents. (Hint: It’s not as hard as it seems.)

Anyone who has worked in purchasing knows the importance of keeping accurate invoicing records. Even without going as far as bringing the “taxman” into the discussion, it’s just good practice to keep good books. And when I say “good,” I mean “consistent.” Imagine how nerve wracking it can be to find out that a certain key bit of information is either incorrect or missing on a whole bunch of financial documents! *gasp* Not good.
In a recent discussion, a situation come up that, while not exactly “grave,” was still pretty annoying to have to fix. A certain purchasing department keeps a secondary record of all their invoices in a Domino database. In this particular database, every line item represents a purchase. Every line item is a separate document. And each of those documents contains an item that holds the currency information.
The problem was that, for some reason, the currency was either entered wrong or missing on every entry for a given vendor. Not exactly the end of the world, but annoying for an already-busy employee to have to deal with.
The good news here is that any scanEZ user has a quick-and-easy way to solve this problem right under their nose—all without having to write any code. It turns out, though, that this feature sometimes remains hidden even from experienced users. So, if you don’t know about it, well, don’t feel bad. The person whose situation inspired me to write this tooltip didn’t. But no biggie, she does now. And so will you.
All data used here is fictional, and your details will differ (of course), but by using these steps, you’ll be able to quickly get an item’s value modified in a whole bunch of documents without having to even come close to an agent.
Here’s how to update item values in multiple documents, all at once, using a ‘Diff’ operation.
Step 1: Clarify which documents are involved.
If in your situation all the documents are found in a single folder containing only those documents, you can skip right to Step 3. But in this case, only specific documents needed to be dealt with. So how do you find them? Easy.
Open scanEZ on your desired database and expand the category ‘Documents’. Expand the folder that contains the documents you need to modify, place the focus on (click) the folder node, then either use Ctrl+T or right-click and select ‘Change Displayed Title…’ (see fig. 1).
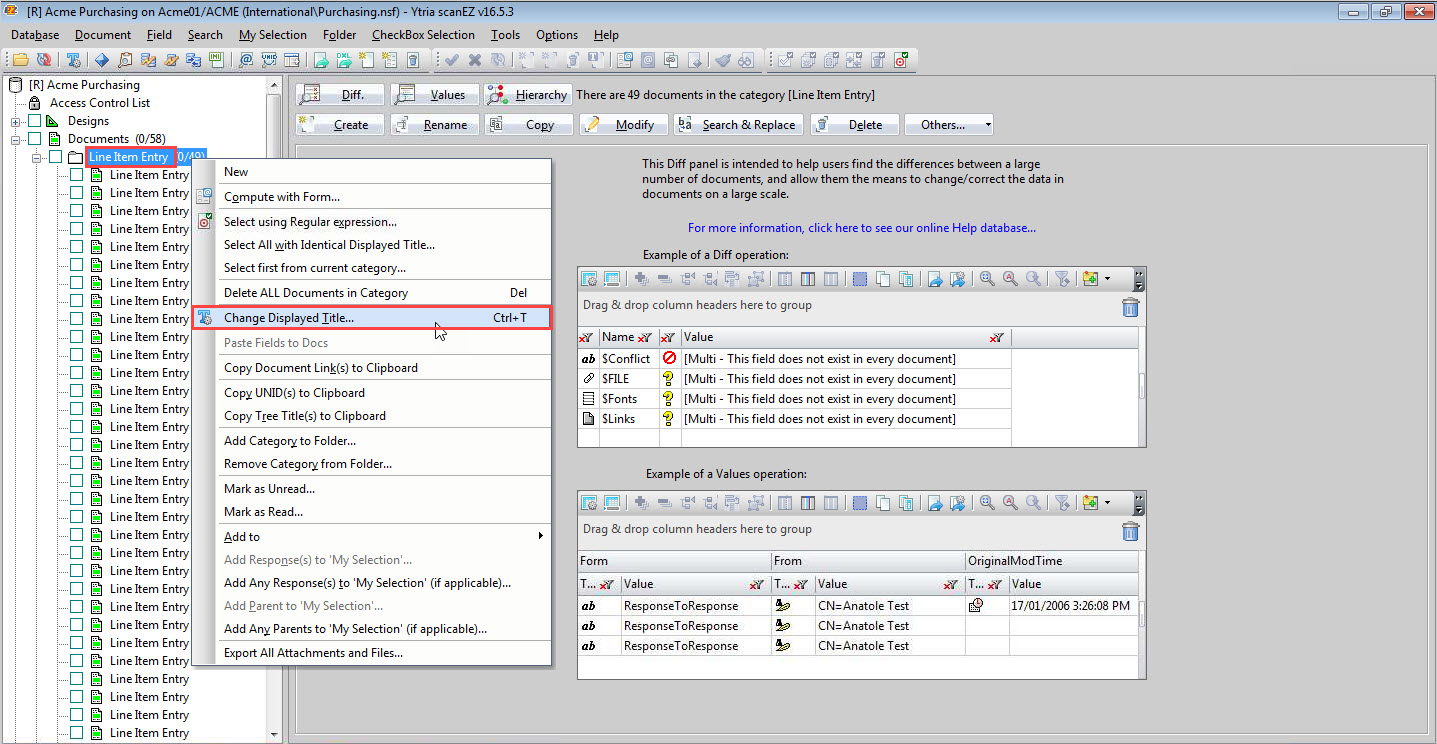
Fig. 1 Use the ‘Change Displayed Title…’ option to better view which documents are what.
This is where you’ll set what information to display in the selection tree. In this particular example, we want to see information that lets us isolate the vendor because, remember, only entries from a specific vendor were affected by this problem. So, we’ll select ‘Field Info/Value Combination’ from the options available. This database happens to be set up using an item called “Vendor” to display the vendor name (phew!), so we’ll select ‘Value’ from the first dropdown menu, and “Vendor” from the second (see fig. 2). Click ‘OK’.
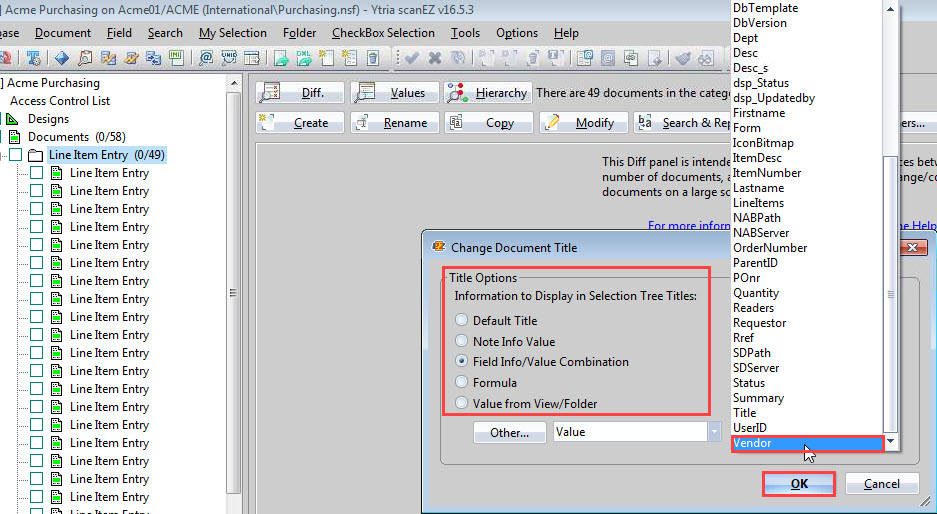
Fig. 2 There are many options available for choosing which information to show in the selection tree title. Here, the value of the item “Vendor” will be used.
You should now see that the information shown in the selection tree has changed to show the value of the item “Vendor” in all the documents, the vendor name (see fig. 3).
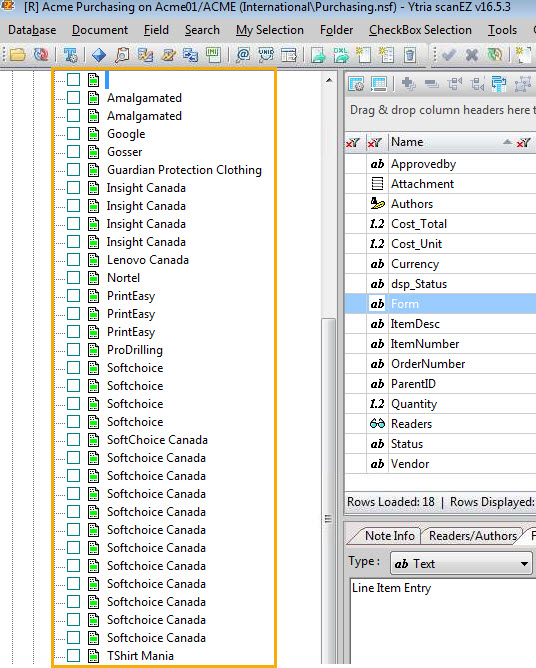
Fig. 3 In this example, using the vendor name as the displayed title (information found in the value of the item “Vendor”) helps quickly ID which documents correspond to which vendor.
Alternatively, you can retrieve the documents you need by using one of scanEZ’s various search features such as the ‘Search by Formula‘ feature combined with the appropriate formula, or ‘Search Using Full Text‘ (if your database is full-text indexed).
Note: It’s entirely possible that, depending on the information you want to show, some entries will be blank. In these cases, the item value was empty. You’ll need to explore different information to check if these documents need processing.
Step 2: Select the right documents.
We’ll assume that the item “Vendor” was properly maintained. We just need to select the appropriate documents by checking their boxes. In this example, the vendor we’re looking for is ‘Softchoice Canada’. Select them and then choose the option ‘Add to > New My Selection’ from the ‘CheckBox Selection’ menu (see fig. 4).
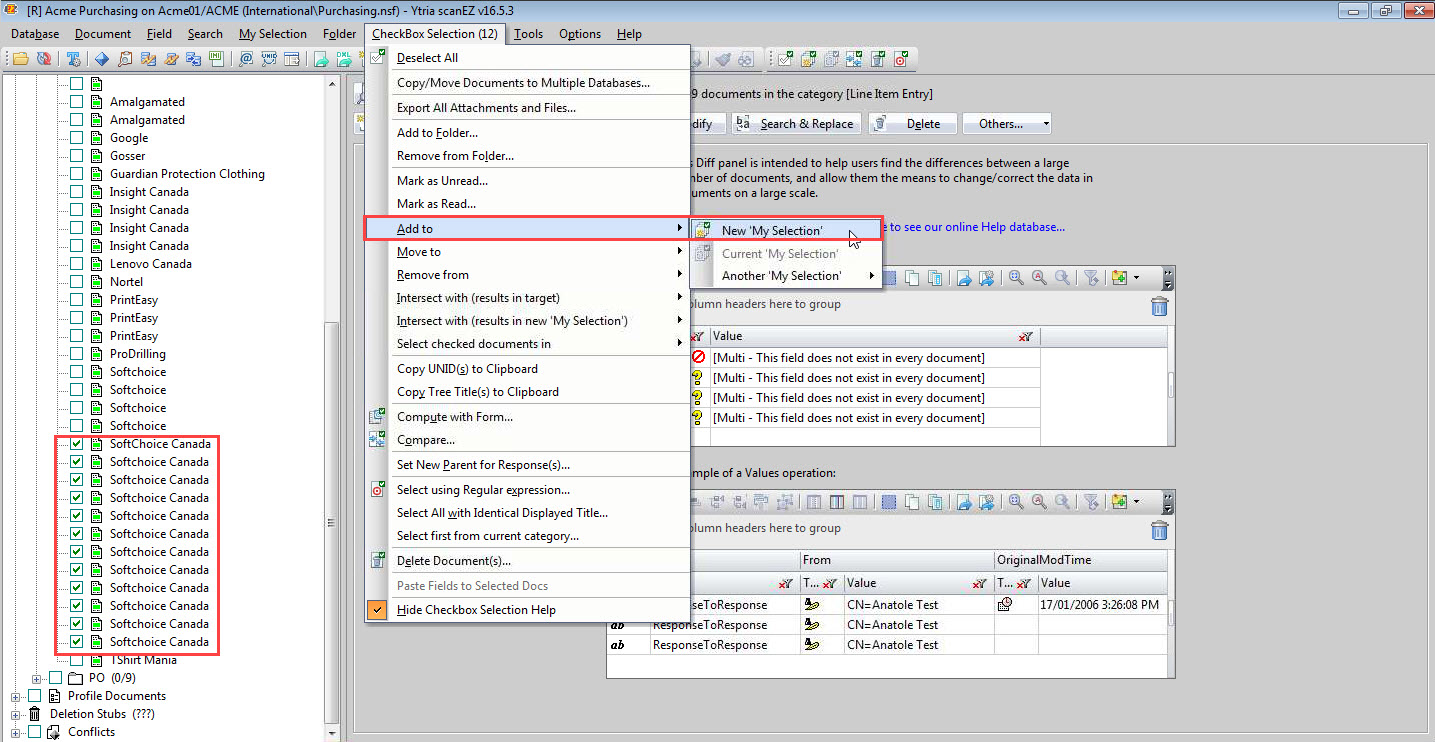
Fig. 4 When selecting the documents using their checkboxes as in this example, it’s important to use the options under the ‘CheckBox Selection’ menu. Use the option ‘Add to > New My Selection’.
You should see the ‘Add to New My Selection’ dialog where you can set the title of your virtual folder as well as change the displayed title information. Enter an appropriate title, and keep the same displayed title info (see fig. 5).

Fig. 5 When adding documents to a new My Selection folder, you can choose to keep the same displayed titles, or change the information. Here, the same titles will be kept.
Your selected documents will now be placed in a virtual My Selection folder bearing your chosen title (see fig. 6).
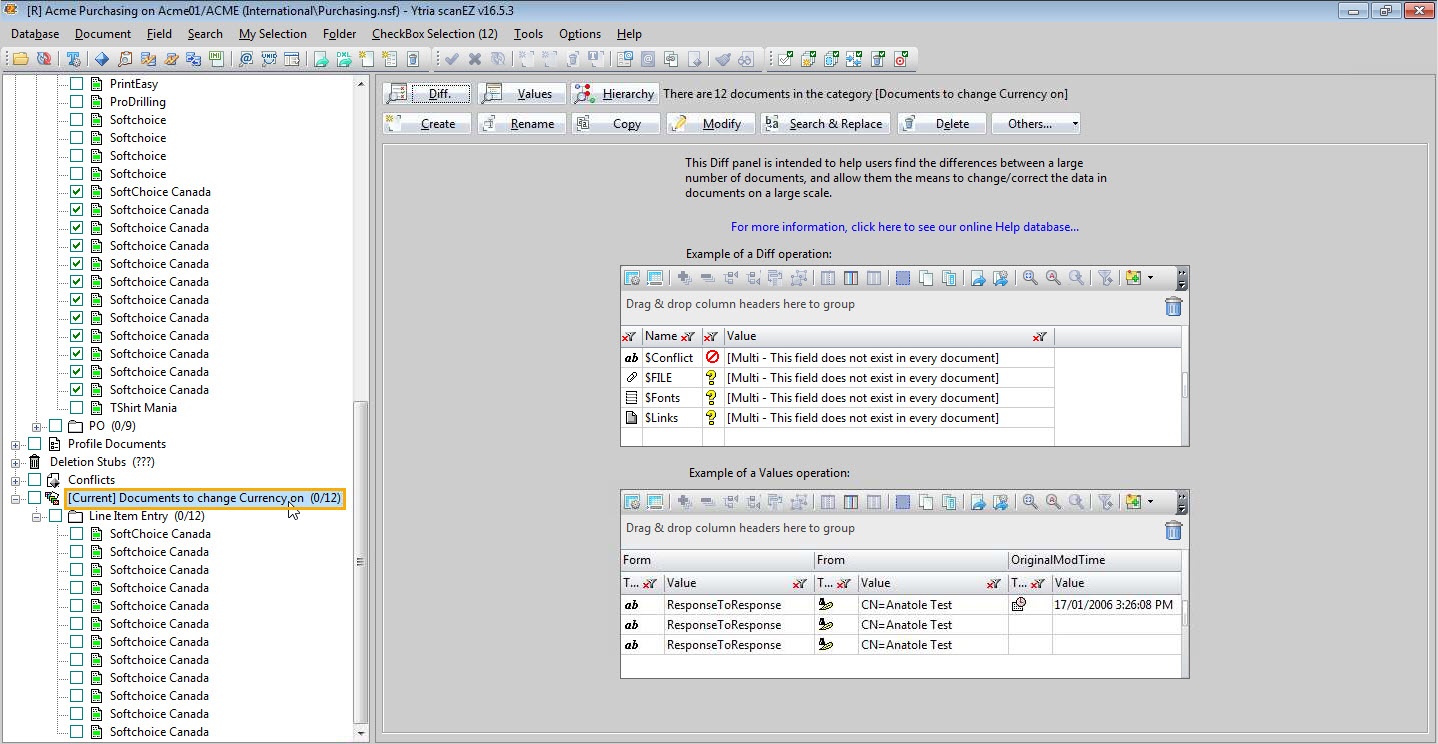
Fig. 6 The documents will now be in a new virtual folder, and keep the same displayed title.
Tip: For a faster and more accurate selection process, particularly if you’re working with a large volume of documents, use ‘Select using Regular expression’ from the Checkbox Selection menu (see fig. 7).
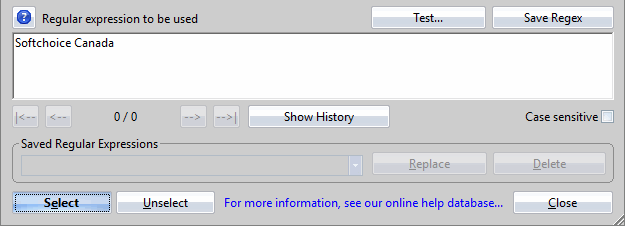
Fig. 7 Speed up your selection process using regex.
Step 3: Choose the item to update.
Once your documents are in a virtual folder, processing them follows the same steps as if they were in an exclusive folder right from the start.
Place the focus on the My Selection folder’s tree node, and click the ‘Diff’ button (see fig. 8).
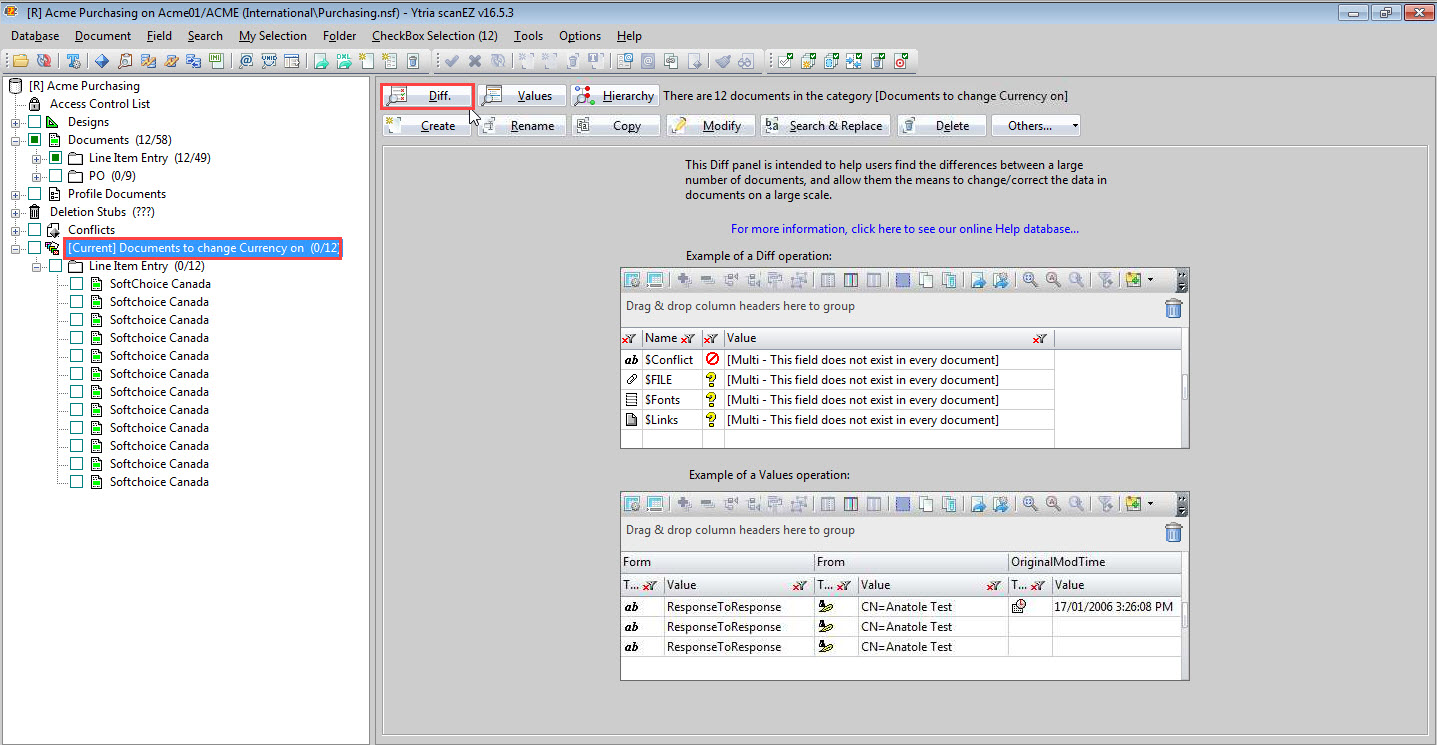
Fig. 8 You can now perform a ‘Diff.’ operation on all documents in the virtual folder.
What you will see is a summarized list of all the items found throughout the selection of documents. This list also shows the status of the presence and value of the items overall. Select the item you want to update from the list, right-click, and then choose ‘Modify Values’ (see fig. 9).
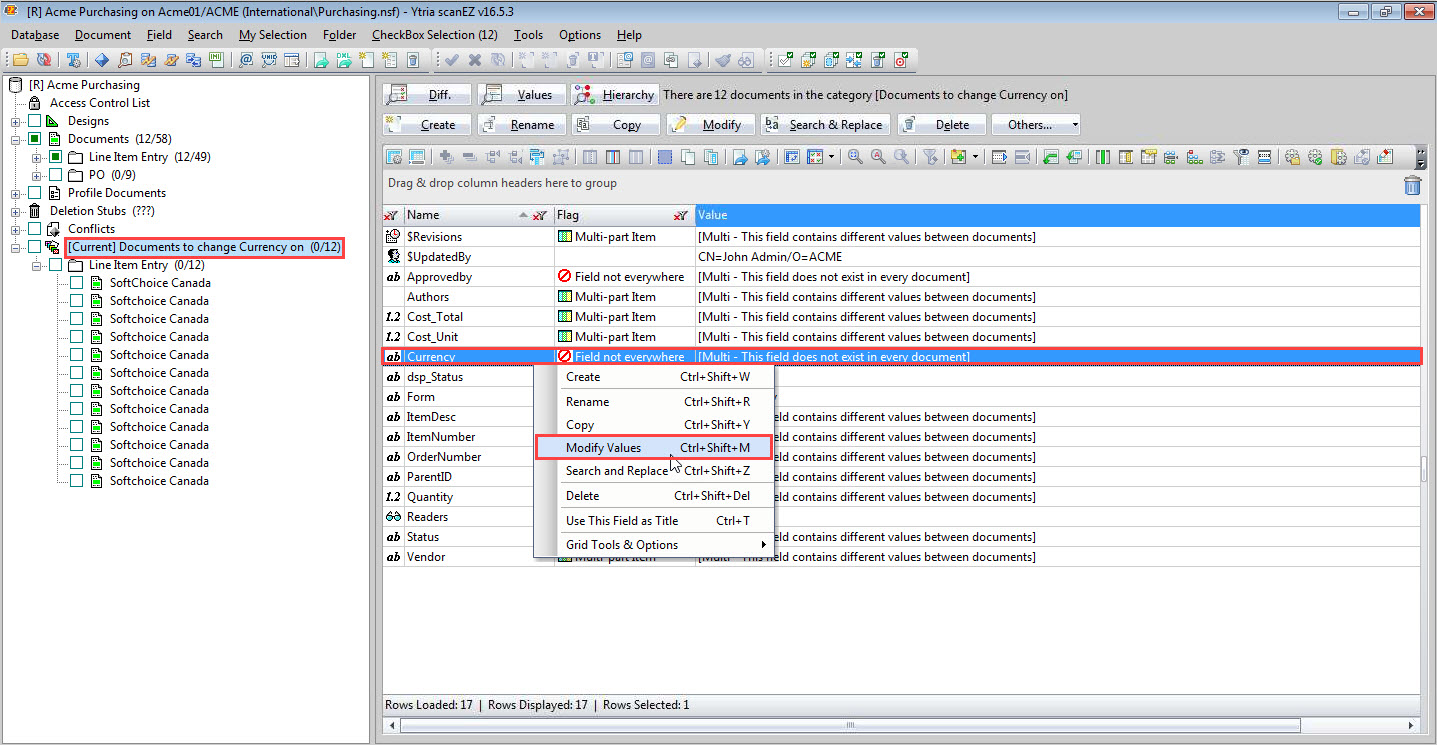
Fig. 9 Select your item from the ‘Diff.’ panels summarized list, and then right-click and select ‘Modify Values’. Note the status indicator for your chosen item.
Step 4: Update ALL the values.
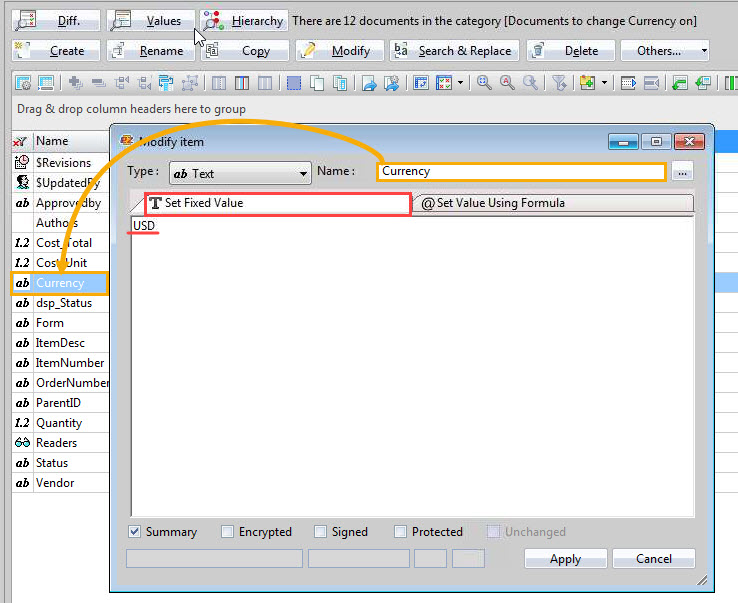
You should now be at ‘Modify Items’ dialog. This is where you choose which value to set in the chosen item. Psst… just in case, make sure that you’ve chosen the correct one. Choose how you want to set your value by either staying on the default ‘@Set Value Using Formula’ tab or, if your situation is like this one and you know the value already, click the ‘Set Fixed Value’ tab. You’ll be able to enter your value directly in the input window (see fig. 10).
Change your value to the right one, and then click ‘Apply’ (see fig. 11).
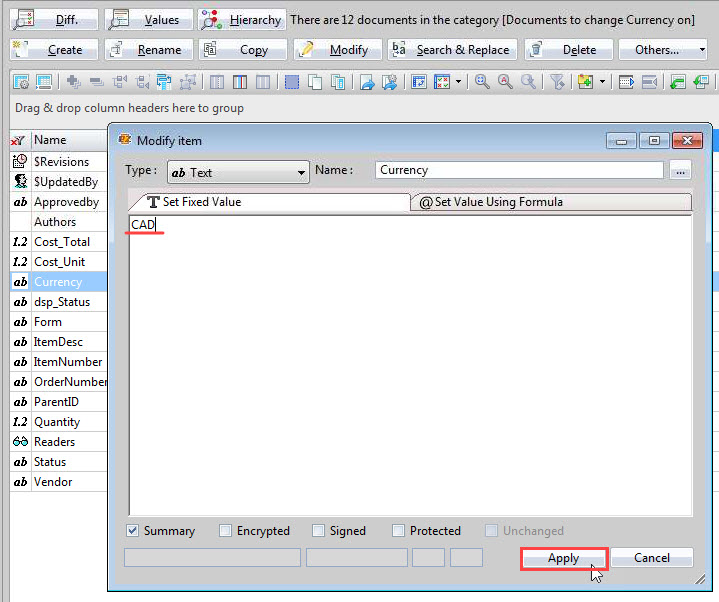
Fig. 11 Change your value and click ‘Apply’. The process will immediately begin running through the list of documents and modifying the desired item.
The process will immediately begin running through your document selection and changing the old values to the newly input one.
But wait… the problem was a compound one: Not only was the item value wrong, but there were also some documents that didn’t even have the item in them. Hmm…
Remember the item status we saw in the ‘Diff.’ panel’s item list (shown in fig. 8)? It’s already indicated there that the item doesn’t exist in all the documents. Here’s what will happen during the process: The documents will be processed in order, and when scanEZ comes to a document that doesn’t have the item you will be presented with a choice to create the item, skip the document and move on to the next one, or abort the process at this point. You will also be able to choose to repeat this action on any remaining documents. We came here to settle this issue for all the selected documents, so let’s do it. Check ‘Apply to all documents’ and click ‘Create’ (see fig. 12).
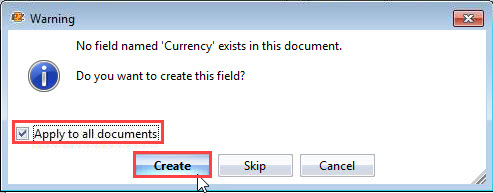
Fig. 12 When the process encounters the first document that is missing the item you want to update, you will have a choice to create the item, skip the document, or abort the entire process at this point. This example requires creating the item in all documents.
And there you go! The item will be updated in the documents where it did exist, and added to the documents where it didn’t. A confirmation will follow (see fig. 13).

Fig. 13 When the process is done, you will see a confirmation dialog that lets you know how many documents have been updated.
While this example simply illustrates the steps needed to isolate documents matching certain criteria and then modify an item’s value in all of them, applying this technique to your own cases (using the specific details that fit your needs) can help you make quick work out of large-scale item modifications. Once you’re familiar with how to use that elusive ‘Diff’ button, I’m sure that you’ll find plenty of situations where this often-overlooked scanEZ feature can get you out of some pretty annoying jams.
For more helpful tutorials like this, check out our tutorial space where you’ll find an ever-growing selection of quick articles that help you get on the fast track to solving a variety of common problems.
Submit a comment