How to perform Batch Signing and other signEZ recipes that bring order to signature chaos

Following up on our previous article that focused on cleaning up your environment using the NAB Presence Checker, the newly implemented feature in most of our administration tools, we wanted to dedicate a standalone blog post to the management of signatures in certain environments. We will demonstrate how signEZ will quickly give you control over all your design element signatures across multiple servers and applications.
Introduction to signEZ
Ytria’s signEZ is much more than just a tool to handle signatures in a given database. For example, it offers an embedded, easy-to-manage way of sharing, securing and using signer IDs in a Notes environment setup. We’ll probably write more in detail about this in a future blog post. For now, you can read more about this feature here.
In addition to this great feature, the tool also comes with incredibly powerful Batch capabilities, which allow the user to take operations that are carried out on a single database to a whole new dimension. For example, any signature action we perform on a given database can be applied on multiple applications, or even on multiple servers, with just one mouse click.
Before we look at specific scenarios, let’s look at the various settings available for signature jobs that are performed on single or standalone databases.
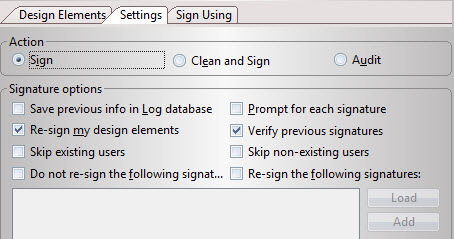
The signEZ Options panel
In the signEZ Options panel we have about 8 options that can influence the way our “Sign”, “Clean and Sign” and “Audit” actions will go down. Let’s take a look at some of these options.
The signEZ Options panel
Verify previous signatures
If this option is selected, all processed elements will be read first, and the previous signature will be collected. This option is mandatory for the features that we’ll be mentioning in this post. If this option isn’t selected, the process will go much faster since the current signatures will not need to be read. Also, note that by disabling this option you can avoid some cross-certification problems you might run into when reading current signatures.
Re-sign/audit my design elements
If you select this option, signEZ will re-sign/audit all design elements that are signed by the ID used in the current signEZ session. You can save some time if you decide to skip these elements, thereby reducing the volume of designs to be modified.
Skip existing users
If checked, the NAB Presence Checker will determine for each design element whether the previous signer is found or not in the NAB(s). Design elements with signatures by IDs not found in the NAB will be resigned/audited using the selected ID file.
Skip non-existing users
This option will skip any design elements which were signed by IDs not found in the current NAB(s) by the NAB Presence Checker.
Re-sign the following signatures
Using this option, we can launch a signature job that will only sign design elements previously signed by a certain ID/user. We can use two methods to select the signatures to be re-signed/audited:
1.Use the “Add” button and select / input signer name. This way is fast, but we might select an ID that doesn’t have any signature in the given database.
2.Use the “Load” button. This will load a unique list of all signers in the current database, and we can select one or more names to sign/audit from the list provided. Note that this might be slower than the first method since all designs must be opened.
Do not re-sign the following signatures
Similarly to the previous option, we can select one or more names, and the design elements signed by these won’t be included in the signature / audit process. As with the previous process, we can use the “Add” or “Load” buttons to select the name(s) in question.
Creating and executing Batch jobs
In order to take the previously discussed options to the next level, you can use signEZ’s Batch capabilities. We’ll look at an example involving the signEZ Server Batch database but we’d like to emphasize that there are almost 10 other methods to achieve similar results such as the use of a saved log, or the signEZ database.
For this example 3 steps are required:
- Decide what needs to be done for each database (save settings // job document)
- Decide which applications to process with a given save settings document (signEZ Server Batch database)
- Select the ID file that will be used to run the Batch job.
1. What needs to be done: Save Settings documents
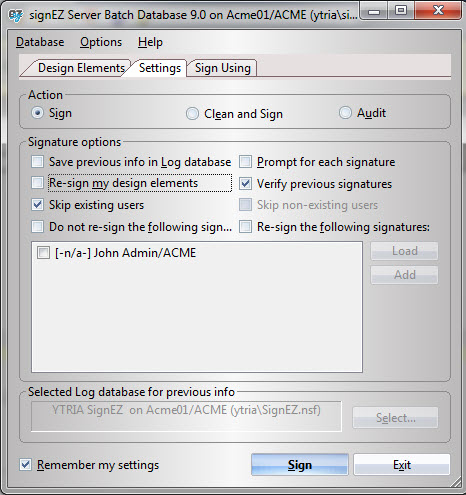
In order to decide what needs to be done, you’ll need to choose your settings in signEZ. For example, in the signEZ Options panel that we discussed earlier, select design elements to process, select the action to be taken (audit or sign or clean & sign). For a batch job, this can be done using any Notes Database since only the settings will be considered during the processing of a batch job (i.e. sign all agents signed by a given individual).
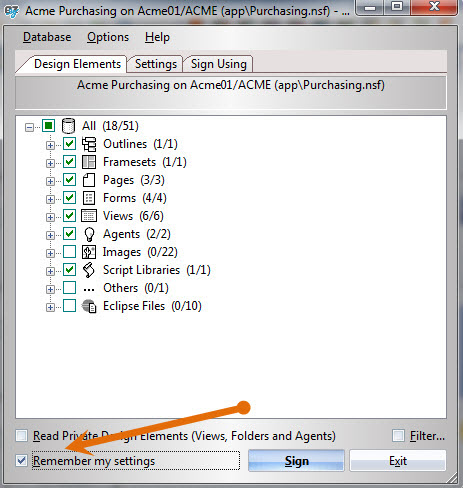
Choose your settings in signEZ
You will also need to click the “Remember my settings” checkbox, and either launch the selected action on the actual database, or hit “Exit”. This is when the “Save Settings” document is created in the signEZ database. Note that the current signEZ database can be set using Database \ Link to another signEZ database.
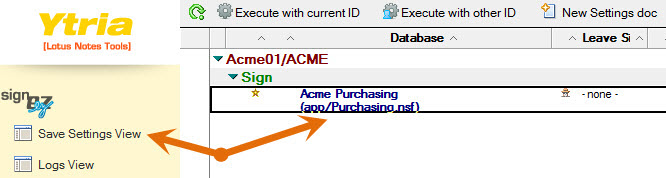
Save Settings document
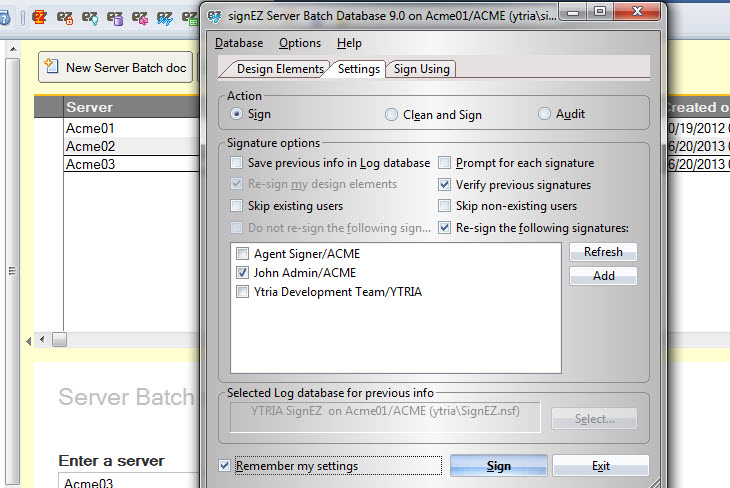
2. Which applications / servers do we want to process: signEZ Server Batch database
Having created the “Save Settings” document that specified what will be done, we can now make use of the signEZ Server Batch database (which can be downloaded from our website) and create one or more Batch documents to select the applications on one or more servers that will be processed according to the “Save Settings” document we just created.
These Server Batch documents work with a list of applications on the specified server. You can use the “Generate Database List” button to quickly get a list of all databases / applications in a certain folder only, but essentially it will be the “Database List” field that will be taken into consideration once the process is launched. Note that this is an editable field.

Use the “Generate Database List” button to quickly get a list of all databases / applications in a certain folder.
3. Select the ID file that will process selected applications
Once everything is in place, the only thing left is to select the Batch documents to process, and whether or not we want to use the current ID or another ID (from the local machine or back-end signEZ database). After selecting the appropriate button here, signEZ will take care of the rest.
Tangible examples
Knowing how the Batch capabilities work, we can combine the power of the options we looked at earlier with the scope of Batch documents and achieve extraordinary results. Let’s take a look at a few examples to see just how far signEZ can get us.
Audit or re-sign all design elements signed by a given person
Many customers we know face the issue of administrators who have left the organization, leaving behind their signed design elements. What if there was a quick way to get rid of all of these?
It’s quite easy. Here’s what we’ll need to do.
- Create “Save Settings Document” using the “Re-sign the following signatures” option, and select the appropriate person name.
- Create Batch documents that might even include ALL applications on ALL servers in the environment.
- Select the ID file to use for re-signing all signatures.
Audit or re-sign all design elements signed by a given person.
Re-sign all design elements previously signed by IDs that do not have a corresponding NAB record
An extremely powerful combination is using the “Skip existing users” option with Batch documents. Essentially what happens here is that signEZ will process all applications, and having verified all previous signers, it will only re-sign / audit design elements for which that NAB entry could not be found by the NAB Presence Checker.
Due to the nature of this operation we advise proceeding in two steps:
CAUTION! This feature will literally process all elements previously signed by names that can’t be found in the NAB. If you have any external contractors who are cross-certified but have no NAB record, you should use the Exclusion list. This is a list of names that won’t be considered as “non-existent” in the NAB. You can edit and add names to the Exclusion list using the text file “YtriaNABCheckerExcl.txt” located in your Notes Data directory. This will also accept Regex values like “CN=.*/O=ACME” to exclude all entries containing /ACME. Note that Regex values must be preceded by a # to be handled as Regex.
Although we’ve added the “Lotus Notes Template Development/Lotus Notes” ID (which would not be found in the NAB) to the Exclusion list in our latest release, you might want to ensure that all similar, default signatures are added to this file like, for example, the “Lotus Fax Development / Lotus Notes Companion” ID.
a) Audit your environment
The first step is to create an Audit job, so that you have an idea about the signatures that are found to be non-existent in your NAB, and so that you can edit the exclusion list accordingly!
Here’s what you’ll need to do to run this job:
- Create “Save Settings Document” using the “Skip existing users” option, and select the “Audit” action. In order to save results to a log file, you should also select the “Save Audit results in Log database” option and make sure the right log file is specified at the bottom of the window.
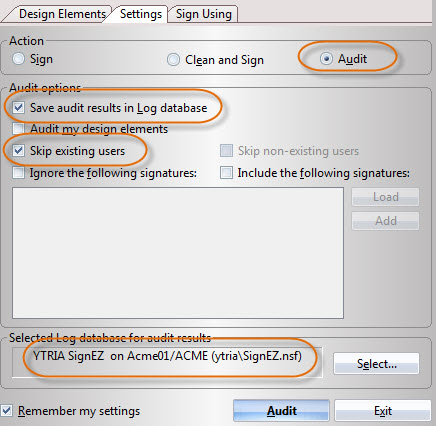
Create “Save Settings Document” using the “Skip existing users” option.
- Create Batch documents that might even include ALL applications on ALL servers in the environment
- Select the ID file to use for auditing all signatures
- Run process.
b) Re-sign all elements with incorrect signatures
The actual signature process is very similar to what we’ve just done. Here, instead of an Audit Batch, we’ll create a “Save Settings Document” using the action “Sign”.
- Create “Save Settings Document” using the “Skip existing users” option, and select the “Sign” action. In order to save previous signatures to a log file, you should also select the “Save previous info in Log database”. Note that this is not really necessary if you completed the Batch job described in step a.
Create “Save Settings Document” using the “Skip existing users” option.
- Create Batch documents that might even include ALL applications on ALL servers in the environment. Or you can use the same Server Batch Document(s) processed during the previous Audit.
- Select the ID file to use for signing all design elements signed by IDs that aren’t found in the NAB.
- Run process.
Although we only described two of the most popular scenarios that signEZ can simplify for you, there are so many more occasions to use this robust product to bring order to chaos when it comes to managing signatures in your environment.
If you’d like to explore a situation you are experiencing in your environment, send us a quick email at support@ytria.com and we’ll be happy to assist you, and perhaps do a write it up on it later.
Submit a comment