How to quickly restore large numbers of deleted Notes documents using scanEZ
A customer recently contacted us asking for help on an issue where one of her end-users deleted a large number of emails a few weeks earlier.
An admin’s first instinct here might be to restore the database from a backup of the appropriate date and have the end-user select and manually recover the emails that have been deleted.
Sadly, this wasn’t an option for our customer since a) the number of deleted docs was huge and b) the user couldn’t possibly identify them all. Furthermore, she had a number of valid reasons beyond the scope of this post that prevented her from being able to simply overwrite the production database with a restored backup (even if she added the missing documents that were created after the backup date).
What she really needed to do was to perform a merge to get the right collection of documents from a restored backup back to the production database.
Luckily for her this job is quite simple when you have scanEZ.
We’ll use this post to walk you through the steps we used to help her out. We thought that this example might be of interest to any beginner-to-intermediate scanEZ users out there as it makes use of a number of less-than-obvious features.
Part 1: Finding missing document unique IDs.
Before we get going, here are a couple of points to bear in mind:
- When a document is deleted, a deletion stub is created (i.e. a note with a different Note Class but without the original document’s item contents).
- The deletion stub maintains the original document’s UNID.
For this tip, we’ll need to take advantage of scanEZ’s ability to work with both documents and deletion stubs.
We’ll start by opening the production database where the emails were accidentally deleted in scanEZ.
From here we’ll launch scanEZ’s Deletion Stub Explorer tool (Fig. 1) in order to narrow down a selection of deletion stubs to a particular date and time (Fig. 2). We’ll use this to get a collection of deletion stubs from the date the accidental deletions took place.
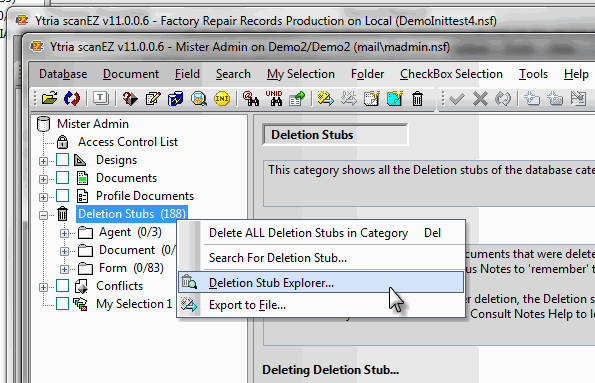
Fig.1 – Launching the Deletion Stub Explorer tool
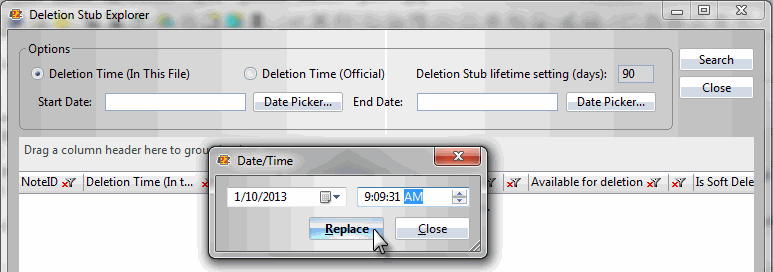
Fig.2 – Narrowing down a selection of deletion stubs to a particular date and time
The Deletion Stub Explorer grid (Fig. 3) lists all the information that’s still retrievable in deletion stubs. Here we’re able to examine properties like the UNID; NoteID; Deletion Times (both ‘officially’ and ‘in this file’); Sequence number; plus the remaining number of days before purging deletion stubs according to the database-level ‘Deletion Stub lifetime’ setting.
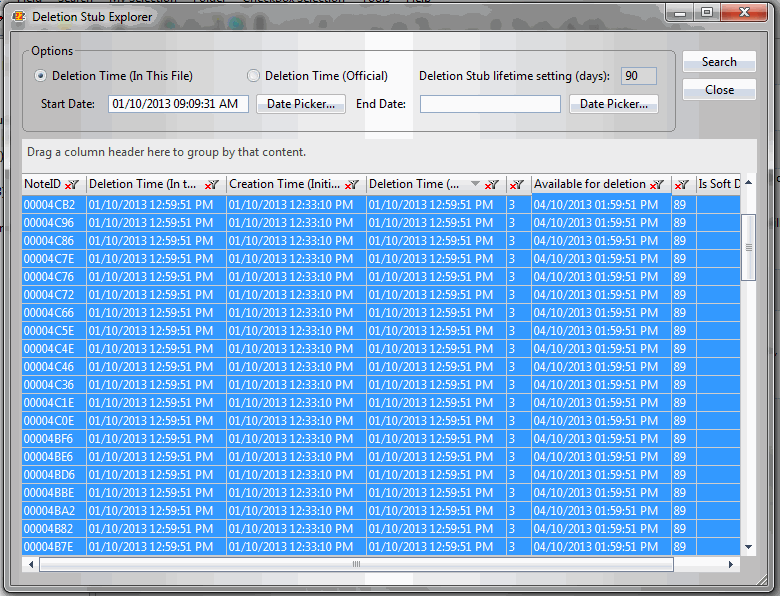
Fig. 3 – Deletion Stub Explorer with a narrowed display based on the date parameters that we entered
In this interface scanEZ won’t show the UNID column by default, we’ll need to right-click the grid and select this property from the ‘Grid Columns’ contextual menu (Fig. 4). We’ll also need to un-click all other properties to hide them, so that the only column displayed is the UNID.
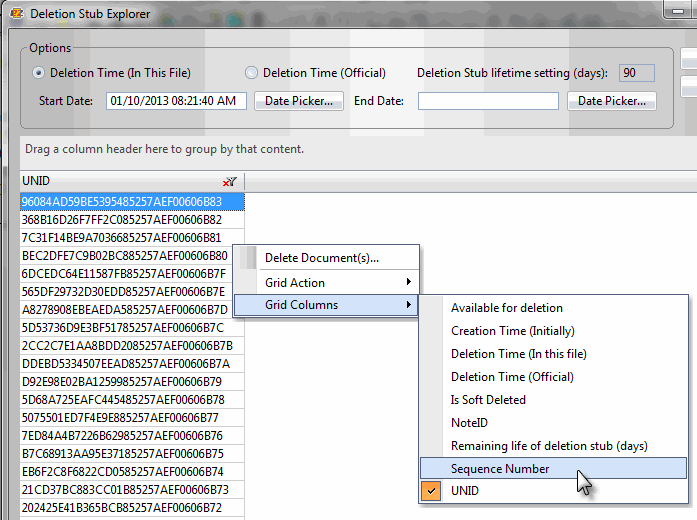
Fig. 4 – Selecting to display only the UNID column
Now that the grid is only showing UNIDs, we can simply select all 100 entries (Ctrl+A), then copy them to our clipboard (Ctrl+C).
Part 2: Finding and recovering missing documents.
With the list of UNIDs of the deletion stubs of the documents we would like to recover on the clipboard, we’ll begin the next stage by opening the restored version of this database in scanEZ.
Next we’ll use scanEZ’s ‘Search by UNID’ feature. Here we can paste the list of UNIDs and retrieve them all at once (Fig. 5).
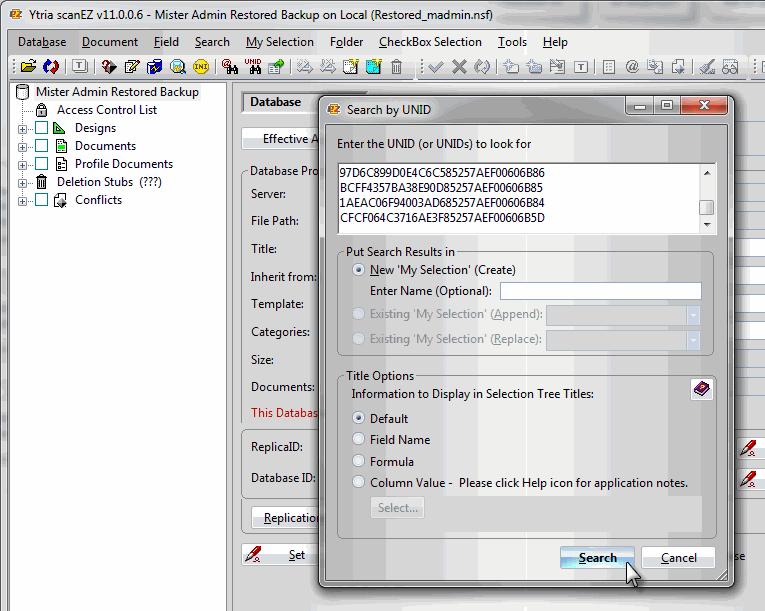
Fig. 5 – Entering a list of UNIDs in scanEZ’s ‘Search by UNID’ dialog
After the ‘Search by UNID’ scan is complete, the retrieved documents will appear in a new MySelection virtual folder. From here we’ll tick the checkbox to select them all.
Next, we’ll right-click and choose Checkbox Selection>Copy to Another Database in the contextual menu. In the dialog that appears, we’ll choose to copy the documents to the production database (Figs. 6 and 7).
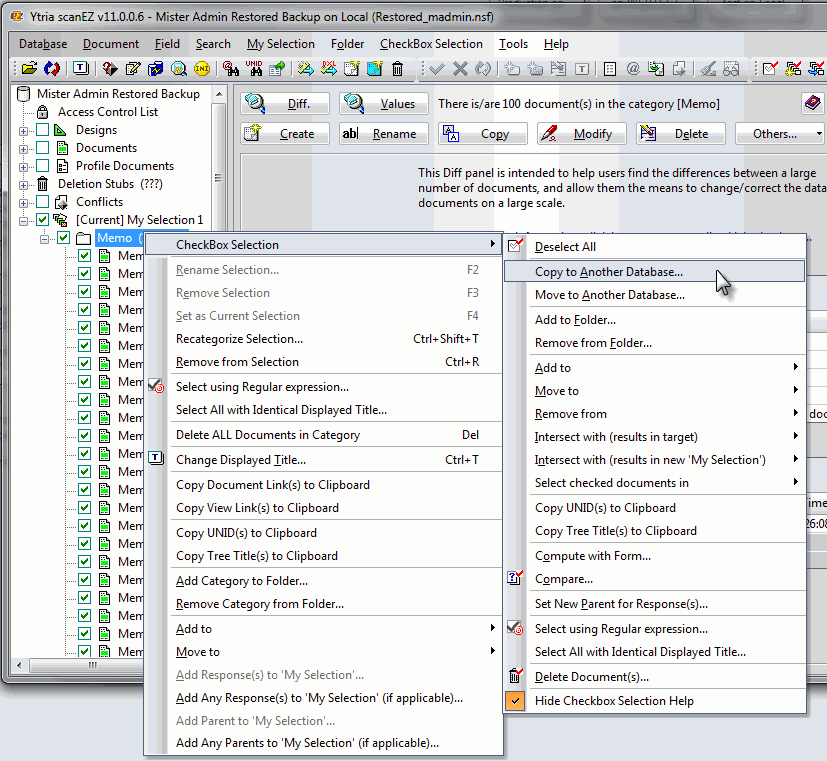
Fig. 6 – Using the Checkbox Selection menu to copy the documents from the MySelection folder to the production database
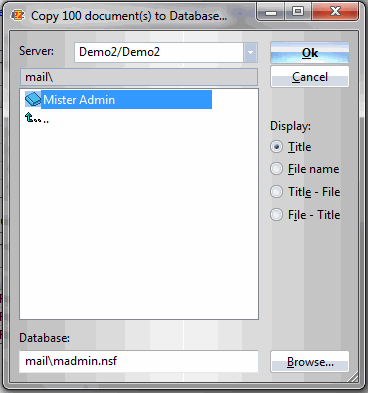
Fig. 7 – Selecting the destination database for the copied documents
As the documents are being copied, scanEZ will automatically detect and overwrite the appropriate deletion stubs. This means the document will keep their Unique IDs.

Fig.8 – Confirmation that the documents were copied
Once the copying is complete, we can prove that everything worked as planned by simply searching for the same list of UNIDs in the production database: If we get a collection of newly restored documents—not the deletion stubs we started with—we know the process was successful.

That’s a very handy tip! I have seen the “search by UNID” function, but never thought of using it this way. Very cool!
Thanks for the kind words Karl-Henry. If you ever run into an interesting real world use for this tip, we’d love to hear about about it.
Thank you for this tip.
I had this situation before and spent a long time fixing it.
I will keep this Ez solution preciously.
Very glad to hear this tip will be helpful for you Daniel! As I mentioned to Karl-Henry, if you get a chance to solve a tough issue with this, we’d appreciate you letting us know. We always like to hear from folks who are using the tools to ‘put out fires.’
Would it work if at fig3 you use delete document to remove the deletion stubs from the production database and in step 2 just launch a replication with the backup (assuming that the backup have the same replication ID)
@Paul
I reckon your method is better for situations where there are many thousands of docs to recover.
@Peter
You need to be careful with is technique. There may be other replicas of the mail file which will still have the deletion stubs. If the rep history is cleared your recovered documents may well disappear again. I have seen it happen in other situations.
What’s with the deletion stubs in the cluster database? They are ignored?
Paul’s suggestion has the added benefit of making sure the documents will go back into their original folders if they were foldered.
You gotta also consider purging the deletion stubs from the cluster replica and keep an eye on the new PIRC feature which can be a gotchya here.
Hi All, thanks for your comments, we are happy to see that this article trigged such an interesting conversation. Let me go through the topics mentioned to answer your questions.
What happens after this scenario if the production mailbox has replicas?
Regardless whether we’re talking about simple or clustered replicas, the newly recovered documents will not be overwritten; in fact due to the replication history they will stay under the replicator’s radar. Two exceptions:
– Replication History is deleted: In this case the replicator task will do a full calculation to decide what would get replicated, and will decide to send over the deletions from the other replica (depending on the recovered documents’ sequence number: if they outrank those of the deletion stubs’, the recovered documents will win.)
– Recovered documents are modified. By modifying these recovered documents, we would bring them to a position where they’d be considered for the next replication event.
Our advice here: it’s probably best if you get rid of those deletion stubs in all your replicas just to stay on the safe side. You can easily find all replicas of a given database using replicationEZ’s “Discover Replicas” feature.
Bonus Tip: If you are unsure about how replication would happen at any point, you should use scanEZ’s “Replication Auditor” feature. This embedded tool is capable of performing the following tasks:
– Complete re-calculation of Replication (i.e. what would happen if the Replication History is not taken into consideration)
– A specific calculation to determine what would happen if replication would occur NOW, having specified a certain date & time for the replication history to consider.
What are the pros and cons of doing this scenario by replicating?
Once you restored the database, you’ll need to keep in mind that it’ll have the replication history from that point in time of the backup. Once you remove the deletion stubs in the prod. database, the documents should be replicating back, and they should indeed keep their folder assignments. However, there is a chance that you might get some ghost documents back in case you don’t have the PIRC feature enabled on the production database.
All in all, it’s one of the great things about Notes / Domino, that there are so many ways to do things, and discussions like this just point out how much flexibility there is in this platform.
If you follow the above scenario, how do you get your folder assignments right?
There is no easy answer to this. In case the recovered documents belong to the same folder, you can quickly find them in the production database using the “Search by UNID” feature, and add them to the desired folder.
Another way would be to work with the “Folder Reference” attribute, but this might be a subject of a future blog post.