Back from the NSF grave: How you can (sometimes) restore deleted Lotus Notes documents

Notes/Domino data loss is never fun. It’s bad enough when you lose data because of random bad luck (say, cosmic rays decide to bombard your hard disk sectors), but it’s particularly infuriating when it’s caused by the pure carelessness of others. Yet every so often there’s a happy ending to these apparent IT catastrophes. Consider the following Lotus Notes tale, where data is lost and then revived—Lazarus-like—by an intrepid developer aided only by his wits and Ytria scanEZ:
The Problem
“So I just deleted a whole folder full of Notes documents that have no backups,” says Ivan the HR guy. “And it turns out I really, really needed them.”
“So Stan,” he adds, “I believe it’s your job to fix this.”
Suppressing a powerful urge to read Ivan his very own shopworn lecture on personal accountability, Stan the Notes developer mutters, “it doesn’t look good, but I’ll see what I can do.”
But what can he do in a situation like this?
Stan thinks for a moment and then remembers that, despite the absence of a proper backup, the database has one replica. And this replica is Australia, so it’s set up to have a relatively long gap between replications.
A Solution of Sorts
Now the solution is simple: he just needs to get rid of the deletion stubs [check out this post for more on deletion stubs] for deleted documents before the next replication. By doing so, the replication process would regenerate the mistakenly deleted docs.
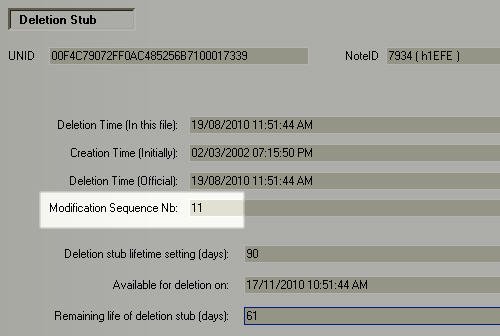
Deletion stubs, as you may know, contain no usable data, just a document’s UNID, Note ID, sequence number and sundry date information (i.e. Created (Initially); Modified (In this file); etc.), their only purpose is to tell other replicas to delete their copies of documents deleted elsewhere.
So how is Stan supposed to find and delete those stubs before the next replication cycle? What’s more, if he fails to beat the clock, the replication process will spread the fire, so to speak, by prompting that replica database to delete the documents as well. So can he possibly get this done in time?
Eureka!
It suddenly dawns on Stan that the solution to this problem is scanEZ, a tool with the ability to explore and edit the full contents of Lotus Notes databases.
With minutes to spare, he opens the affected database in scanEZ. From here he can immediately see all the database’s deletion stubs, so he trashes the stubs for the mistakenly deleted documents.
And finally he needed to clear the Replication ‘Receive’ history in the database with the deleted documents. (This ensures that the replication process will synchronize the missing documents even if their ‘Modified (In this file)’ date precedes the last replication).
The Waiting Game
Now all he could do was cross his fingers and wait for the database to replicate.
After those two seemingly interminable minutes elapsed, Stan wanted to be sure that the documents were regenerated during replication. So he once again turned to scanEZ. This time he launched its Replication Auditor tool to check what happened to the database during the last five minutes–lo and behold the trick worked: with the deletion stubs gone, the database appeared to be missing those once-deleted documents and they were duly regenerated from the Australian replica database. Victory was Stan’s to cherish and Ivan, the HR man, owed him a debt of gratitude.
Step-by-step instructions
Here’s how Ytria’s scanEZ tool can help you recover deleted documents:
1) Open the database where the documents were deleted in scanEZ
2) Expand the Deletion Stubs category in the Selection Tree
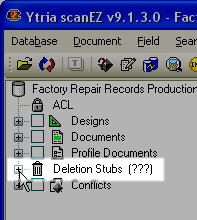
Lotus Notes deletion stubs in scanEZ’s tree view
3) Next you need to choose the course that’s appropriate for your situation. So either:
Delete all the deletion stubs in the category by right-clicking the category and choosing ‘Delete All in Category‘
or
Individually right-click to delete Deletion stubs in the Selection Tree (scanEZ will use the deletion date as the title in the tree)
or
Use the Deletion Stub Explorer (right-click>Deletion Stub Explorer) to view the stubs in a grid. This tool allows you to show deletion stubs that match a specific date range. From there you can group, sort and delete any number of deletion stubs.
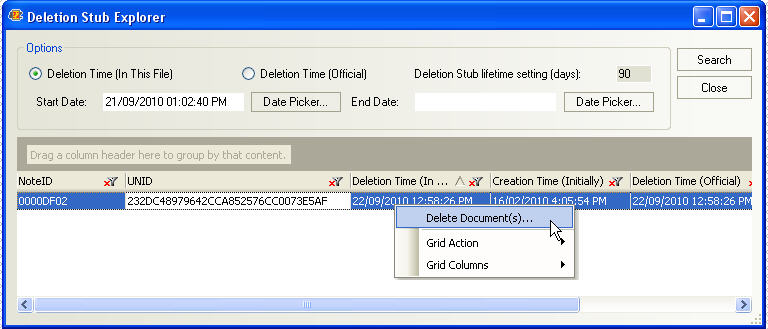
The scanEZ Deletion Stub Explorer grid
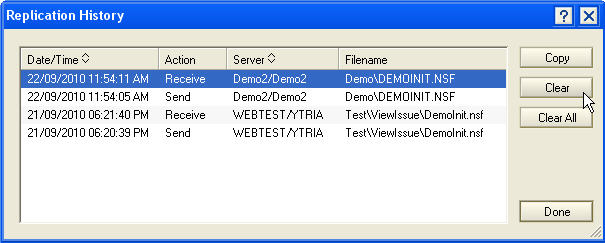
4) Clear the appropriate Replication History line (In Notes you can right-click the database icon and choose Replication>History; You can also clear the Replica History in scanEZ, just click the top-level database icon to see the option). Clearing the history ensures that the replication process will regenerate the missing documents.
5) Wait for the database to replicate (or you can manually actuate the replicate process in Notes)
6) (Optional) You can verify that the replication process did its work by doing the following:
Open scanEZ’s Replication Auditor tool (in the Tools menu)
Enter a cutoff date and time just a bit prior to the replication (perhaps 15 minutes in the past)
Click ‘Audit’ and group by “In/Out” to see if the documents were regenerated.
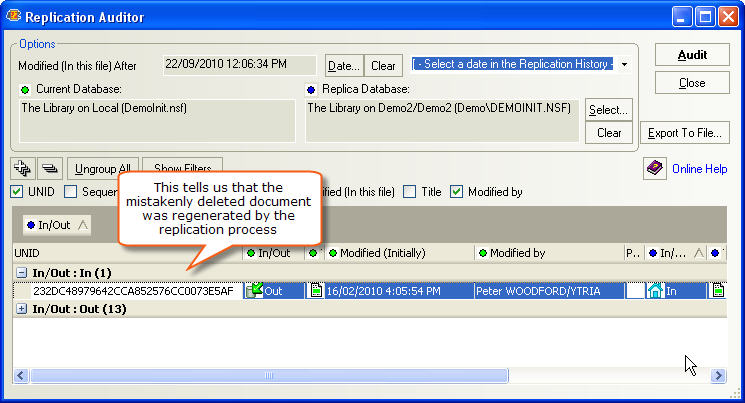
scanEZ’s Replication Auditor lets you take a closer look at what changes have taken place in the database and its replica
Some important caveats
Remember though, this ‘delete the deletion stubs’ trick will only work if there is a valid replica of the affected database AND replication has not yet taken place. So in the real world, you’ll often have to work very quickly or be lucky enough to have a database with a favorable replication schedule to make use of this tip. (You may be able to buy yourself some time by temporarily ‘unplugging’ a database, either by adjusting the ‘Other’ Replication Options in Notes or by temporarily changing the ReplicaID; here are the instructions for doing this with scanEZ). And of course, scanEZ respects Notes security, so you’d need to have adequate access to make this work.
All that said, this trick has gotten us out of a few sticky situations and a number of our customers have reported similar success reviving deleted docs in this manner.
Bonus Tip: Sequences and their Consequences
While we previously noted that a deletion stub retains no useful data, it does still contain the document’s sequence number. Why does it bother to keep that, you might ask? Well, it turns out that whenever a copy of a document on a replica has a sequence number greater than the deletion stub’s, Notes is smart enough to realize “hey, this document may have been deleted on one replica but it was changed elsewhere in the interim.” Logically enough, the higher sequence number trumps the deletion stub so rather than being deleted, the updated document will be regenerated during replication.
The case is as follows:
1) lotus notes was accidentally shut down;
2) opened the target nsf in lotus notes;
3) lotus notes launched consistency check within lotus notes;
any chance that mails were purged by this instance of consistency check?
4) the nsf seems corrupted;
(there were approx. 45,000 mails; now there are only 27,213 left.)
5) number of folders were also truncated;
any chance that lost mails could be recovered from other tabs within scanEZ?
any other EZ tools you think thay migth help?
what if there are only several mails under [Deletion Stubs]?
still worth using Deletion Stub Explorer?
you know, Deletion Stub Explorer is not free. Still recommend using it?