Restoring deleted folder designs, and returning their documents to their rightful place

“I’ve deleted a folder—the design itself—not the documents contained in the folder. How can I get everything back to the way it was?” This is a question that came up during a recent on-site customer workshop. During these sessions, we always find the time to perform an thorough health check using the Ytria tools, as well as discuss any issues that our customers might be struggling with.
This is not the only time the question had been asked, either; the issue was brought up on several different occasions during workshops, as well as in some support emails, too. We decided to try and help.
This is the core issue.
Let’s say an end user reports having deleted one or more folder design notes in their mail file. Now, just to be clear, we’re not talking about documents in a folder, but rather the folder design (or designs if you’re even more unlucky) itself. When this happens, documents that were contained in the folder end up in something close to a “limbo” in the Notes database. And while the documents are still visible under ‘All Documents,’ finding them and getting them back in their original folder isn’t all that easy.
To fully understand the solution, we must keep in mind that at its core the folder functionality in Notes doesn’t mean that documents “know” which folder they belong to, but rather that each folder keeps track of the documents they contain via a NoteID Table.
Some may confuse this with the Folder Reference Attribute, which is a feature that exists in addition to the NoteID table kept by each folder. Once enabled, it will stamp each document with the UNID of the folder(s) they belong to, thus making it easier to figure out where these documents should go. This feature is quite interesting. For instance, did you know that whenever a document is added to/removed from a folder, the document is updated in a way that doesn’t increase its sequence number? This causes the folder information to become inconsistent between replicas—we may very well discuss this in a future blogpost.
What do we need to do?
We’ve covered restoring and merging mail files in the past (check the post out here); this article is somewhat of an extension to what was covered there. We’re going to walk through how to bring this situation to order. The example we will look at involves only one folder, but this process is generally the same whether you need to find one or multiple deleted folder notes, aside from one slight difference which will be noted below.
IMPORTANT: Steps #1 and #2 are only required if we don’t know the deleted folder’s name. If we know what the folder was called, we can proceed directly to step #3.
Step 1: Locating deletion stubs for deleted folder design notes
The idea is fairly simple: scanEZ has a great way of working with deletion stubs, whether they were created upon deletion of either documents or designs, and regardless of how many there are. In fact, it’s quite easy to spot any deletion stubs for view and folder design notes using the Deletion Stub Explorer tool after applying the appropriate date and time filters (see fig.1).
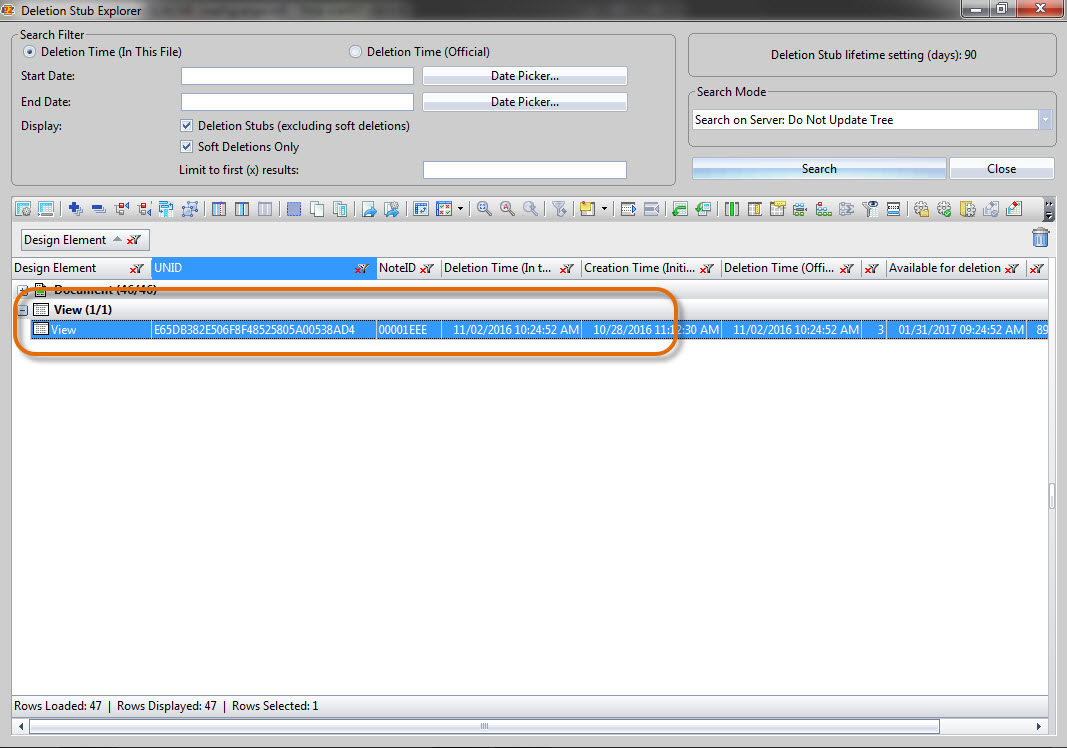
Fig .1 scanEZ’s Deletion Stub Explorer provides an easy way to spot any deletion stubs. Simply set the appropriate date and time filters.
Now, with the folder note deletion stub found, all we need to do is copy the appropriate UNIDs to the clipboard. This is easy to do; simply navigate to the UNID column and use CTRL+SHIFT+C. This will copy the contents of this specific column only.
Tip: You can copy data from flexYgrid panels at any time by using CTRL+C and CTRL+V. However, it is also possible to navigate between columns using the left and right arrow keys, and then copy only the contents of your currently selected column using CTRL+SHIFT+C or the toolbar options shown below (see fig. 2).

Fig. 2 To copy only the data within a selected column, use either CTRL+SHIFT+C or the appropriate toolbar buttons.
Step 2: Figuring out the name of the deleted folder
With the applicable UNID on our clipboard, we need to navigate to a restored version of the mail file, launch scanEZ on the database and—as in the article on merging restored mail files—use the Search > Search by UNID feature to find the folder by its UNID, and then place it in a MySelection virtual folder. The only thing we need from folder involved is its name. Once we know them, we can employ another special search feature to retrieve the documents that were previously in the folder.
Step 3: Finding documents that belong to deleted folder
scanEZ comes with an extremely powerful search feature—which also happens to be its fastest tool to search for documents in a database—that lets you quickly retrieve the contents of a view or folder.
Let’s open scanEZ on the restored version of the database, choose Search > Quick Retrieve Contents of View or Folder option, and then select the deleted folder from the list. Choose to add it to a new MySelection folder (see fig. 3), and once that is completed we will have a virtual folder in scanEZ containing the documents we need to add back into their initial folder in the original database.
Tip: In version 16.5, if you need to restore documents to multiple folders, it’s important to add documents from ALL applicable folders into the same My Selection virtual folder.
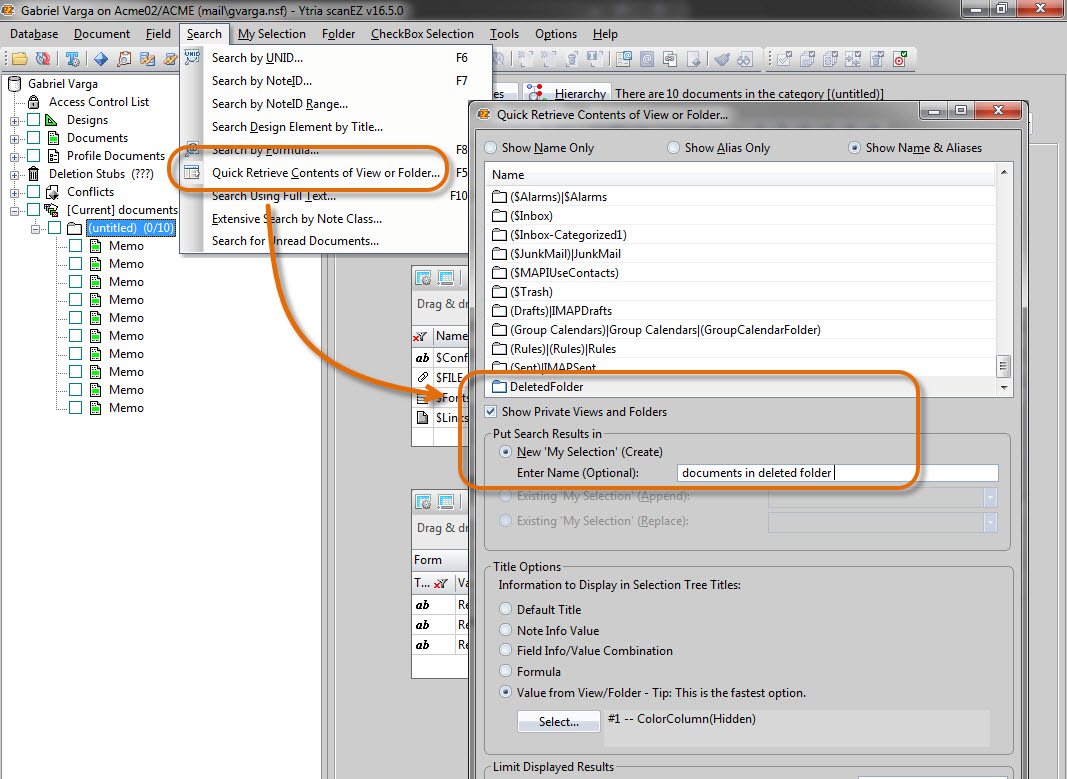
Fig. 3 Choose to add the contents of your deleted folders into a new My Selection virtual folder. This will contain all the documents that you need to put back into their initial folders.
Step 4: Moving the documents back to their initial folder
After completing step 3, we’ll have located the documents that used to be in the folder that was deleted. Now it’s time to move them back to where they belong, but we must remember that we’re currently working with the restored version of the mail file.
We’ll use a brand-new feature in scanEZ: the ability to copy documents while conserving their original folder assignments. So let’s highlight our My Selection folder containing all the documents we need to move back to their original place, and employ the Copy/Move Documents to Multiple Databases feature found in the Documents menu.
In the resulting dialog, we’ll add the production mail file as our destination database, and make use of the following two options (see fig. 4):
1) Make sure the options Set folders to use in the target databases and Get folders from source documents (slower) are checked. This will scan all currently selected documents for their current folder assignments and ensure that when they are copied to the production mail file they will end up in the folder they used to belong to.
Note: If ever you’re dealing with folders that are special in terms of their designs, you might first want to locate the folder design notes and copy them back to the production mail file. In most cases this isn’t needed, but because scanEZ will create the appropriate folders automatically—using the default folder design—it’s important to mention.
2) Select Replicate Documents. This is a new way to copy documents in which scanEZ will essentially perform a manual replication, in the sense that it’ll overwrite any documents/deletion stubs it finds for the documents being copied. It will also ensure that the copied documents will use same sequence number as the documents in the restored version of the mail file. This also means that the process won’t generate any duplicate emails.
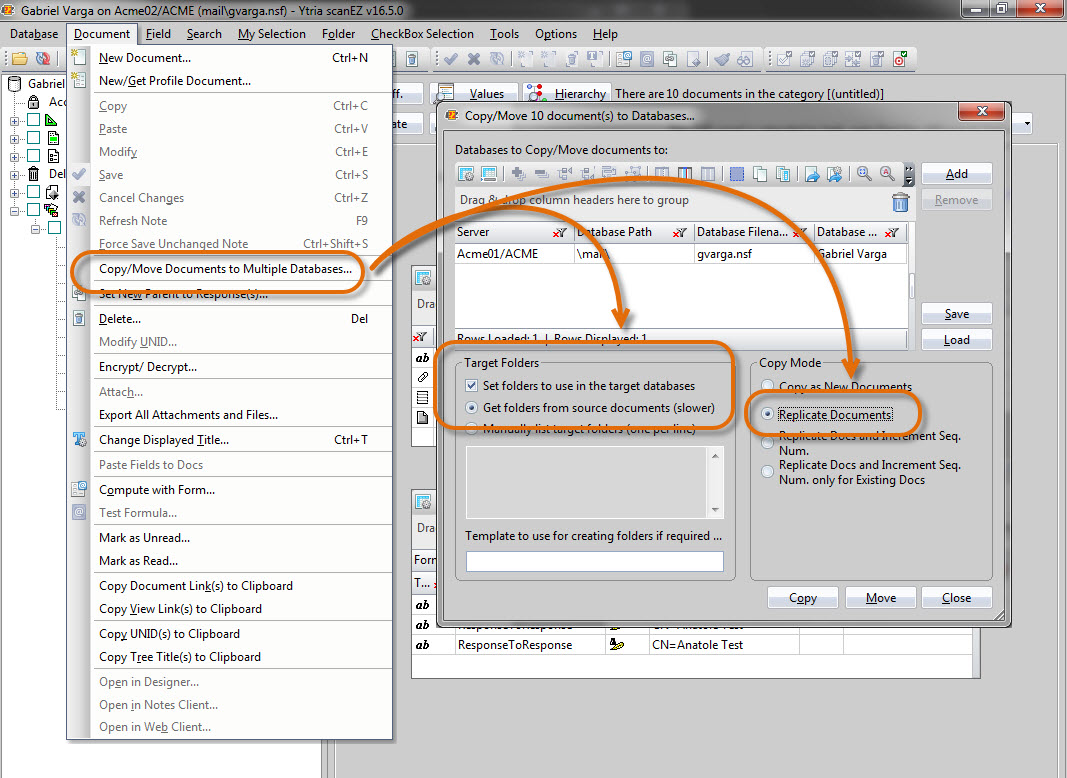
Fig. 4 Make sure to select the options Set folders to use in the target databases, Get folders from source documents (slower), and Replicate Documents.
What will happen, exactly?
At the end of this process, each document that used to be in the deleted folder was scanned, with scanEZ finding any and all folder assignments in the restored version.
With the Replicate Document copy option selected, scanEZ will overwrite the documents in the production mail file, depositing them into the folders they used to belong to in the process. In the event that these folders were deleted, scanEZ will automatically create them.
Note: When we say scanEZ deposits the mail documents in folders, what we mean, technically, is that scanEZ adds their NoteIDs to the folders’ NoteID table; essentially what’s being modified are the folders, not the documents.
Even if you have a cluster mate for this mail file, should the two mail files replicate—the documents might be overwritten and updated to the latest version—the folder assignments will still stay.
If the mail file does not have a replica, you may want to create a temporary local replica using the production mail file, copy & overwrite the documents, and then replicate with the local replica. This way you’ll make sure all documents are updated to their current version (e.g. if some of them have been flagged with a quick flag since the time of the backup).
With this newly-possible workaround, the long-standing, painful way of dealing with deleted folders is resolved; yet again, scanEZ comes in to help make end users happy with the Notes platform.
Submit a comment