
EZ Suite Download
Size 376 MB – Version v26.0.2 – 2026-05-09
Size 436 MB – Version v26.0.2 – 2026-05-09
See just how much faster and more fluid your HCL Notes Domino administration and development can be.
The suite includes all of Ytria’s software tools for Notes & Domino:
Unlike previous versions, starting with version 20, all the products of the EZ Suite are bundled in a single download.
However, the installer will allow you to choose which tools you want to install.
Starting with version 20, EZ Suite comes with a new registration and licensing system.
License keys for product version 16.5 and older will NOT work for version 20 or version 26 products.
Download older version products from here.
If you have questions about getting your software to work, see the links below:
Note: Be sure to provide complete, accurate information during registration and use a valid email address*; otherwise we cannot deliver important product information to you. You only need to register once to use all our tools.
* By confirming your email address and downloading this file, you are signing up to get periodic follow-up emails from us. Any emails we send you will contain unsubscribe information, and you may opt-out of future emails at any time.

EZ Suite v26 Version History
EZ Suite v26 Version History
See where EZ Suite has been
EZ Suite 26.0.2
May 09 2026
General fixes and improvements
- Fixed the computed agent duration in agentEZ, which was previously calculated incorrectly.
- Improved identification of the grid’s Data Viewer section by displaying a text label when the section is collapsed.
- Improved the value filter dialog by first displaying a loading spinner and value count before loading the complete list of values.
EZ Suite 26.0.1
April 20 2026
General fixes and improvements
- Improved the copy feature by standardizing the clipboard format. Previously, whether text was copied as raw or formatted depended on selecting cells in a column or entire rows, which was confusing. Now, clipboard text matches what you see in the grid (except for hyperlinks and rich text), so pasted values are predictable and consistent.
- Fixed an issue in the Data Viewer where, when you expanded or collapsed sections, it kept scrolling back to the field of the column that was in focus.
- Fixed an issue where the Regex history (for example, in Regex filters) could not be loaded and therefore was not available.
- Fixed an issue in replicationEZ where the right‑click context menu could not be activated.
- Fixed a crash in scanEZ that occurred when displaying the Responses panel.
- Fixed an issue where updating EZ Suite tools using “Check for Updates” could hang when the YtriaUpdate component became stuck.
EZ Suite 26.0
April 6 2026
What’s new in the latest version?
New general features
- Added a new Data Viewer section (orange vertical band) on the right side of the grid which allows you to view property values of selected rows. You can also apply column filters, sorting, formatting and more directly from the Data Viewer, plus a section at the bottom that clearly displays which filters are currently applied in the view. Use keyboard shortcuts Ctrl + Click to copy the value and Alt + Click to copy the column ID.
- Added the ability to apply conditional colour formatting on a column for values that meet a set criteria.
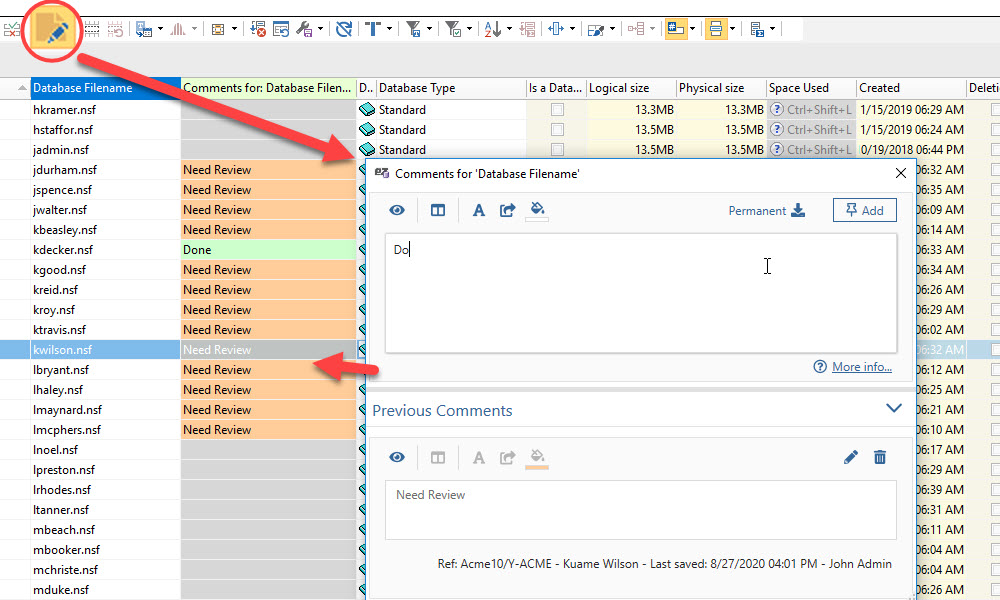
Refreshed the design and enhanced the functionality of filter and Comments dialogs.
New scanEZ features
- Added the ability to create documents from a Excel/CSV file from the Tools menu in scanEZ.
- Added the ability to execute a quick search from selected fields using the ‘Search Documents By Formula With Selected Fields’ submenu item of Fields in scanEZ.
General fixes and improvements
- Improved the Offline license activation option with clearer process messages and made the license’s offline activation status easier to understand in the About section.
- Improved the grid Comments dialog, which now lets you add column titles and comment titles during creation, and reuse previous values when creating new comments.
- Improved Comment management by letting you delete comments at all levels directly from the grid, which removes the entire comment column when cleared.
- Improved the ‘Add Data from file’ feature in general and with the addition of options in the dialog to skip rows, include headers, and information about any merged rows in the imported file.
- Improved how currency symbols are managed in the grid so that when the symbol of a column changes, all referencing columns, including Comments, display the updated symbol.
- Improved grid sorting, which is now significantly faster when working with large numbers of rows.
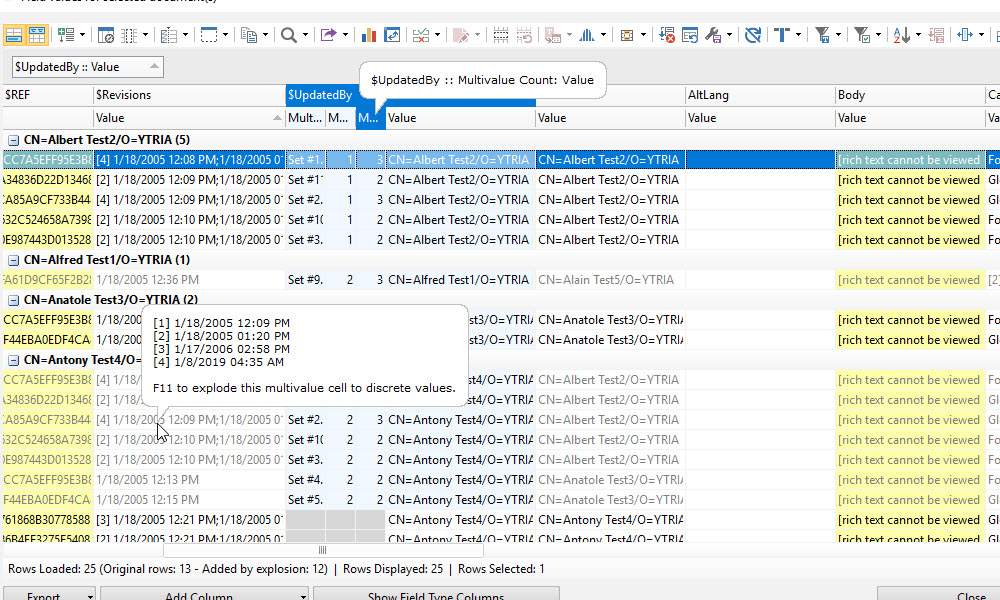
- Improved the dialogs shown when exploding or unexploding multivalues.
- Improved value filter with new interface and features, including the option to view visible rows only and listing unique values when there are multivalue cells.
- Improved column settings with option to always auto-explode multivalues.
- Improved the Export dialog to show how many rows are selected for export and removed the default selection of ‘Selected rows only’ and ‘Include locked technical columns’.
- Improved the appearance of message boxes by using new HTML-based message boxes.
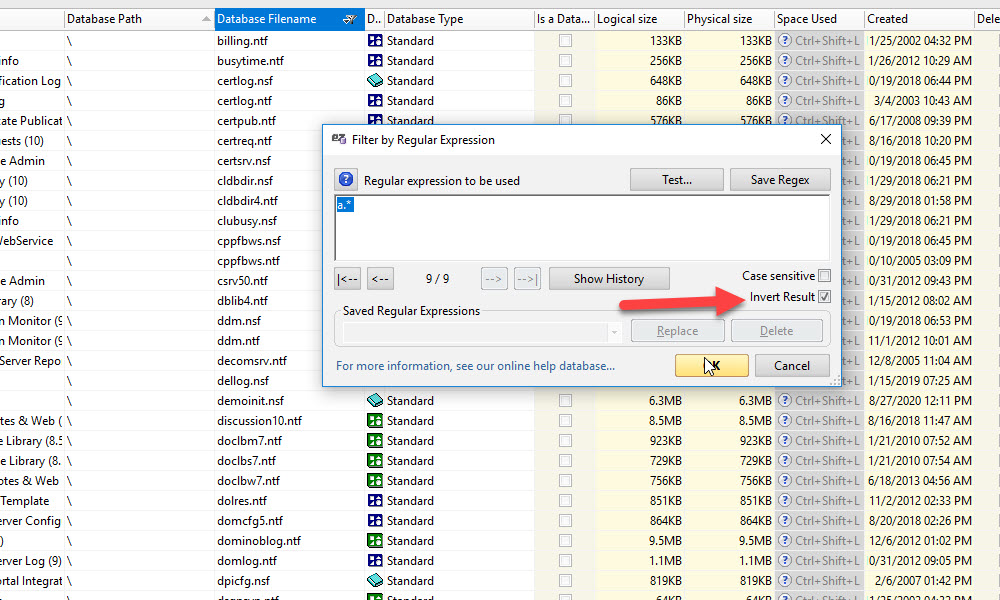
- Improved grid filters with options to retain only empty value cells and a cut-off filter for future date values (ex. expiration dates).
- Improved features ‘Select from File’ and ‘Filter from File’ with an option to generate an Excel file with entries that could not be matched (skip list).
- Improved value filter applied on a grouped column header that has been hidden. Previously, the values listed were blank.
- Improved the feature to resize the column to header text length.
- Fixed offline license activation behavior where canceling activation exited the application instead of falling back to Lite mode.
- Fixed comparator where all Result Column Background Colors were set as black by default.
- Fixed issue where Comment columns where shown under a ‘ghost category’ in the grid.
- Fixed issue where combining ‘Hide empty groups’ and ‘Hide single-entry groups’ did not work properly in a grid with multiple grouping levels.
- Fixed issue where the keyboard shortcut Ctrl+Alt+F10 did not list multi-values in the ‘Multivalue viewer’.
- Fixed unexpected grid behaviour when multivalues are first value-filtered, then grouped. Previously, entries were not categorized for each remaining value.
- Fixed issue in the Comment dialog where it was unable to process an empty formula result.
- Fixed issue where saved Column Comments could not be edited and in cases where they were not shown in the grid after saving.
- Fixed issue with temporary Comments where the tooltip content was doubled.
- Fixed issue where deleting a Comment that had been exploded into multiple rows now correctly removes all associated exploded rows from the grid.
- Fixed an issue where editing an exploded column comment caused blank cells to appear in the comment column in the grid while the comment edit dialog was open.
- Fixed an issue where comment values were not displayed in the grid when using a localized language.
- Fixed a crash that occurred when removing exploded multivalue column comments.
- Fixed a sorting issue for columns with multivalue cells where ordering was inconsistent between lowercase and uppercase values.
- Fixed grid behaviour where group count was not taking into account exploded rows.
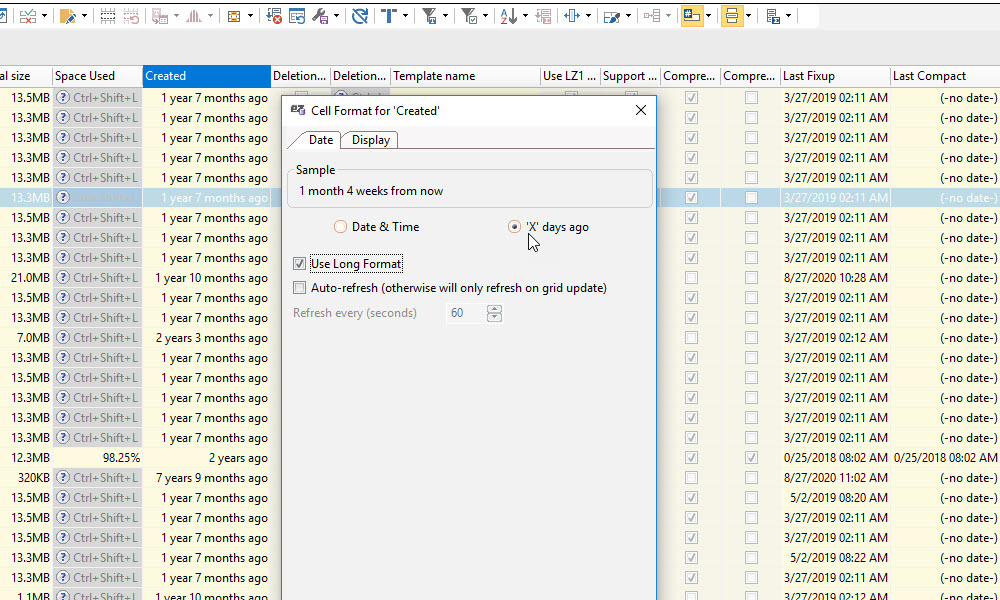
- Fixed date/time formatting issue in the grid.
- Fixed issue where the value filter list displayed ‘unset’ and ‘false’ states in the same way for checkbox type columns.
- Fixed grid issue where Hexadecimal color value was not applied to a column.
- Fixed an issue in ‘Add data from file’ where some numbers were incorrectly converted into dates.
- Fixed an issue where values in hierarchy columns were not correctly updated when child rows were filtered out or hidden.
- Fixed a crash that occurred when cancelling a multivalue explosion.
- Fixed an issue where ungrouping one column from a group of same-family columns incorrectly triggered an unexplode confirmation dialog.
- Fixed an issue where multivalue comments that were part of a column family could not be removed.
- Fixed an issue where changes to a multivalue comment were not reflected in the grid while it was exploded.
actionBarEZ
- Fixed issue where Copy/Paste was causing a crash in actionBarEZ 64bits
scanEZ
- Improved how dates are displayed by increasing the column width.
- Fixed issue where Named Documents were wiped out when opened.
- Fixed issue where existing grid editions seemed to have been lost after removing an item in a document.
- Fixed issue where deleting a formula from the Formula History was not saved
viewEZ and databaseEZ
- Fixed issue where the view index sizes did not match with what was provided by the Domino Administrator.
aclEZ and replicationEZ
- Fixed an issue where automatic sub-grid updates made it difficult to navigate and interact with the main grid using the keyboard.
Automation
- Fixed various automation issues and added new automation tags which are listed in our help documentation: https://docs.ytria.com/automation/release-notes.
EZ Suite
See just how much faster and more fluid
your HCL Notes and Domino administration and development can be.

Notes&Domino用のYtriaソフトウェア 日本語版。
EZ Suites
EZ Suite Complete 26
は HCL Notes/Domino 運用管理者および開発者のための Ytria ソフトウェア・ツールのすべてが同梱されており、一度に複数の製品のインストールを素早く完了できます。このスィートには scanEZ, aclEZ, agentEZ, databaseEZ, consoleEZ, replicationEZ, signEZ, viewEZ, actionBarEZ, designPropEZ そして formEZ を同梱。もちろん、インストールしたいツールだけ選択してインストールすることもできます。
EZ Suite Complete 16.5
は HCL Notes/Domino 運用管理者および開発者のための Ytria ソフトウェア・ツールのすべてが同梱されており、一度に複数の製品のインストールを素早く完了できます。このスィートには scanEZ, aclEZ, agentEZ, databaseEZ, consoleEZ, replicationEZ, signEZ, viewEZ, actionBarEZ, designPropEZ そして formEZ を同梱。もちろん、インストールしたいツールだけ選択してインストールすることもできます。
Version
16.5.5

EZ Suite v20.2.x Version History
EZ Suite v20.2.x Version History
See where EZ Suite has been
EZ Suite 20.2.1
April 16 2024
General fixes and improvements
- Improved font resizing option by always keeping columns with icons the standard size.
- Fixed product registration process where invalid formats were accepted for the email address field resulting in void registrations.
- Fixed issue where increasing the font size in Preferences resulted only in increasing the cell size and not the font size itself.
- Fixed issue during installation on the Notes client 12.0.2 FP3 64-bit.
scanEZ
- Improved Document Analyzer with additional handling of 60K and 64K limitations.
- Improved the field selection dialog by providing a history on the field names that were used for the selection.
aclEZ
- Cleared up how Hierarchy values are displayed when using aclEZ’s Group Expander.
consoleEZ
- Added Console Setting in Preferences to set the font size and colour in the consoles via RegEx.
- Fixed issue where RegEx Search was not carried out on the selected Column.
databaseEZ and replicationEZ
- Removed the “varying flag” from column set by default with the % number format. It is now limited to 2 decimals for Space Used in replicationEZ, and for Analysis Result and Current Usage in databaseEZ.
- Added Large Summary Support flag in replicationEZ.
Automation
- NEW – You can now load content from Notes views and folders in any grid to enrich it. See how it works here: https://docs.ytria.com/automation/importviewingrid-insert-data-from-a-notes-view-int.
- Fixed various automation issues and added new automation tags which are listed in our help documentation: https://docs.ytria.com/automation/release-notes.
EZ Suite 20.2.0
November 14 2023
General fixes and improvements
- NEW – Improved grid grouping zone visibility by highlighting the grouping zone and its text in green when dragging a column header.
- NEW – Improved grid with text size options to increase text size and cell height in Grid Tools & Options.
- NEW – Improved grid with a visible column selection indicator. The selected column now shows a border.
- Improved column value filters where you can now see all values previously filtered and change your previous selection.
- Improved ‘Remove Duplicates’ feature by enabling it if duplicates info is present and removing them from a list.
- Improved the ‘Convert text to date/time’ dialog by adding some format examples.
- Improved the ‘unloading’ filtered and hidden rows in the grid by adding process count and a progress bar.
- Improved access to “Select from File/Clipboard” by adding it to the Main Grid Menu.
- Improved confirmation dialog of “Select from File” by indicating the number of rows selected in the grid and by adding a progress bar for the matching process.
- Improved grid filter for cut-off date/time with option to invert results.
- Improved grid behaviour where now hierarchy columns and comments update only when data is changed, and where sorting or grouping no longer trigger a hierarchy or comments update.
- Improved grid refresh behaviour for multi-value properties. “Processing Multivalues” will be shown when multivalues are exploded or imploded, a field is modified, or when a row is added.
- Fixed regression where grid cells of Time-only type showed ‘Invalid DateTime’ value.
- Fixed grid issue where double-clicking on the border did not result in increasing the cell width to show the full column data.
- Fixed issue where using ‘Totals’ for groupings was not working properly with multi-values.
- Fixed how multi-values are handled in building charts and pivot table. Explode them first to process them as single values.
- Fixed Comments issue where ‘Refresh’ greyed out (disabled) the ‘View Orphans’ button.
- Fixed offline license dialog which presented “product expired” message, and also removed irrelevant information when there is no active license.
scanEZ
- Fixed issue where the document tree was not shown after loading a saved tree config.
- Fixed issue where applying a saved setting required transforming old sfd files to the newer JSON format.
agentEZ
- Fixed issue where the wrong time zone is used when calculating the last Run Date of an agent where the server time zone is different from that of the client where agentEZ is running.
Automation
- Added new automation tags and fixed various automation issues, listed in our help documentation: https://docs.ytria.com/automation/ez-suite-latest-automation-additions
EZ Suite
See just how much faster and more fluid
your HCL Notes and Domino administration and development can be.

EZ Suite v20.1.x Version History
EZ Suite v20.1.x Version History
See where EZ Suite has been
For version 20.2 and over, see EZ Suite v20.2.x Version History
EZ Suite 20.1.5
April 18 2023
NEW
- Added new option “Keep Optional Rights” in aclEZ to allow users to apply new access levels while keeping existing non-mandatory values.
General fixes and improvements
- Improved the “Convert text to date/time” dialog by adding some format examples.
- Improved EZ Suite product branding by updating the Ytria logo for the YtriaLog.nsf.
- Improved grid features ‘Find All’, ‘Find First’ or a ‘Start With’ when no matches result. You will now see ‘NOTHING FOUND’ at the bottom left of grid when there is no result.
- Fixed issue where Show Duplicate in Grid’ did not function for Comments/annotation columns.
- Fixed issue where ‘Show Duplicate in Grid’ was tagging hidden rows instead of being applied only visible ones.
- Fixed cause of crash during registration when Japanese localization is applied.
- Fixed issue where the preview of a comment formula does not match the format of the comment column itself.
- Fixed issue where the ‘Compare Values’ feature was not working for dynamic columns like Column Comments.
- Fixed unexpected behaviour for sorting date multivalues.
- Fixed product freezing issue due to Webview2.
- Fixed cause of Error h800c0008 when downloading files via YtriaUpdate.
scanEZ
- Fixed “Import from a DXL Logs” issue where grid data was not displayed.
- Fixed cause of crash when deleting documents from a Values dialog.
- Fixed cause of crash when pressing ‘V’ in “Search by formula” dialog.
- Fixed issue where clicking on Expand Nested Groups resulted in the highlighting of all members.
- Fixed cause of unexpected long launch time.
- Fixed NAB presence checker issue where empty groups or groups with non-existing members appeared as “not in NAB”. Now these groups are shown as being “in the NAB”.
aclEZ
- Fixed issue where clicking on Expand Nested Groups resulted in the highlighting of all members.
- Fixed cause of crash when using ‘ACL Entry Selection Filter’.
- Fixed Group Navigator issue where “Include Mail-in” was not enabled when the NAB navigator was opened for the first time if the NAB option “check presence” was active.
- Fixed NAB presence checker issue where empty groups or groups with non-existing members appeared as “not in NAB”. Now these groups are shown as being “in the NAB”.
agentEZ
- Fixed cause of crash when editing Schedule Properties.
Automation
- Added new automation tags and fixed various automation issues, listed in our help documentation: https://docs.ytria.com/automation/ez-suite-latest-automation-additions
EZ Suite 20.1.4
December 14 2022
New
- The User Activity Analyzer in databaseEZ has been added to replicationEZ (see contextual menu in the Selected Databases subpanel).
64-bit specific fixes
- Fixed the 64-bit installation database that was not properly updating old 32-bit files.
- Fixed the Full Admin Access that was broken in the 64-bit version of EZ Suite.
- Fixed 64-bit scanEZ issue when reading or editing composite items like RFC8222 or MIME.
- Fixed 64-bit scanEZ issue when reading detailed information on an $FILE item.
- Fixed inability in 64-bit viewEZ to properly save columns and views.
General fixes and improvements
- Fixed an error in YtriaUpdate which resulted in the inability to download the current config.
- Fixed an error in the installation database which resulted in a possible corruption of Notes client Toolbar configuration if a toolbar was present after the Ytria toolset toolbar.
scanEZ
- Fixed an automation error when opening scanEZ from a selection in replicationEZ.
- Fixed a unexpected warning when using the automation <SearchBy>.
- Fixed the inability to execute an automation file on scanEZ from databaseEZ.
signEZ
- Fixed an unexpected crash which occurred when building the list of existing signature from invalid designs.
replicationEZ
- Fixed the load of a ‘Saved Selection’ file which was not reselecting the databases in the main grid.
EZ Suite 20.1.3
November 20 2022
General fixes and improvements
- Fixed a crash during the registration process that was on Japanese Windows, or any other Asian language Windows.
- Fixed the 64-bit EZ Suite installation database that was causing an error when creating/updating the toolbars.
replicationEZ
- Fixed an error when opening scanEZ from a selection in replicationEZ.
databaseEZ
- Fixed an error when doing an Open with signEZ, scanEZ and viewEZ from a selection in databaseEZ.
aclEZ
- Fixed an error when doing an Open with scanEZ from a selection in aclEZ.
databaseEZ
- Fixed an error when doing an Open with scanEZ from a selection in agentEZ.
EZ Suite 20.1.2
October 26 2022
General fixes and improvements
- Added the ability for users to manage exceeded product activations by letting them remove license activations (obsolete or retired machines) in order to allow the creation of new ones. More info here:
https://docs.ytria.com/globalfeatures/deactivating-a-license - Improved product registration experience, especially offline registration, with a clearer license activation dialog text, better button behaviour and links to explanatory help documentation throughout the process.
- Improved product installation regarding errors that can occur because Webview2 or VC++ Redistributable. We have added help documentation links to workarounds in the installation process.
- Improved users’ ability to use the Column Map to manage columns in grids in server-based tools by adding a helpful pop-up dialog to guide them there.
scanEZ
- Improved access to “Copy Tree Title(s)” action by adding it to the contextual right-click menu on My Selection.
- Improved visibility of action “Resolve this Conflict” by adding it to the Document menu and to the contextual menu.
- Fixed issue where Formula History was showing Saved Formula, and vice versa.
- Fixed issue where “Find First”, “Find All” and “Find Next” searches in the Items grid did not update the Field Value panel, and where the field selected in the grid did not match what was shown in the Field Value panel.
- Fixed issue of the server name being left blank in the confirmation dialog when copying an ACL to a local database.
- Fixed High Resolution [HiDPI] issue where formulas were incompletely displayed in the lookup window in the formula editor.
databaseEZ
- Added “Inherit from” property to the default view in the grid.
Miscellaneous small improvements
- Improved Column Map by auto-scrolling to the currently selected column.
- Improved tooltip display of rich text cells containing html by showing the html content. Previously, the tooltip rendered the html.
- Fixed regression where exporting a formatted date value to Excel failed to keep the format.
Automation
- Added new automation tags and fixed various automation issues, for which help documentation can be found here: https://docs.ytria.com/automation/ez-suite-latest-automation-additions
EZ Suite 20.1.1
July 27 2022
General fixes and improvements
- Now using Webview2 runtime. Improved dialogs and other HTML-based UI by upgrading to Microsoft Edge WebView2. This replaces the embedded Internet Explorer which has reached its end of life. More information about Microsoft Edge Webview2 and EZ Suite tools can be found here:
https://docs.ytria.com/globalfeatures/issue-with-microsoft-edge-webview2-runtime - Improved offline registration by adding a reference number for the offline request to help users understand the situation if doing several offline requests. The reference number will be provided on the web page and in the email.
- Updated a core component to tentatively fix a potential SSL revocation issue when connecting to Ytria’s various sites during registration on network with proxy servers.
FlexyView Grid
- Fixed RegEx issue where filters did not work correctly on blank (gray) cells, and fixed incorrect display in edit dialog. Also improved it generally by adding more information when errors occur.
- Fixed issue where dialog from RegEx filtered column shows the last RegEx inputted instead of of the RegEx formula used on current column.
- Fixed issue where exporting a number value to Excel is not formatted correctly as an integer when thousand separator is not set as “,” in Windows.
- Fixed handing of multivalue results from comments (grid annotations) containing formulas. Previously, it showed unexpected behaviour or crash.
- Fixed handling of exploded multivalues where the suffix is now ONLY used to as a display in the grid. All other manipulations (export, filter, etc) are based on the value.
- Fixed behaviour of deleted comments where previously, they were not removed from the grid if there were orphan comments with the same column ID.
scanEZ
- Added ability to retrieve Large Summary documents, when corresponding option is set in the database (needs Notes version 9.0.1FP10 and later).
- Fixed issue where groups with hierarchical names with slashes were not expanded in the aclEZ/scanEZ grids.
- Fixed ‘Copy/Move documents’ issue where scanEZ became unresponsive when copying a big number of documents.
- Fixed issue when canceling ‘Copy/Move documents’ resulted in the Report Logs grid being empty even if some documents were copied.
- Improved dialog UI for ‘Copy/Delete/Rename fields’ in Diff panel by making all input sections more consistent in behaviour (resizing, multi-line, etc).
- Fixed issue causing crash when doing multiple consecutive ‘Search by UNID’ actions.
- Fixed issue causing crash when clicking on ‘View Log’ after ‘Export all attachments and files’.
- Migrated all sfd files (used to store saved formulas, saved regular expressions) to JSON.
replicationEZ
- Added option ‘Use Domino Attachment and Object Service’ when creating replica stub to enable DAOS.
- Fixed issue where copying an ACL from one server to another was not working for target servers that appear lower in the list than the source server.
- Fixed Notes Counters issue where the counter showed a large number for non-existing databases instead of a grey cell when the first server has replicas, but is missing a few databases on a multi-database, multi-server selection.
- Fixed high pixel density (HiDPI) issue for the ‘Replication Properties’ dialog where certain fields were displayed incorrectly, and where some introduction text was missing.
- Added option to set <TreeSelectionLive> when saving selection.
databaseEZ
- Added new column in databaseEZ to show the count of ‘Not indexed’ documents.
- Fixed high pixel density (HiDPI) issue for the ‘Basic Properties’ dialog where the value ‘No Change’ was displayed incorrectly, and where some introduction text was missing.
Automation
- Improved automation process for large SetVar set, which was slowing down process by writing everything to the console. Now you can set SetVar as “silent”.
- Added ‘Alternate Values’ to Status column values to use in automation scripts. Ex. ‘Modified’=’1’.
- Added automation tag for ‘Go to next’ to go to the next selected row in the grid.
- Added index for list entry reference in ListItem and SetVarFromList
- Added new if Target=”Question” with same parameters as MsgBox.
- Added a variable of type NoCheckboxList which will be read only for user input dialogs.
- Added new variable type ‘FileSel’ to add a field in the user input dialog for selecting a new file.
- Other automation fixes and improvements, for which help documentation can be found here: https://docs.ytria.com/automation/ez-suite-latest-automation-additions
EZ Suite 20.1.0
March 8 2022
NEW
All the products in the EZ Suite are now available in 64-bit. You will need it to work with the publicly available 64-bit beta version of HCL Notes Client. A new 64-bit installation package is available for download. And like the 64bit HCL Notes Client, our 64-bit EZ Suite solutions are in Beta.
General fixes and improvements
- Handle the new ODS version 55 for Notes/Domino 12.
- When saving a Database Selection, you can now specify if you want a partial server load or a full server load.
- Fixed an issue where a Full Access Administration Rights error was wrongfully shown when it was in fact the target server which was not responding.
- Fixed an issue that was blocking Load Saved Database Selection with the incorrect error “This command cannot be executed at this time”
- Fixed a crash that occurs when there was no YtriaComment.nsf database present locally.
- Protected the function used to give the type of a design element to handle a situation where the Flags and FlagsExt items were not correct text item.
- Fixed an issue that was forbidding the launch of any product with the -x (automation) option in the command line.
- Counters in task bar and progress bar are now formatted with thousands separator.
- Bytes values exported in Microsoft Excel are now formatted as integer with thousands separator.
- Fixed an issue in Grid Cell Comments which was forbidding the edit of multiple existing identical comments
- Fixed an issue where grid Current Configuration set as Default was not applied properly.
- Fixed an issue where the various totals on groups in grid were not reading elementary values in multi-values cells
- Fixed an issue where ‘Count: exclude blank cells’ (former ‘Count: exclude empty cells’) where not counting number cell with a value equal to 0
- Improved the Online/Offline license lease renew process.
- All communications to Nalpeiron License Management solution is now HTTPS by default (this can be overridden by some registry entry).
- Note: Nalpeiron system is still unable to use auto-detect proxy. You must use manual proxy settings.
- Fixed links provided in the Lite Welcome dialog.
scanEZ
- NEW – Added support for the new document type in Notes/Domino 12.0.1: Named Document.
- Added new features “Conditional Delete Conflicts in Category” to delete a conflict ONLY if items that are in conflict with the parent are part of the list provided. If an item that is not on the list is in conflict (different or missing in parent) then the document will not be deleted.
- “Save Current Checkbox Selection To File” replaces the former “Save Current Selection To File” menu entry. It now saves a CSV file listing the UNIDs of the current checkbox selections. The new “Load UNID File Into New My Selection” will use this file to crate a New My Selection. This replaces the former “Load ‘Saved Selection’ File”.
- “Save current Tree State to File” replaces the former “Save all ‘My Selection’ Folders to File” menu entry.
- Fixed a crash occurring when opening an old saved Tree State file (formerly ‘My Selection’ Folders file).
- Fixed an issue after a field rename or copy in the Diff Grid, where the Diff Grid was always updated, even if some errors have been encountered, bringing the false impression the renaming/copying has been done.
- Fixed a refresh issue of the tab that lists all the responses of a given document, where it was showing the list of the responses from a previously selected document instead.
- Ytria Support Crash Reporter dialog is now HDPI compliant.
- Dialog showing new available updates is now HDPI compliant.
consoleEZ
- NEW – You can now set a “pre-text” on each console title to allow a custom sorting of the consoles. This is saved in the Snapshot of the current settings.
replicationEZ
- Fixed an issue when copying ACL from one replica to another where the file path of the databases were mixed up between replicas.
- Fixed an issue when looking for replicas on a server that was stopping the search if one of the selected databases encountered an error while looking for its replica, and all databases not processed yet being skipped.
- Fixed a misleading output file path information provided when copying ACL between replicas.
- Fixed an issue that was freezing replicationEZ when updating the main tree
databaseEZ
- Added new console command options for compact and dbmt available since Domino 12.
aclEZ
- Fixed the Test button in the NAB Group Navigator which was not properly opening the dialog to test the Regular Expression.
- Fixed an issue where a default NAB database and server manually set was not properly used to get the members of the groups.
actionBarEZ
- Fixed an HDPI issue on the dialog used to edit the Action properties.
EZ Suite
See just how much faster and more fluid
your HCL Notes and Domino administration and development can be.

EZ Suite v20.0.x Version History
EZ Suite v20.0.x Version History
See where EZ Suite has been
For version 20.1 and over, see EZ Suite v20.1.x Version History
EZ Suite 20.0.9
December 23 2021
General fixes and improvements
Fixed 2 regressions introduced in 20.0.7 (also present in 20.0.8)
- After a successful offline license activation, product was saying wrongfully there was no license and was shown as Lite.
- Product crash on start-up (server based tools) or during utilisation if the local YtriaComments.nsf did not exist already.
EZ Suite 20.0.8
December 16 2021
General fixes and improvements
- Fixed a regression introduced in 20.0.7 related to the creation of saved selections in multiple products.
EZ Suite 20.0.7
December 14 2021
General fixes and improvements
- New ability to select or filter grid entries directly from the Clipboard.
- Improved Offline registration and license re-activation experience.
- Fixed handling of exceptions resulting from special items $Flags and $FlagsExt that are non-strings.
FlexyView Grid
- Improved progress and task bar readability by using system format for number counters used. Ex. ‘Processing 100,000 rows…’ Instead of ‘Processing 100000 rows’.
- Fixed exporting issue to export unformatted number values (RAW) to Excel as General format. Previously, RAW numbers were set to be exported as Numbers with decimals to Excel.
- Fixed behaviour of date filters on multi-value date columns.
- Fixed incorrect calculation of totals in the grid for multi-value number cells.
- Fixed Column Comment issue where editing a Column Comment containing a column reference resulted in the application of the computed value of that cell to all the rows instead of the reference or formula.
- Improved dialog for creation or edition of grid Comments by adding shortcut key in tooltips.
- Fixed issue when adding comments to a large number of rows was taking a lot of time. It’s now much faster and there is a progress bar that lets you know where you are at.
- Fixed Comment issue so that all grids in EZ Suite tools have Temporary Comment creation enabled. Note that not all grids allow Permanent Comments.
scanEZ
- Added ability to delete conflicts conditionally. ‘Conditional Delete Conflicts in Category’ on the Conflicts main tree category will only delete conflicts where conflicted items are part of a list provided by the user.
- Fixed crash caused by opening a saved My selection created with previous versions using scanEZ 20.0.6. It is now backwards compatible.
replicationEZ
- Fixed issue where the full paths of the databases are mixed up between replicas when using replicationEZ to copy ACL from one replica to another.
Automation
- Improved ‘KeepAlive’ management with two new values: ‘ThisAndSuspend’ to disable automation until the dialog is closed, and then automation resumes, ‘ ThisAndStop’ to disable automation and exit when then dialog is closed.
- Fixed issue of single ‘\’ that are “escaped” in <MsgSplash>, when they shouldn’t be.
- Fixed issue of <SetVarListsFromGridColumns> to use values from visible rows only. Previously, it was retrieving values of all rows, even hidden or filtered out rows.
- Fixed issue of errors occurring in loop being processed more than once.
- Fixed issue of hidden/filtered rows being shown because the “Display All” grid option was always on. Now it’s off by default.
EZ Suite 20.0.6
October 14 2021
General fixes and improvements
- Improved online and offline registration by addressing license check timeout issues, strict proxy settings, Notes Federated Login etc.
- Added a rental option directly in each tool’s Help menu. This option was removed when the new licensing system was adopted.
- Improved and fixed elements in field mapping dialog to be more comprehensible for those tool features that use them.
- Fixed issue of the Export/Copy preferences not being correctly initialized when launching a tool in Windows for the first time. Previously, you needed to open the ‘Export Preferences’ dialog to avoid this issue.
- Fixed issue where ‘Adjust to local time zone’ cell format was available to be applied on date-only values. This cell format is now unapplicable for date-only values.
- Improved user experience in Lite mode with a server check every 24h rather than upon every launch.
FlexyView Grid
- Added the ability to create ‘Column Comments’ which are comments whose value is applied on every row dynamically. These are useful with Javascript formulas. The original cell-linked comments are now called ‘Cell Comments’.
- Improved ‘Export to File’ by adding option to ‘Export as text (applies only to values with unsupported format)’ when exporting to Excel or CSV for unsupported formats like bytes/mb/g.
- Fixed issue where Copy Column on exploded values included the [x of y] at the end, making the list unusable.
- Fixed issue of all grid entries being removed when ‘Unload filtered entries’ was selected.
- Fixed ‘Select from File’ to not select blank rows by default, and added a confirmation dialog at the end.
replicationEZ
- Added the ability to specify a target folder when creating stub replica for multiple databases.
scanEZ
- Improved My Selection with information about its origin. You will now be able to see if it came from ‘Values’, ‘Replication Auditor’, ‘Document Analyzer’, etc.
- Improved ‘Explode’ in ‘Values’ and ‘Hierarchy’ grids by adding more column information. Before it was not possible to distinguish between the columns names.
aclEZ
- Fixed ‘Check Presence in NAB’ which was not properly handling the option ‘Include Mail-In Db, Internet Address and all Alternate names for Check Presence’.
signEZ
- Fixed button “New Settins doc” in the signEZ view of the EZ Suite database that was not working when no previous document was selected.
Automation
- Enabled the ability to use <UserInput> in EZ Suite Automation. It was previously not working.
- Added new tag ‘Savetofile’ to save the content of a variable to a file. The file will be overwritten if it already exists.
- Added the ability to use CDATA in setvar which lets you create complex Variable in automation by allowing the use of <![CDATA[ ]]> block in the tag.
- Added ‘Explode’ parameter to SetVarListsFromGridColumns to enable multi-value field explosions (with no actual explosion in the grid) to build a list of unique values of all values in the column.
- Added warning when automation script tries to execute a disabled grid action.
- Fixed scanEZ automation issue where scripts using <SelectFromList> did not keep Values Grid alive.
- Fixed databaseEZ automation <UserActivity> which caused a databaseEZ crash if StartDate was empty.
- Fixed process for <SelectFromList> which was very slow for large volumes of rows.
EZ Suite 20.0.5
August 7 2021
General fixes and improvements
- Improved automation analysis or troubleshooting by adding more information in the trace file.
- Improved message in Lite mode dialog and trial or rental information.
- Fixed offline registration error handling and improved messages.
- Fixed missing information in ‘About’ section due to special characters used in registration.
- Fixed positioning of ‘Cancel’ and other buttons in various dialogs for a more consistent experience.
FlexyView Grid
- Fixed CSV export issue. CSV exports with Unicode output are now set to UTF-8 instead of UTF-16 (UTF-16 is associated to several compatibility problems).
- Added ability to create temporary comments in any grid. Previously only certain grids allowed comment addition.
- Fixed issue of the ‘Case sensitive’ option disappearing in Regular Expression filters in specific scenarios.
- Fixed display problem of ‘Save Formula’ and ‘Saved Regular Expression’ dialogs.
replicationEZ
- Improved new replica creation in replicationEZ with a new option ‘Copy all replication formulas’.
scanEZ
- Fixed issue of missing error when scanEZ encounters a 32K issue on a document category.
databaseEZ and agentEZ
- Improved Column Map with text to indicate which column values require additional loading (ex. ‘Load all information’).
EZ Suite 20.0.4
May 17 2021
General fixes and improvements
- Fixed issues for offline license activation by clarifying labels and dialog content for ‘Enable offline usage’.
- Fixed application freezing issue when clicking on ‘Export’ after having dragged and dropped a sub panel to open a new window.
- Fixed automation issue for switching ID where if the selected ID file name was longer than the one stored in XML, then switching ID was not working. Also fixed an issue for recording automation where the password was not recorded.
- Fixed focus shifting problem by adding a button in the toolbar, menu and ribbon which focuses on the next selection in grid.
FlexyView Grid
- Fixed various number formatting issues. Now ‘number values’ uses the current Windows format (for example, the Values grid previously used the raw format by default ). Also fixed an issue with editing decimal numbers.
- Fixed an issue in Values grid where the wrong date format was imposed.
- Fixed a sorting issue where empty cells are now sorted after empty values.
- Fixed the ‘Select using a csv or an Excel file’ option. It now uses the formatted data from Excel, instead of the raw value.
- Improved the ‘Select using a csv or an Excel file’ to enable the user to see the hierarchy of columns in the mapping dialog. Also hidden columns are no longer shown by default.
- Improved the ‘Select using a csv or an Excel file’ by adding 8 text matching criteria for each property column in the dialog. Your selection can now be more specific or broader.
- Added automation for ‘Filter from file’ options.
- Fixed an issue with temporary comments, where there would be a blank dialog box when creating or editing multiple temporary comments.
- Improved temporary comments by adding a missing column reference button in the creation and edition dialog.
aclEZ
- Fixed the issue with the filter ‘Empty Groups’ in the NAB Group Navigator, and issues with group explosions and member presence in the Nested Group Expansion. A full refactoring was done on the core of the NAB Group Navigator , the Group Members and the Nested Group Expansion.
scanEZ
-
- Fixed an issue with the filter ‘Empty Groups’ in the NAB Group Navigator, and other issues with group explosions and member presence in the Nested Group Expansion. A full refactoring was done on the core of the NAB Group Navigator, Group Members and the Nested Group Expansion feature.
- Fixed a regression of the Move/Copy documents feature which allows the recreation of the folder structure.
- Fixed regression of the Document Analyzer not working in automation.
- Fixed regression of the Formula Evaluation feature not showing errors when an error occurs.
- Fixed an issue of the data in the exported XML file (using right-click menu) not matching the tree layout.
- Fixed an issue of generated Automation files containing invalid tags.
- Fixed regression of ‘Load selection from file’ error after saving using ‘Save current selection to file’.
- Fixed automation of the Values feature which was getting stuck in an open dialog waiting for user input because the ‘setparam’ value was not provided.
- Fixed a ‘Formula Evaluation’ issue where evaluation results of multivalues were not multivalues themselves.
- Fixed ‘Save current selection to file’ feature where the full path of the tree was set in the XML. So if you want to move the file to another folder then you’ll need to edit the XML.
- Improved handling of multivalues to clear up displayed grid data. Only one family of multivalues can now be exploded at a time and the currently exploded family is displayed in the grid status bar.
signEZ
- Improved the start-up of signEZ by making ‘remember my settings’ checked by default.
EZ Suite 20.0.3
October 20 2020
All Products
- Fixed – process for offline registration & license activation – VM environments no longer need to redo the process every day
- Fixed – The key depository system:
- License errors were not displayed for licenses in cases involving the key depository
- Not able to choose Offline option with the key depository
- Improved – YtriaUpdate is now prevented from crashing during proxy settings test
- Improved – Changed crm.ytria.net URL to crm.ytria.com
- Improved – Optimized the Proxy Settings dialog
Grid
- Fixed – Column Format Options: display option ‘Abbreviate Canonical Name When Displaying..’
signEZ
- Fixed – command-line command failed to sign the note in a specific context
scanEZ
- Fixed – ‘Add any responses to My Selection’ with ‘Also include descendents…’ option was freezing scanEZ
- Fixed – AddIns menu option: despite the correct .ini entry, the ‘Multi-Selection Installation’ option dialog incorrectly indicated that it was not installed.
EZ Suite 20.0.2
September 23 2020
All Products
- Improved – Online registration process no longer runs unnecessary checks on every product launch
- Fixed – Application would freeze during ‘Check for Updates’ process
- Fixed – launch application launch by URL
- Fixed – YtriaUpdate would fail to connect to server
- Fixed – After exiting YtriaUpdate, it would fail to reopen the product from which it was launched (example scanEZ)
- Fixed – The current session was not kept when opening one product from another. For example when using the option Re-open ‘as is’ in another scanEZ
- Improved – Better handling of SwitchID between multiple products. No need to re-enter password multiple times
- Improved – The About dialog is now bigger by default and resizable
- Fixed – During offline registration process, cancelling the loading of offline certificate would display a ‘success’ dialog
scanEZ
- Fixed – scanEZ would crash when trying to modify a document using the Modify item dialog
- Fixed – Save MySelection option would fail to keep the recategorization
- Fixed – Certain automation tags prevented results from being added to the tree selection, and could crash
databaseEZ
- Fixed – Dialog for User Activity Analyzer was displaying incorrectly and would freeze
- Fixed – Edit ‘Full Text Index’ settings was allowed on all selected databases when only already indexed databases can be set
actionbarEZ
- Fixed – Loading a design as template in ActionBar was not showing the new settings
replicationEZ
- Fixed – ‘Copy Unread Table between replicas’ was missing some documents
EZ Suite 20.0.1
September 4 2020
All Products
- Fixed – validation process did not correctly recognize single product licenses – prevented them from working
- Fixed – problem when launching signEZ or scanEZ from Notes
- Improved – license validation when launching product now much faster
- Improved – dialog display of correct expiration date when enabling Lite version
- Improved – more informative dialog displays if license type is Trial or Lite
EZ Suite
See just how much faster and more fluid your HCL Notes and Domino administration and development can be.

What's new in EZ Suite 20
What’s new in EZ Suite 20
00:40:45 MIN
EZ Suite 20 is brimming with many new features that will make life even easier for Notes admins and devs. We’ve made the FlexyView grid even more versatile with a rich and robust infrastructure and new ways to organize and analyze data.
Learn all about the new possibilities EZ Suite 20 holds for your administration and development
In this webcast, we’ll explore some of the new features that will improve the way you work with Notes Domino, including the ability to:
- Select multiple entries in the grid or tree using a CSV or Excel file
- Search and replace on Rich Text fields in Diff/Values grids
- Test Formulas in Diff/Value grid to evaluate a formula on multiple documents
- Manage new properties introduced in Domino 10
- Work more comprehensively with ACLs, including group management
- And much more!
Time-Stamped outline
Here is what the webcast will cover (2:06)
Part I: The flexyview, richer and more responsive (4:00)
Part II: Global improvements (16:16)
Part III: actionBarEZ, viewEZ, signEZ, designPropEZ (18:15)
Part IV: aclEZ (19:34)
Part V: scanEZ (20:42)
Part VI: replicationEZ (27:00)
Part VII: databaseEZ (31:22)
EZ Suite
See just how much faster and more fluid your HCL Notes and Domino administration and development can be.

EZ Suite v20
EZ Suite 20 is here!
Ytria’s EZ Suite, already the most extensive toolkit for HCL Notes and Domino available, has gone through some radical developments since our last version.
EZ Suite 20 is our dev team’s hard work materialized into a revamp of everything you’ve known about our tools and how we let you work with your data.
What’s new in our products?

General additions and enhancements
Along with some fixes and improvements that smooth out the user experience, there are several new important features that impact on how you use the EZ Suite tools.
What's new in the FlexyView
NEW - Easily navigate the grid
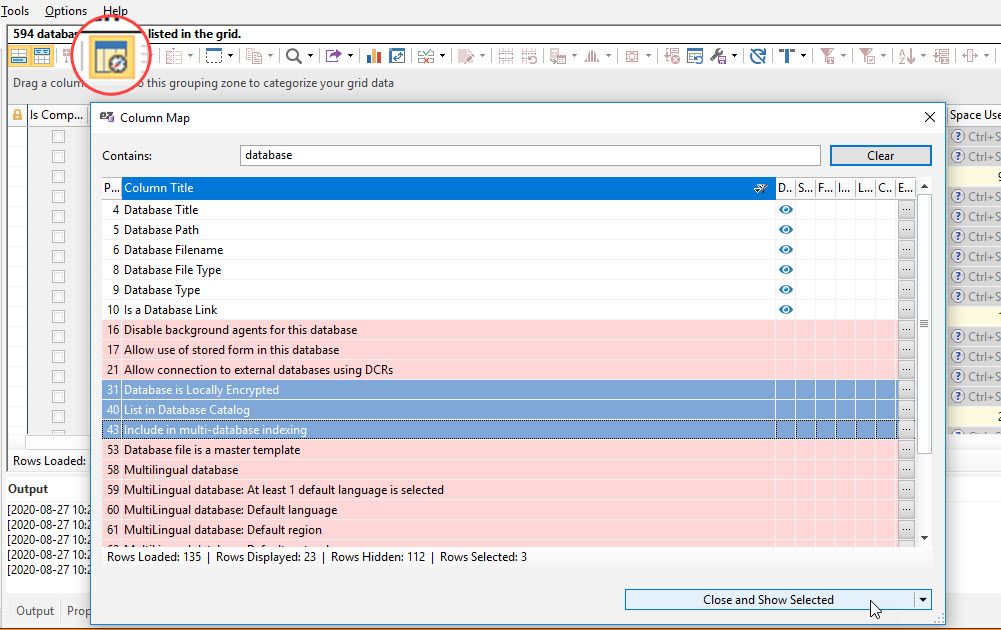
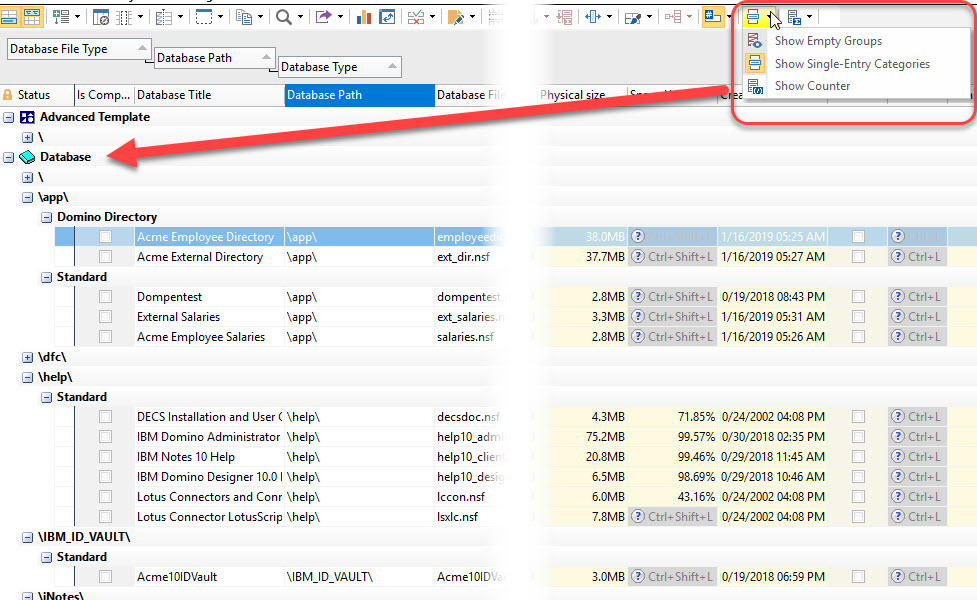
Use the ‘Columns Map’ button to find, show or hide grid properties you need to make the grid view just the way you want it. Type ahead to find a property column and double-click it and you’ll be taken there in an instant. Or select a whole of properties and click on the “Show” button to add them to the grid. Wherever there’s a grid, you’ll find yourself using the ‘Columns Map’ to explore the fields available to you because it’s so easy!
NEW - Chart your grid data in more ways
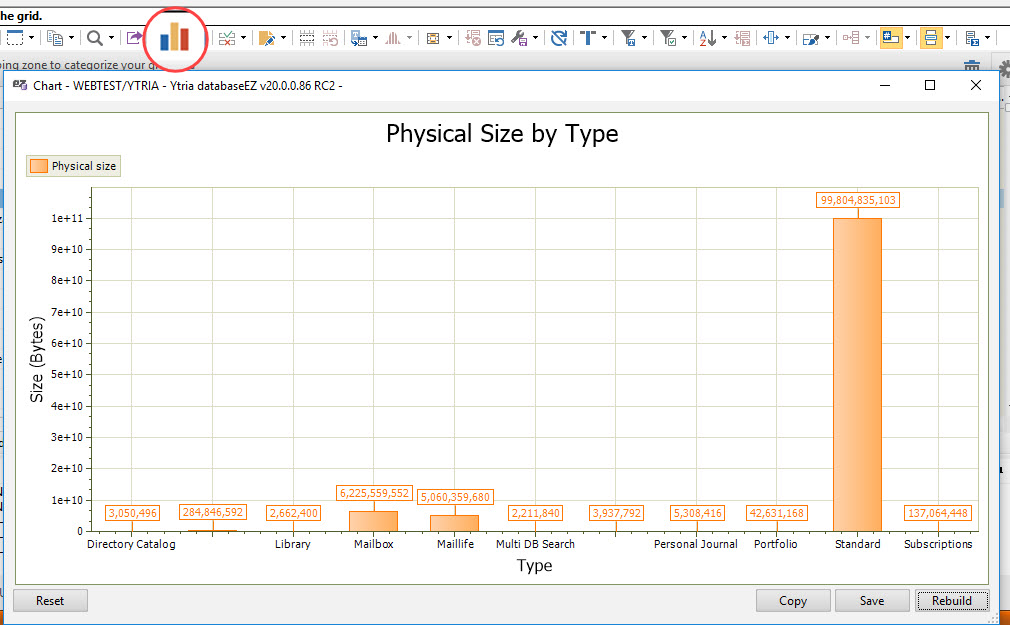
You now have options to visually represent the data you see to include in your reports. Click on the “Create a chart” button and choose from pies, bars, columns, lines, pyramids and radars to best show your data distribution. Copy it or save it for your reports.
NEW - Format your pivot table data and chart it
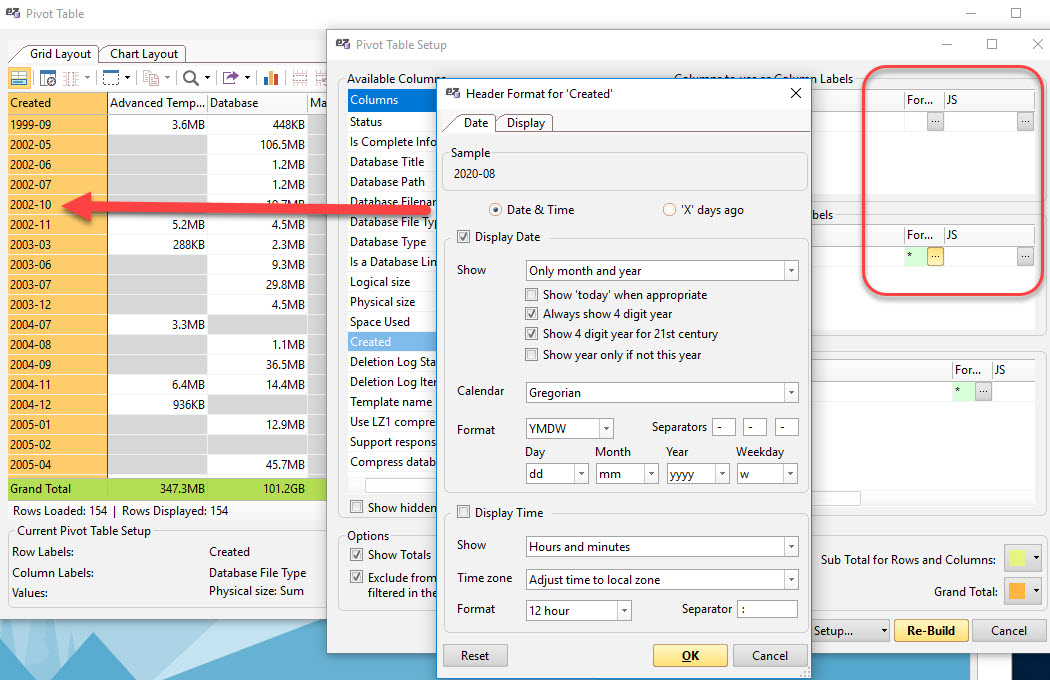
We’ve given you the ability to pre-process your grid data using JavaScript before you create more meaningful pivot tables. You can now format X and Y labels when creating a pivot table. From there you can also create a pivot chart for a visual presentation of your pivot data. Create pivot tables and charts from any grid data, including hierarchical view data.
NEW - Identify duplicate values in a selected column
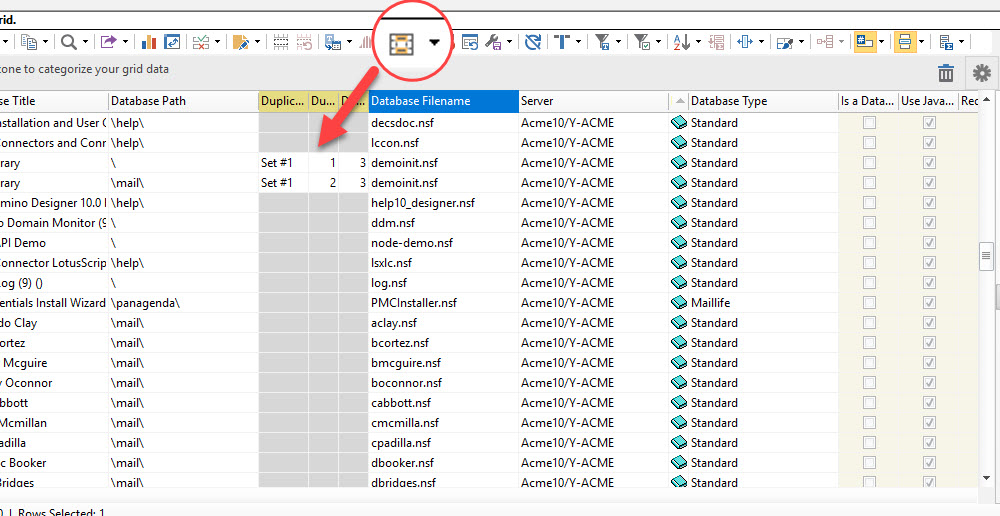
If you’re looking for duplicate values within a field across your grid entries, you can now find them quickly using the ‘Duplicates’ button. This will create new columns to indicate the sets of duplicates and their numbers for the values of the property column you selected. You can remove them once you have completed your analysis.
NEW - Get some fancy stats on your field values
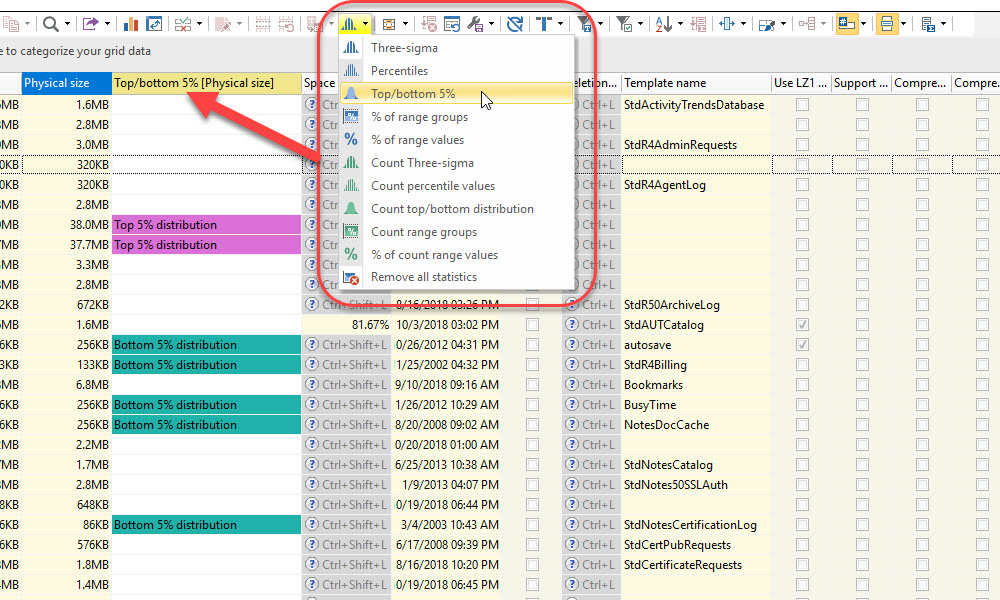
You now have access sophisticated statistical functions that you can use for selected fields or column values. Options include ‘Three-sigma’, ‘Percentiles’, ‘Top/bottom 5%’, ‘% of range groups’, ‘% of range values’, ‘Count Three-sigma’, ‘Count percentile values’, ‘Count top/bottom distribution’, ‘Count range groups’ and ‘% of count range values’. The results are displayed in a new column next to the one you selected. You’ll also have the option ‘Remove all Statistics’ to clean up the grid of these columns.
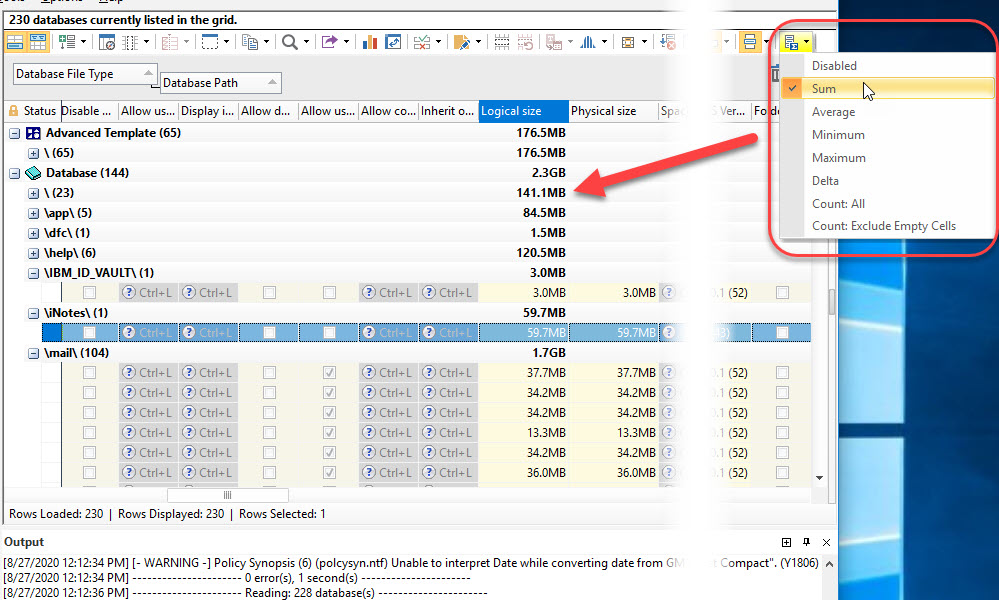
NEW - Display totals for each categorized grouping
If you’re a “serial grouper” and if you work mainly with quantifiable columns values, you’re going to love adding count information to the grouped column header. Click on the button ‘Display the totals…’ and choose the type of total to be displayed including ‘Sum’, ‘Average’, ‘Minimum’, ‘Maximum’, ‘Delta’, ‘Count: All’ and ‘Count: Exclude Empty Cells’. Available options for setting a Group Total vary depending on the type and status of the column.
NEW - Expand groupings and categorizations to specific levels
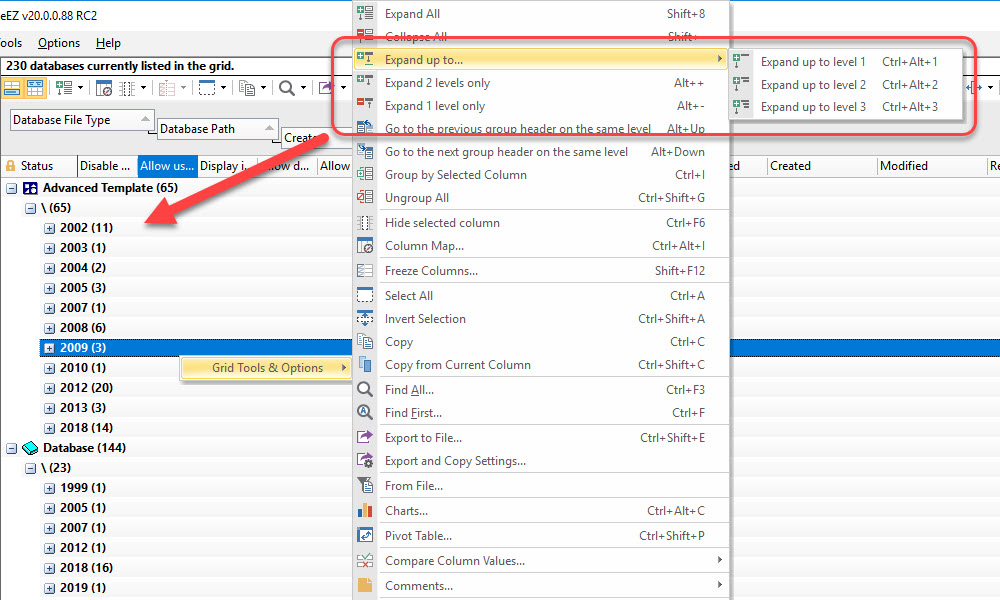
There’s now a smarter way to work with subgroupings. You can expand all top-level categories in the grid by a chosen number of levels using the right-click menu grid option ‘Expand up to…’ or you can expand a selected category by 1 or 2 levels only from the ‘Expand/Collapse’ submenu.
NEW - Separate dates and times into components
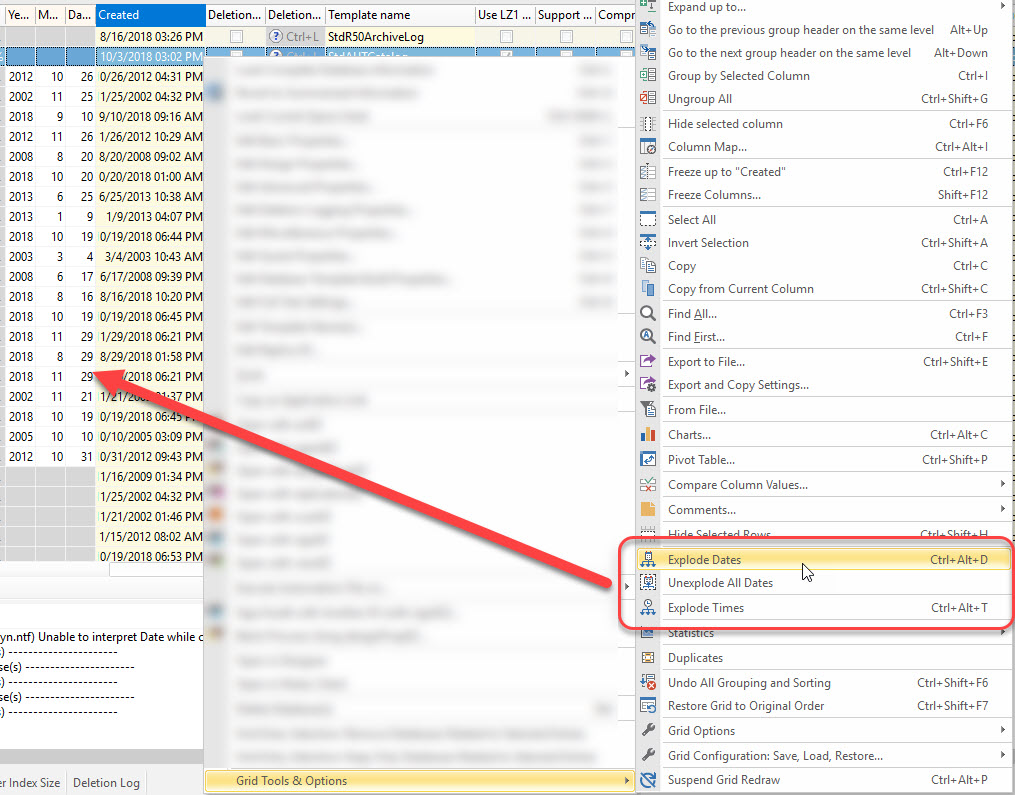
What if your analysis is based on the month AND hour of your entries? You no longer need to spend time changing the cell format of your date/time column – click on one of the ‘Explode’ buttons to separate the values of a date/time column into their date or time components: hours, minutes, seconds and year, month, day. A new column will be added for each one.
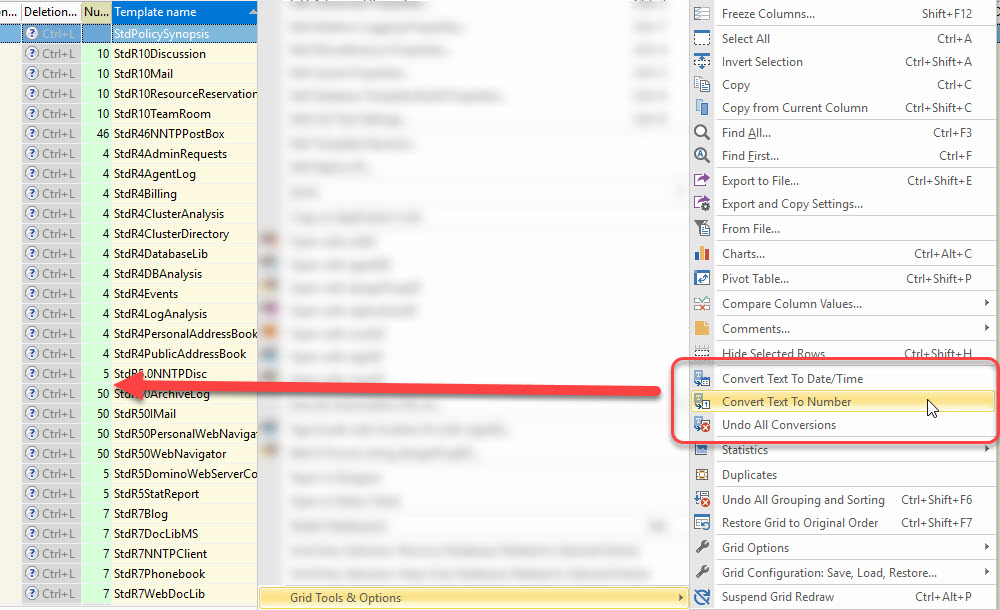
NEW - Convert a text value to a number or a date
If you’re tasked on performing a quantitative analysis but your data is in a text format, click an ‘Convert text values to…’ option to convert the column values to a decimal number format or to a date format. The resulting values will be shown in a new column which can then be used in your analysis.
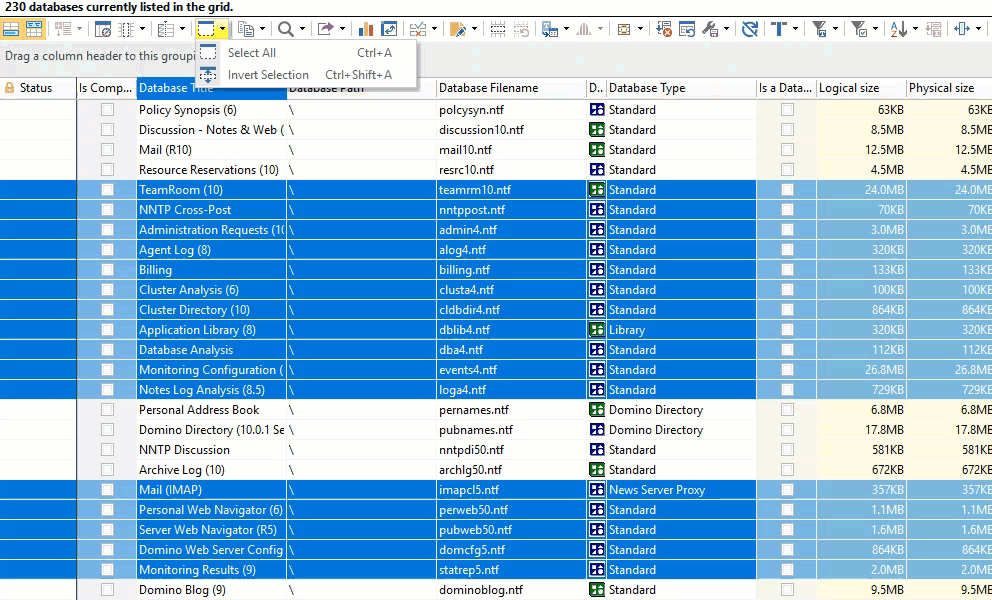
NEW - Invert your entry selection
You can now reverse your row selection in the grid by clicking ‘Invert Selection’ submenu item of ‘Select All’. Similarly, the ‘Invert Results’ checkbox option has been added in ‘Select using Regular expression’ to invert the results of the regular expression you use.
NEW - Choose to hide categorization/grouping counts
If you want to export the categorizations you made in the grid as a list of values without the count information, you can now clean up the final look by hiding the group counts that appear next to groupings’ value. Simply turn off ‘Show Counter’, a submenu item of ‘Toggle the displaying of categories…’.
NEW - Select grid rows using a CSV or Excel file
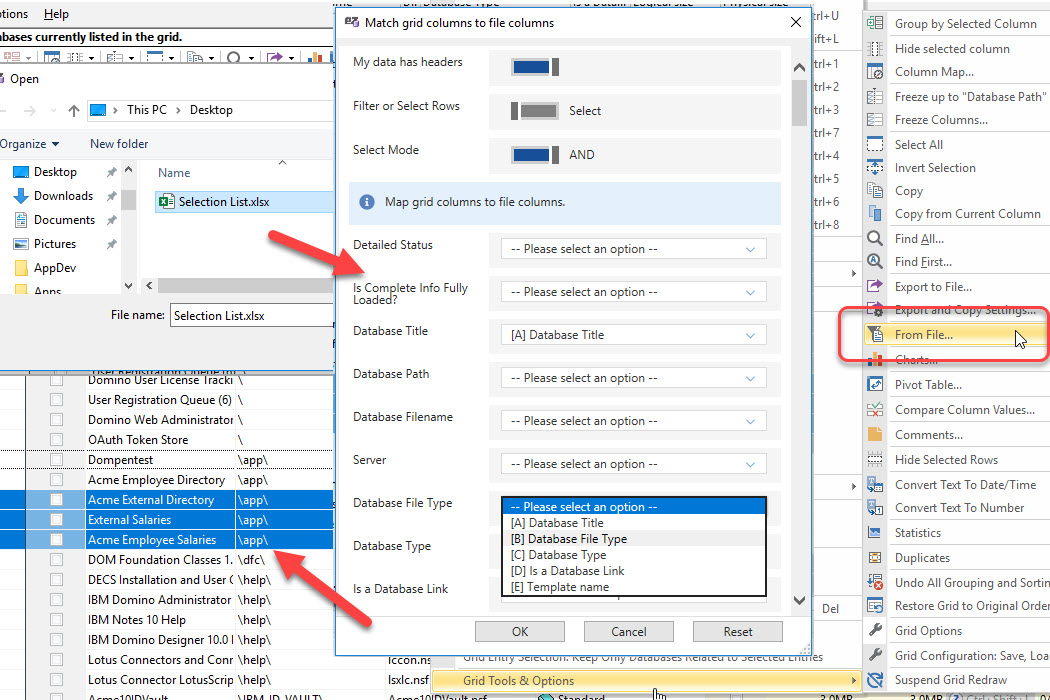
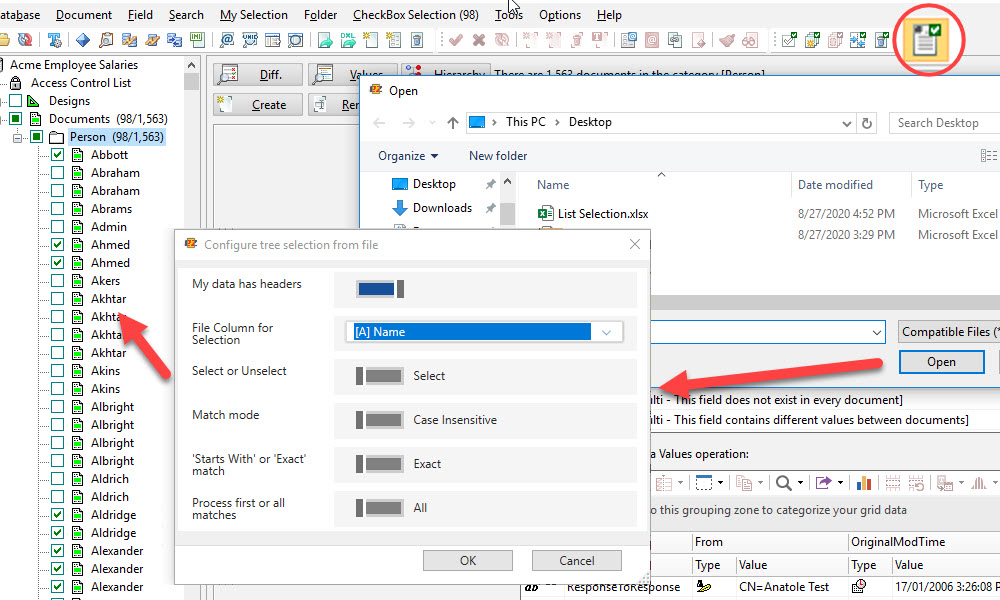
Need to work with grid entries that match a specific list of values that is beyond the capability of selecting with a regular expression? Click on ‘Select using values in a column from a CSV or an Excel file’ to match values within a selected column in the grid. You also have this feature available in scanEZ to make tree selections.
NEW - Manage fields or columns with multi-values
Instead of limiting yourself to working with fields that have multiple values in the ‘Field Value’ section below the grid, you can now work with them directly in the grid. Explode cells with multiple values for further analysis, or group by that column to automatically explode them. You can also sort on the element count rather than the value to keep entries with the largest multi-value at the top.
NEW - Get a document view by hierarchy (scanEZ only)
You now can see selected documents and their response documents in one pane by clicking on the ‘Hierarchy’ button. You’ll have a clearer understanding of the hierarchical relationship between parent and child documents for several documents at once. You can even switch between a Flat or Hierarchical view. This is available in scanEZ only.

NEW - Get the inverse of your filter by regex results
When using ‘Filter by Regular Expression’ use the newly added ‘Invert Results’ checkbox option to filter your data by the inverse of the regex result. This is just like the option used in ‘Select using Regular expression’.
NEW - Create permanent or temporary comments in the grid
Using the JavaScript function of grid comments is a faster way to transform grid data because it’s done in the grid directly without having to open documents. You now have the option to make your comments permanent or temporary. You can even share permanent comments with your team since they are stored in a Notes Database. Computed comments/annotations are available in aclEZ, agentEZ, databaseEZ, and replicationEZ and in the special Values grid in scanEZ only.
NEW - Display date/time values in broader terms
What if you want a more comprehensive grid view of your databases’ creation dates? We’ve added a date/time formatting option to display dates as a broader range. For example, date/time values can be shown as “In the last hour”, “1 month ago”, “1 year ago”. You’ll see this option in the formatting parameters applied at the cell or grouping level.
Choose from more options click-searching a grid
We’ve added more options in the quick-search dialog. A quick search in the grid consists of clicking anywhere on the grid and typing. You now have more ways to search, whether it’s the whole grid or within a specific column.
What's new in automation
- Variable list management:
Test if list exists
Get list size
Set list from grid selection
Set list from grid Columns (unique values)
Filter values in grid from list
Get value from list
Filter from List
- User input fields and formats
- Progress and Message Box for clarifying run status
- CalcVar using JavaScript
- Parameters to configure the grid (use of saved grid config no longer needed)
- On Error management when automation errors occur
- Send mail capability
- Else function
- Various newly added grid actions including comparator, pivot table & chart, etc.
- Copy/move document to databases (scanEZ)
What's new in all EZ Suite products
NEW – Launch any EZ tool from a URL
Just like for scanEZ, you can now execute an automation script by launching any EZ Suite tool directly from a URL. Since we’ve added even more automation capabilities, you can take advantage of this to speed up your recurrent tasks.
NEW – Use new options in Formula Editor
We’ve added ‘@ModifiedInThisFile’ and ‘@AddedToThisFile’ list options in the Formula Editor.
FIX – Keep your session ID launching one tool from another
If you switch between various IDs when working with your EZ Suite tools, you’ll be glad to know we fixed an issue so that you keep your session ID when launching a different EZ Suite tool from another tool. For example, if you launch databaseEZ from scanEZ, your databaseEZ session will use the current scanEZ session ID.
FIX – Manage ‘Alternate Names’ in ACLs
You can now conduct ‘Check NAB Presence’ operations in aclEZ taking into consideration ‘Alternate Names’. You’ll also be able to manage ‘Alternate Names’ in the Address Book dialog.
FIX – Create new Manager ACL entries with correct defaults
We fixed it so that when you create a new Manager entry in the Access Control List (ACL) of scanEZ or aclEZ, ‘Delete documents’ is set by default just like in Notes.
FIX – Register, update tools, get notifications from tools (SSL-compliance)
Product-to-Ytria communication protocols are now SSL-compliant. All communications involving license management, updates and notifications from the products to Ytria meet SSL requirements. For example, proxies that previously blocked updates because of SSL requirements are now no longer an issue.
Product specific additions and improvements
Check out what we’ve added and fixed in your favourite individual EZ Suite tool.
What's new in scanEZ
NEW - Retrieve contents of a view faster
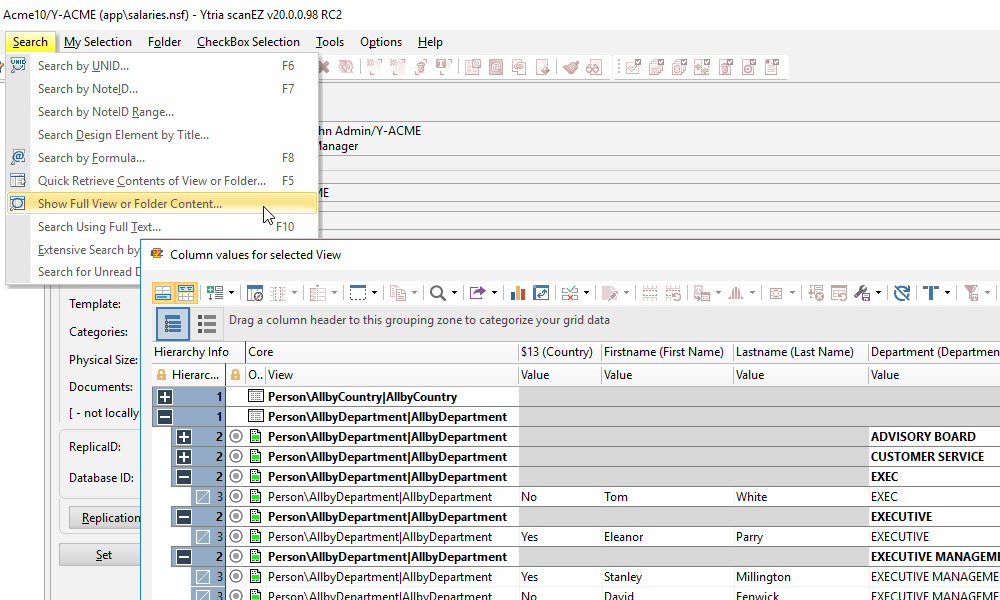
The newly added ‘Show Full View or Folder Content…’ feature lets you get your view content faster than with the Diff/Values path because it’s based on the view index. And you get to see the full content of multiple views and folders in a Hierarchical view. You’ll find this feature in the submenu of ‘Search’ in the toolbar.
NEW - See a true hierarchical view of all your documents
When working with many documents and their responses in scanEZ, you can now see a global picture of their hierarchical relationships. Once the Hierarchy grid is loaded, you can use various grid tools to analyze your data. You can also switch between a flat and hierarchical view depending on your needs. Simply click on the ‘Hierarchy’ button to show the complete hierarchy of all selected documents (beside the Diff and Values buttons).
NEW - Make a checkbox selection from a CSV or Excel file
This new option ‘Select using a CSV or Excel file…’ from the ‘Checkbox Selection’ and in the toolbar lets you select entries in the tree view matching values stored in a CSV or Excel file. This comes in handy when regex rules are just not enough. If your file has multiple columns, you can choose which column to use for your selection.
NEW - Work with multi-value cells in the Diff/Values grids
Part of the grid enhancements includes working with multiple values directly in the grid. Documents in the Diff and Values grids that have multi-value attributes can now be manipulated for further analysis. Try grouping by that attribute column and you’ll see all the multi-values automatically explode within it, or sort them on the element count rather than the value to keep entries with the largest multi-value at the top
NEW - Evaluate formulas on multiple documents
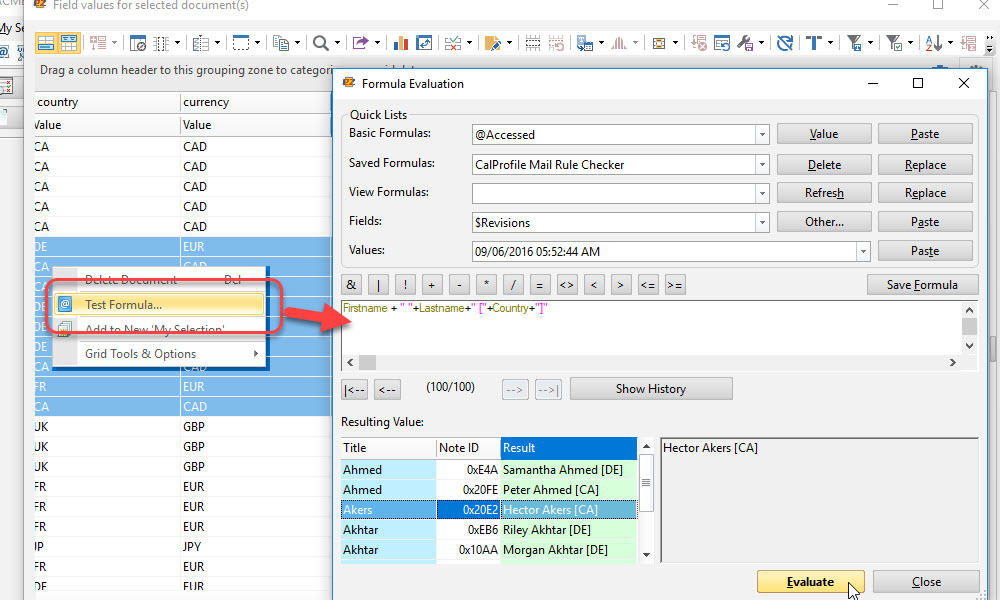
The Diff and Values grids are great for analyzing multiple documents, but now can also ‘Test Formula’ for multiple documents. You no longer must test it out one document at a time from the tree view. Access this feature from the right-click menu, test a formula, and you’ll see the results for the documents you selected in the ‘Resulting Value’ space.
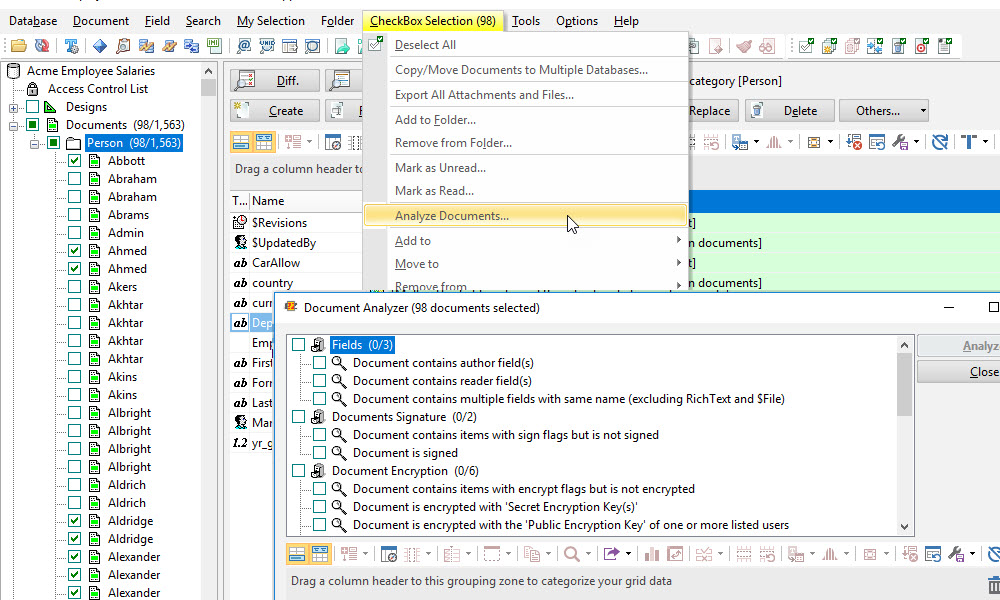
NEW - Execute 'Document Analyzer' on selected documents
You can now run ‘Document Analyzer’ on selected documents of a tree node (from Documents submenu or the right-click menu) or on a checkbox selection (from CheckBox Selection menu) to find relevant response documents whose parents are ‘phantoms’ instead of processing every document in the database.
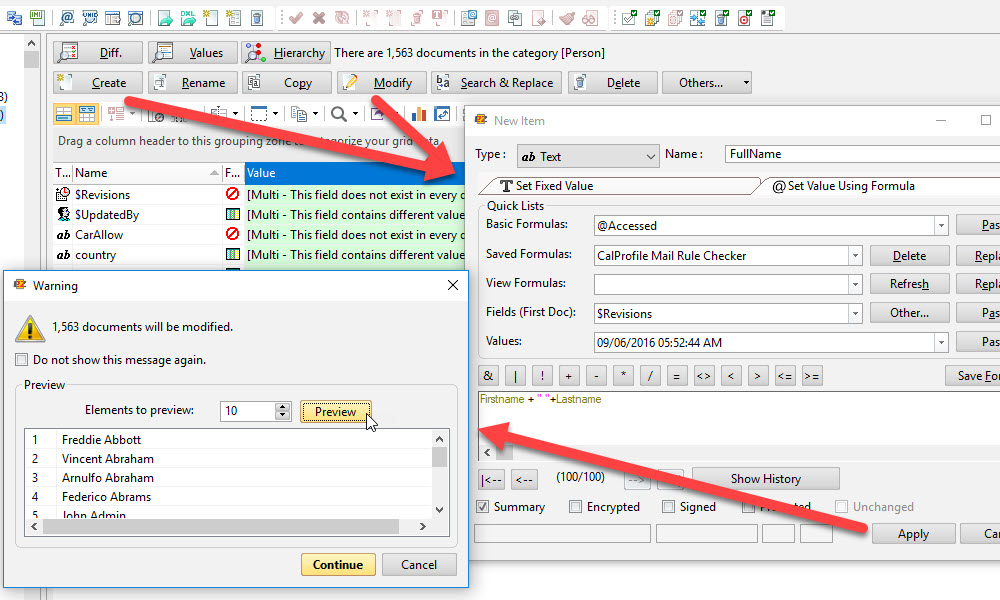
NEW - Confirm and preview Mass Data Modifications
Mass Data Modifications applied on a category of documents or a My Selection virtual folder in focus in the Selection Tree were applied as soon as you pressed the ‘Apply’ button. Now you will see a preview of your changes and a confirmation dialog stating how many documents will be modified before your changes do get applied.
NEW – Get the inverse of your checkbox selection regex results
When using ‘Select using Regular Expression’ from the Checkbox Selection menu, the newly added ‘Invert Results’ checkbox option lets you filter your data by the inverse of the regex result. This is just like the option used in ‘Filter by Regular Expression’.
NEW – Manage multi-value field of a single document
Just like in the Diff and Values grids that work with several documents, the grid for a single document has been enhanced to handle fields with multiple values. Once ‘exploded’ multi-values can sorted, filtered or analyzed on an individual basis. Note that the ‘Field Value’ section will still show all the components of the multi-value field when one component is selected in the grid.
NEW – Search and replace Rich Text fields for multiple documents
Searching documents based on the content of a Rich Text field is no longer cumbersome. You’re now able to find a text string AND replace it within Rich Text fields for several documents.
NEW – Hard delete conflict documents
Previously using the Conflict Solver resulted in soft deleting the conflict documents which may have turned into a source of various issues. Solving conflicts in scanEZ now results in a hard delete.
NEW – View responses counts in the Conflict Solver and in the Comparator
Whether you’re comparing documents in the Comparator or seeing them side by side in the Conflict Solver, you now have the option to display document response counts in the grid – click on the ‘Response Count’ button at the bottom.
FIX – Use a default column title when adding a column
Previously, when adding a column in Diff/Values grids, the column title was empty which prompted errors if one quickly clicked through to simply add a column. The column title is now populated by the value ‘Column’ to speed things along.
NEW – Add several members to a given group (ACL) at once
Managing ACL group memberships is now even easier since you can select and add multiple users to an ACL group at once. This feature is also present in aclEZ.
FIX – Restore Soft Deletions faster
See Soft Deleted documents restored significantly faster. We’ve improved the process of handle large scales of restoration.
FIX – Search by Notes Class based on ‘Documents [Data]’ & Soft Deletions
Limited by how Notes works, we’ve added a clarification in the ‘Extensive Search by Notes Class’ dialog in scanEZ to indicate that if you select ‘Documents [Data]’, the search will also include Soft Deletions.
FIX – See list type fields as tree titles
Previously there was an issue if you chose to display tree titles based on list type fields. List types are now properly handled.
FIX – Copy/move folder with extensive hierarchy
We fixed an issue causing a crash when copying or moving a folder with a hierarchy structure bigger than 64 bytes.
FIX – Retain Formula History for multiple instances of scanEZ
Formula History is now handled correctly when using multiple instances of scanEZ. Previously, there were cases where the last formulas used were not always retained in the Formula History when having several active scanEZ sessions.
What's new in consoleEZ
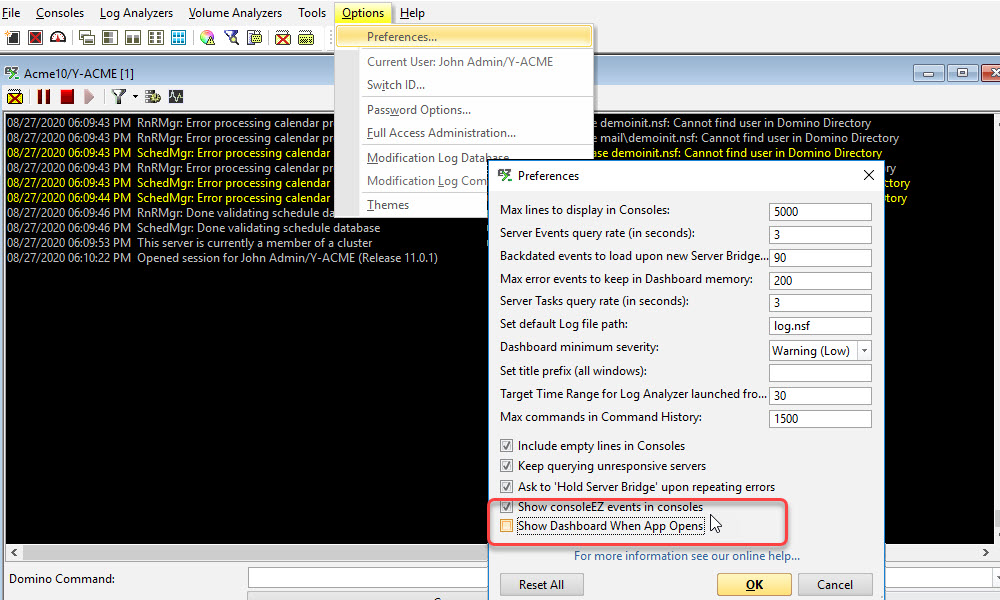
NEW - See the consoleEZ dashboard upon launch, or not
Some of you let us know that the dashboard is not the first thing you want to see when running consoleEZ. We heard you and made the dashboard display upon launch a preference.
FIX – Filter your server tasks without issues
We’ve optimized the Server Task grid’s loading process to avoid pc memory usage issues. Previously, hidden server tasks were taking up too much machine memory even when using filters in the Server Tasks grid because the grid was constantly refreshing itself every 3 seconds.
FIX – Manage the dashboard size after minimizing
When you minimize the dashboard to get it out of the way and then click on the ‘Dashboard’ button to get it back, it will now display with a manageable size. Previously, the dashboard would reappear as aSet tiny window.
What's new in agentEZ
FIX – Set an agent to run within the hour or later
Previously, you were only able to set agents to run after an hour. Scheduling anything before that was not possible until now – we fixed the technical issues surrounding this.
FIX – Edit many agents, save once
If you’re updating several agents at once, you’ll now be prompted only once to save your changes. Previously, the ‘Save modification’ dialog box would pop-up for every agent.
What's new in aclEZ
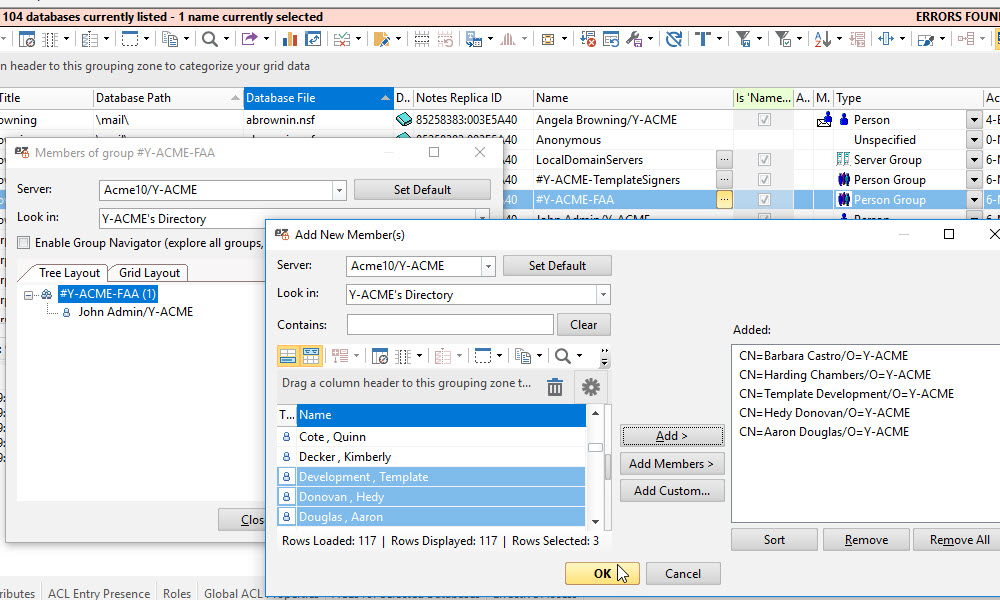
NEW - Add several members to a given group (ACL) at once
Managing ACL group memberships is now even easier since you can select and add multiple users to an ACL group at once. This feature is also present in scanEZ.
NEW – Add group members in the Group Explorer grid
When managing ACL group members in Group Explorer, you can now add several members at once in the grid layout. Previously, adding multiple members was only possible in the tree layout.
FIX – Check member presence of Mail-in Database entries
Mail-in Database entries are now properly handled when running a ‘Check Presence’. Previously there were issues with this type of entry.
FIX – Manage ‘Alternate Names’ in ACLs
You can now conduct ‘Check NAB Presence’ operations in aclEZ taking into consideration ‘Alternate Names’. You’ll also be able to manage ‘Alternate Names’ in the Address Book dialog.
FIX – Add new member to an empty group
Previously, adding a member to a group without members resulted in adding an extra empty entry. This has been fixed.
FIX – Remove members with canonical names in Group Explorer
We fixed an issue with removing ACL group member entries that had canonical names in the Group Explorer grid.
What's new in replicationEZ

NEW - Compare unread document counts between replicas
When doing a comparison between mail database replicas to diagnose replication issues, if you want to make sure that your replicas have the same number of unread documents, you can now see the unread document count information in the grid. Simply click on ‘Load Unread Counter’ option in the right-click menu to fetch display the numbers in the ‘Unread Counter’ panel at the bottom.
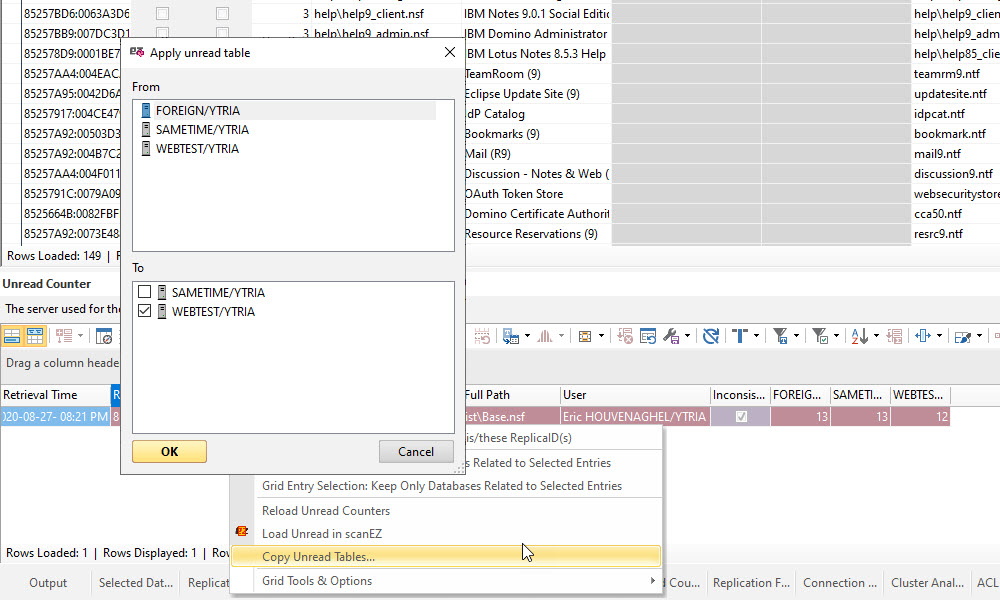
NEW - Copy an Unread Table to other replicas
It’s easy to make sure that unread mail documents are consistent across replicas. After you’ve compared unread document counts for your replicas, you can solve any discrepancies by copying an Unread Table from one replica to all the others before tackling the repair of your replication issues.
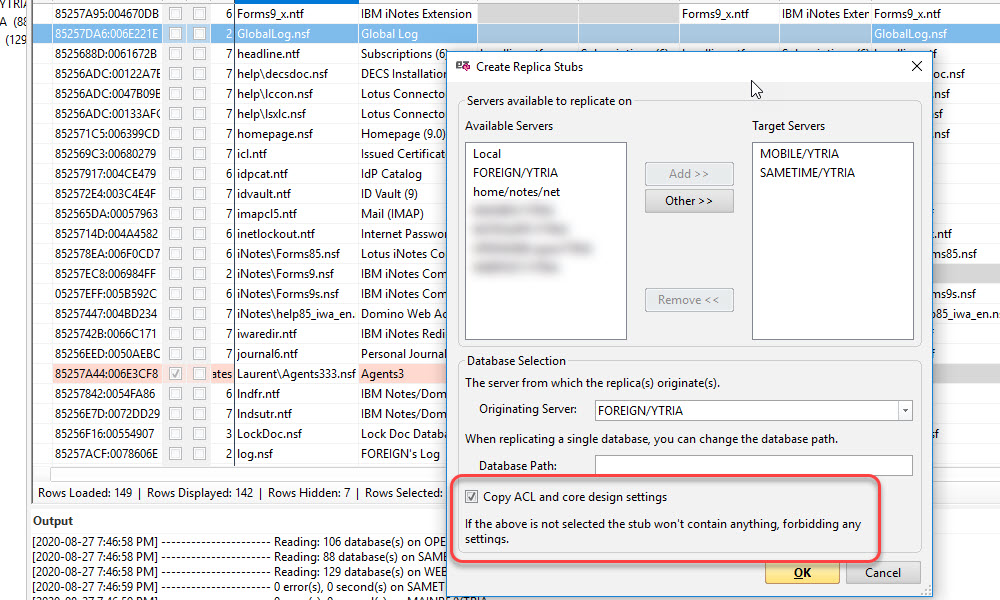
NEW - Create replicas with the same ACL core design settings
When you create a replica in replicationEZ, you can now include the same ACL core design settings for your replica stub. This will allow you to work on it right away. This option is checked by default.
NEW – Manage ‘Out Of Service’ and ‘Marked for Deletion’ cluster-related properties
We’ve added replication properties ‘Out Of Service’ and ‘Marked for Deletion’ in the ‘Selected Databases’ panel. Select databases and click on ‘Edit Database Replication Properties’ from the right-click menu to edit these cluster-related properties. These are also available in databaseEZ.
NEW – Use ‘Replicate’ console command options (Domino 10)
With their introduction in Domino 10, you now have 2 parameters under ‘Flags to use’ for the ‘Replicate’ console command: ‘-F’ to clean replication without clearing replication history and ‘-L’ to log changes only but don’t do them.
NEW – Use the ‘Repair’ console command (Domino 10)
We’ve added ‘Repair’ to the list of console commands in replicationEZ. This Domino 10 command comes with 3 parameters under ‘Flags to use’. They include ‘file’ which issues a request to the repair service to repair a missing database, ‘disable’ which excludes a database from missing files scans, for example, a database that is being rest, and ‘enable’ which includes a database in missing file scans again.
NEW – Execute automation files with many tool instances or just one
Previously you were only able to run automation files based on a single instance of a tool (ex. scanEZ), whereas now you have the choice of using several instances (in parallel) just like in databaseEZ. You will be prompted to choose after selecting the automation script file that you wish to run.
NEW – Select replica reference to see ‘Database full path column’ in the Conflict Counter
When looking at the flattened information about the replicas’ databases in the Conflict Counter of replicationEZ, you can now choose the server for which you want to see the ‘Database full path column’ of the selected databases specific to that replica.
FIX – Cancel the clearing of the Replication History
You can now change your mind having started to ‘Clear Replication History’ process. Simply click on the ‘Cancel’ button to stop the history purge.
What's new in databaseEZ
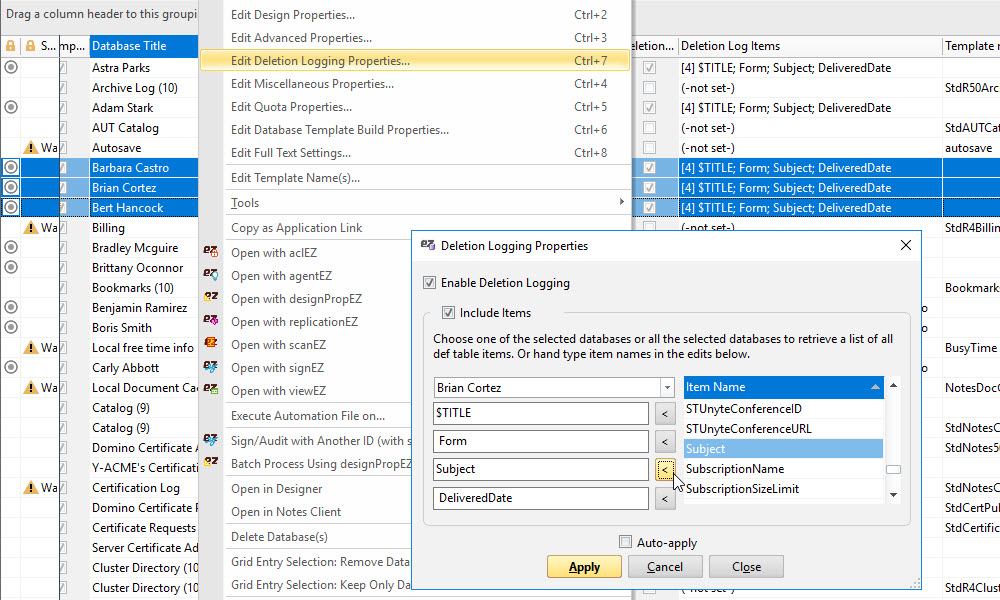
NEW - Enable Deletion Logging and set Deletion Logging properties (Domino 10)
The management of deletion logging was introduced in Domino 10 and featured the enabling deletion logging and the defining of fields (Deletion Log Items) used to manage the deleted databases. You’ll see these in the databaseEZ grid as ‘Deletion Log Status’ and ‘Deletion Log Items’ columns. Both attributes can be edited in by clicking on ‘Edit Deletion Logging Properties’. Here is a handy article that explains deletion logging by Daniel Nashed , and you can find instructions on how to obtain his Domino 10 Deletion Log Annotation and Backup Application here. [http://blog.nashcom.de/nashcomblog.nsf/dx/nshdellog-domino-deletion-log-annoatation-and-backup.htm?opendocument&comments].
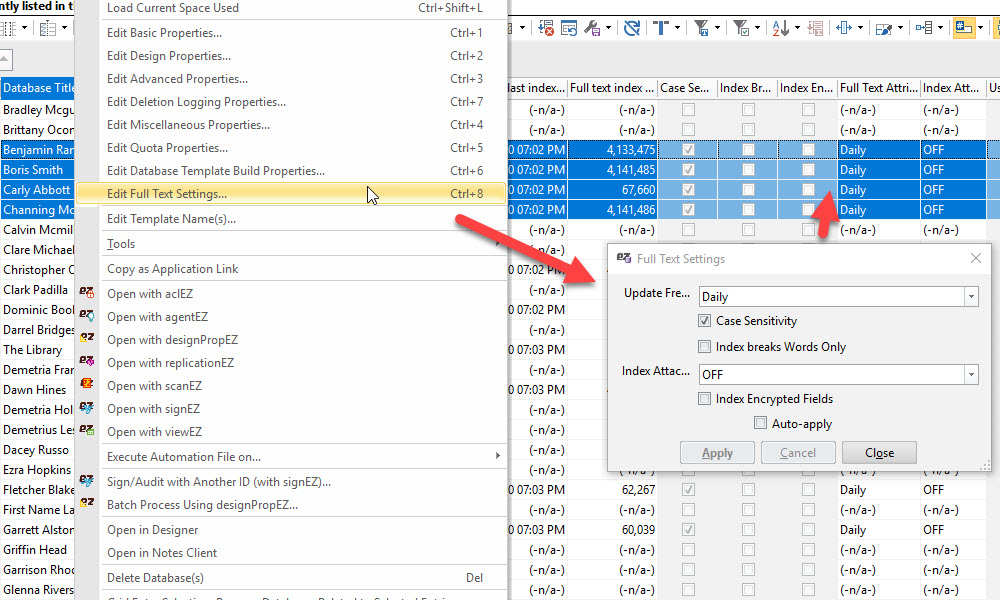
NEW - Update ''Full Text Settings' for many databases
Why limit yourself to changing Full Text Settings one at a time natively in Notes? You can now mass modify these settings for multiple database at once. Simply click on ‘Edit Full Text Settings’.
NEW – Manage ‘Out Of Service’ and ‘Marked for Deletion’ cluster-related properties
We’ve added replication properties ‘Out Of Service’ and ‘Marked for Deletion’ in the ‘Selected Databases’ panel. Select databases and click on ‘Edit Database Replication Properties’ from the right-click menu to edit these cluster-related properties. These are also available in replicationEZ.
NEW – Use ‘LargeSummary’ option for the ‘compact’ console command (Domino 10)
We’ve added an option in databaseEZ for the ‘compact’ console command that was introduced in Domino 10. You can now choose the ‘LargeSummary’ option (Replication-style: Restart server on renaming failure) from among the ‘Flags to Use’ in the Command Line Details section.
FIX – Set ‘User Activity flag’ faster
If you’re working with Database User Activity, you’ll notice that the processing time for setting the ‘User Activity flag’ to ‘ON’ on multiple selections has significantly improved from the previous version.
What's new in actionBarEZ
NEW – Show new mobile action properties related to Domino 10
We’ve added options for displaying new properties related to Domino 10: ‘Include actions in mobile actions button’, ‘Include action in mobile swipe left’, ‘Include action in mobile swipe right’.
NEW – Hide designs in the grid AND in the selection tree
Now when you’re done cleaning up the actions grid by hiding designs, when you revert back to the tree view, you will be asked to choose if you want to unselect the designs in the selection tree that you hid in the grid. You’ll also notice that we fixed the lost grid focus issue that was present when hiding designs.
What's new in viewEZ
NEW – Hide designs in the view & column grids AND in the selection tree
Just like in actionBarEZ, after hiding designs in any of the grids, when you revert back to the tree view, you will be asked to choose if you want to unselect the newly hidden designs in the selection tree. You’ll notice that we also fixed the lost grid focus issue that was present when hiding designs.
FIX – Purge view indexes of hidden design views
We’ve improved the management of view indexes by enabling the discarding of indexes for hidden design views. Previously, the button ‘Purge index for selected views’ was disabled.

EZ Suite v20 - pre release
Test drive the pre-release version
EZ Suite 20!
EZ Suite 20 is here!
Just wait until you see what we have for you – a revamped grid, heaps of automation and…
So. Many. Features.
FEATURE HIGHLIGHTS
For all the tools, you’ll see:
• A new grid infrastructure with cool ways to organize and analyze your data.
• New automation capabilities to create even more automated tasks
• The ability to keep your current session ID when launching a different EZ Suite tool from another tool (example: launching databaseEZ from scanEZ).
• SSL-compliance for licensing, update and notification communications from the products to Ytria.
In scanEZ, you’ll be able to:
• Search the full content of multiple views and folders in a Hierarchical view, like in Diff-Values.
• Make tree and grid selections from a CSV or Excel file.
• Test formulas in the Diff/Value grid to evaluate a formula on multiple documents.
• Get a preview and a confirmation dialog when editing in Diff/Values to avoid mistakes.
• Use ‘Document Analyzer’ on a selected tree node or on a checkbox selection.
• Use search and replace on Rich Text fields in Diff/Values grids.
• Restore Soft Deletions way faster.
If you use the other EZ Suite tools, you’ll be able to:
• Choose to see the consoleEZ dashboard upon launching.
• Add multiple members to a group at one time in aclEZ, including in the Group Explorer grid.
• Take into account Alternate Names during the ‘Check Presence’ operation in aclEZ.
• Compare unread document counts between replicas in replicationEZ, and copy an Unread Table from one replica to other replicas.
• Copy ACL core design settings by default when creating a new replica with replicationEZ.
• Edit cluster-related properties ‘Out Of Service’ and ‘Marked for Deletion’ in replicationEZ and in databaseEZ.
• Edit ‘Deletion status’ and ‘Deletion Log Items’ properties (introduced in Domino 10) in databaseEZ.
A new major release of Ytria’s EZ Suite looms on the horizon and we’re offering you, as one of our esteemed users, an exclusive opportunity to test drive the new pre-release version before we take this news public. All we ask in return is that you give us your feedback, both positive and negative. Let us know your first impressions at support@ytria.com.
Pre-release license key | Valid until August 31st, 2020
Copy and paste the license code below into the product window when prompted.
YQN7R9-DZUN84-PMDADZ-BYP8D2-15NSPD
Installing the EZ Suite 20 pre-release version in parallel to your current version:
To ensure proper installation of your Ytria software, unzip (extract) the file YtriaEZSuite20RC.nsf to your local Notes\Data directory, open the database in your Notes client, click the “Install” button, and follow the instructions to complete your installation.
If you are already using Ytria tools, this installation file will perform a parallel installation of the new pre-release version, providing you with a separate toolbar (with icons indicating your pre-release version software) and EZ Suite 20 pre-release database.
Parallel installation will still allow you to benefit from Ytria Update and product integration. However, the following features are not available at this time:
• scanEZ Extension database
• scanEZ web launch extension
• signEZ server Batch database
• Ytria Designer widget
Need some help? Contact us at support@ytria.com.

EZ Suite v16.5.5 - Minor update
Version 16.5.5 is available now!
This latest EZ Suite release includes some small improvements and a host of minor fixes. Keep things running smoothly with this new update. Here’s a summary of what has changed.
And stay tuned for a major announcement as we’re putting the final touches on version 20!
EZ Suite v16.5.5 – minor update
EZ Suite – All Products
- Fixed a bug that caused the command line Notes.ini to be ignored in some products.
- Fixed a bug that prevented use of Notes.ini in command line even if automation (-x) is specified.
- Improved the process used for ACL presence check (to accommodate the above fixes in aclEZ and scanEZ)
- Fixed a bug that was causing a conflict between EZ Suite product panels and Windows taskbar.
- Fixed a bug that caused a copied grid to lose its correct ordering.
- Fixed – The ‘Restore all hidden entries’ icon was not being greyed out when no hidden entries existed.
- Fixed a bug in all grids that, when exporting to Excel, prevented totals from being exported from the values grid.
databaseEZ
- Fixed a bug that sometimes displayed dates incorrectly.
- Fixed a bug that caused excessive database reloads when User Activity flag is set to ‘On’.
- Fixed a bug when loading a large number of databases that could cause a crash due to infinite recursion.
aclEZ
- Fixed a bug when checking alternate names extended NAB vs. check presence. This could occur when using products in languages with special characters not recognized by the English alphabet (Japanese, Chinese, etc…)
agentEZ
- Fixed – The ‘Edited’ status icon would not appear beside a scheduled agent even after restoring the saved agent properties.
- Fixed a bug that caused partial load to take a very long time to process, during which time no user action could be taken.
consoleEZ
- Fixed – The Server Tasks were not properly removing hidden rows when refreshed, causing the grid to be overburdened.
scanEZ
- Fixed crash when using ‘Export All Attachments…’ with ‘Copy Document links’.
- Fixed crash when using ‘Export All Attachments…’ with ‘Copy/Move Documents to Multiple Databases’.
- Fixed a bug when using Restore of Soft Deletions from within the Deletions Stub Explorer (as opposed to from the selection tree) that caused extremely long process times.
- Fixed a bug when checking alternate names for extended NAB vs check presence. This could occur when using products in languages with special characters not recognized by the English alphabet (Japanese, Chinese, etc…)
- Fixed – The Summary Data Size column was not properly populated in the Document Analyzer when using the ‘Sum of Summarized Item Data’.
replicationEZ
- Improved the ‘Create new replica’ process. Now includes additional default design elements.
- Fixed – When clearing the replication history, clicking on Cancel failed to stop the process.
Automation
- Fixed the ModifyItem tag which was preventing the proper handling of user input dialogs.
- Improved – added the option to execute an automation file on another EZ Suite product using one instance for each database.
EZ Suite
See just how much faster and more fluid your HCL Notes and Domino administration and development can be.
EZ Suites (older) Downloads
EZ Suite Complete 16.5
All of Ytria’s software tools for HCL Notes and Domino. It includes scanEZ, aclEZ, agentEZ, databaseEZ, consoleEZ, replicationEZ, signEZ, viewEZ, actionBarEZ, designPropEZ and formEZ. The installer will let you choose which tools you would like installed.
Size
146.2 MB
Version
16.5.5 – Fix release – 2020-07-11
EZ Suite Admin 16.5
The EZ Suite Admin comprises a comprehensive set of powerful software tools for HCL Domino (formerly IBM Lotus Domino) administrators. It includes scanEZ, aclEZ, agentEZ, databaseEZ, consoleEZ, replicationEZ and signEZ.
Size
99.2 MB
Version
16.5.3
EZ Suite Dev Plus 16.5
The EZ Suite Dev Plus comprises agent and console management software tools in addition to the standard set for IBM Notes application developers. It includes scanEZ, consoleEZ, agentEZ, signEZ, viewEZ, actionBarEZ, designPropEZ and formEZ.
Size
108.9 MB
Version
16.5.3
EZ Suite Dev 16.5
The EZ Suite Dev comprises a full set of essential software tools for IBM Notes (formerly IBM Lotus Notes) application developers. It includes scanEZ, signEZ, viewEZ, actionBarEZ, designPropEZ and formEZ.
Size
84.1 MB
Version
16.5.3
If you have questions about getting EZ Suite 16.5 software to work, see the links below:
Note: Be sure to provide complete, accurate information during registration and use a valid email address*; otherwise we cannot deliver important product information to you. You only need to register once to use all our tools.
* By confirming your email address and downloading this file, you are signing up to get periodic follow-up emails from us. Any emails we send you will contain unsubscribe information, and you may opt-out of future emails at any time.

Individual products (older) Downloads
scanEZ
Investigate, analyze and fix database problems right away.
Size : 19.8MB
Version: 16.5.3
aclEZ
Manage and ensure consistent, and secure Access Control Lists (ACLs) on a server.
Size: 20.4MB
Version: 16.5.3
agentEZ
Easily manage and control all agents on a server.
Size: 21.4MB
Version: 16.5.3
databaseEZ
Manage global database properties across an IBM Domino server.
Size: 20.5MB
Version: 16.5.3
consoleEZ
Manage all consoles for multiple servers in one dashboard.
Size: 20.0MB
Version: 16.5.3
signEZ
Enable complete control over design element signatures and delegation.
Size: 20.2MB
Version: 16.5.3
signEZ Template
Database template to update the signEZ database design.
Size: 20.2MB
Version: 16.5.3
replicationEZ
Find, display and analyze all replicas across HCL Domino servers.
Size : 23.7MB
Version: 16.5.3
viewEZ
Manage view columns visually and quickly change view properties all at once.
Size : 20.8MB
Version: 16.5.3
actionBarEZ
Manage actions visually and quickly change action bar properties all at once.
Size : 20.1MB
Version: 16.5.3
designPropEZ
Edit design properties for multiple databases.
Size : 23.7MB
Version: 16.5.3
If you have questions about getting your software to work, see the links below:
Note: Be sure to provide complete, accurate information during registration and use a valid email address*; otherwise we cannot deliver important product information to you. You only need to register once to use all our tools.
* By confirming your email address and downloading this file, you are signing up to get periodic follow-up emails from us. Any emails we send you will contain unsubscribe information, and you may opt-out of future emails at any time.

Other Downloads
scanEZ Extension database
Adds additional features to scanEZ including: open multiple documents from any HCL Notes view, plus open documents from a list of web URLs.
[scanEZ installation required] Learn more
signEZ Server Batch Database
This optional Server Batch database contains extended functionality and allows you to include all databases on a server—including those in sub-directories.
[signEZ installation required] Learn more
Ytria Designer Widget
This widget enables tight integration with Ytria tools and the Eclipse-based IBM Domino Designer. To install, simply click and drag the file Ytria_Designer_widget.xml to the right into the IBM Notes client My Widgets panel.
[IBM Domino Designer 8.5+ required] Learn more
Ytria Launcher Widget
An Eclipse-based launcher for Ytria tools. To install, simply click and drag the file Ytria_Launcher_widget.xml to the right into the My Widgets panel in IBM Notes.
[IBM Domino Designer 8.5+ required] Learn more
Download YtriaUpdate Utility (for 32-bit)
This is the application that checks for updates of your Ytria products and downloads them. This is the same application behind the ‘Check for Updates’ option included by default with your installation of EZ products. It is offered here as a separate download for those who need it.
Download YtriaUpdate Utility (for 64-bit)
This is the application that checks for updates of your Ytria products and downloads them. This is the same application behind the ‘Check for Updates’ option included by default with your installation of EZ products. It is offered here as a separate download for those who need it.

EZ Suite v16.5
EZ Suite 16.5 sees the tools you love getting smarter!
Hot on the heels of the revolutionary EZ Suite 16 release, which saw the light of day earlier this year, comes an extensive update. Version 16.5 greatly increases the scope of what can be done through EZ Suite’s powerful automation capabilities and brings in many new performance enhancing functions and preferences.
Expand the scope of your EZ Suite tasks with these ready-to-use scripts.
As a quick preview of the newly expanded automation script capabilities, we have included some working scripts that you can put to use immediately. For your convenience, comments have been included as explanations of key functionalities. Feel free to change the values to meet your needs. Be sure to keep the Ytria Automation tag specifics in mind to ensure that your scripts function properly.
Script Level: Easy
Find and report all Mail Owner access levels and various connected properties and settings regarding their permissions across multiple databases on multiple servers.
This script can be used by itself in aclEZ to process a currently opened server, or with the new function found in replicationEZ that lets you launch a script on a selection of servers directly from within the interface. Learn more about this function here.
This script will parse the entire mail directory folder on a given server to find all mail owners set side by side with a selection of key properties and settings that govern access and permissions to their respective mail databases. A report will be generated and exported into an Excel file. Each access level will be reported on its own sheet within the file.
<ytriaAutomation Application="aclEZ" ApplicationVersion="16.5">
	<!--This will set the script's behavior when encountering an error. In this case, it will continue.-->
	<onerror continue="true" ></onerror>

	<!--First it is specified that the NAB presence is NOT to be checked and groups are NOT to be "expanded."-->
	<Option Type="PresenceInNAB" value="false"></Option>
	<Option Type="GroupExpander" value="ExpandNone"></Option>
	<TreeSelectionLive Value="True"></TreeSelectionLive>
	<!--All databases on the current server will be deselected in the tree.-->
	<unselect target="tree" server="true"></unselect>

	<!--Then the mail directory folder for the current server will be selected.-->
	<select target="tree" folder="mail"></select>

	<!--The next part of the script defines the actions to be taken within the Audit grid. The grid layout will be set as stated below. A Suspend Grid Redraw function is added so the processing will be held off until all columns are set.-->
	<SuspendRedraw value="true"></SuspendRedraw>

	<!--All columns are removed from the main grid in order to prepare for the columns that will be added.-->
	<RemoveAllcolumns></RemoveAllcolumns>

	<!--The grid columns are moved to the first position in reverse order. The name of the columns are indicated.-->
	<Add ColumnID="DB6" Position="1"></Add><!-- Catalog Categories -->
	<Add ColumnID="DB4" Position="1"></Add><!-- Database Type -->
	<Add ColumnID="A9" Position="1"></Add><!-- Replicate or Copy Documents -->
	<Add ColumnID="A8" Position="1"></Add><!-- Write Public Documents -->
	<Add ColumnID="A7" Position="1"></Add><!-- Read Public Documents -->
	<Add ColumnID="A6" Position="1"></Add><!-- Create LS/Java Agents -->
	<Add ColumnID="A5" Position="1"></Add><!-- Create Shared Folder/Views -->
	<Add ColumnID="A4" Position="1"></Add><!-- Create Private Folders/Views -->
	<Add ColumnID="A3" Position="1"></Add><!-- Create Private Agents -->
	<Add ColumnID="A2" Position="1"></Add><!-- Delete Documents -->
	<Add ColumnID="A1" Position="1"></Add><!-- Create Documents -->
	<Add ColumnID="ACL4" Position="1"></Add><!-- Type -->
	<Add ColumnID="ACL1" Position="1"></Add><!-- Name -->
	<Add ColumnID="DB3" Position="1"></Add><!-- Database File -->
	<Add ColumnID="DB2" Position="1"></Add><!-- Database Path -->
	<Add ColumnID="STATUS" Position="1"></Add><!-- Status -->
	<!--Any residual grouping and sorting is cleared.-->
	<Reset></Reset>

	<!--A new grouping configuration is set.-->
	<GroupBy ColumnID="ACL5"></GroupBy><!-- Access -->
	<GroupBy ColumnID="DB7"></GroupBy><!-- Server -->

	<!--And a new sorting configuration is set.-->
	<Sort columnID="DB2" Ascending="true"></Sort><!-- Database Path -->
	<Sort columnID="DB4" Ascending="true"></Sort><!-- Database Type -->
	<Sort columnID="DB3" Ascending="true"></Sort><!-- Database Filename -->

	<!--A filter is added to isolate only mail owners,and then the grid processing is reactivated by turning off the Suspend Grid Redraw state.-->
	<Filter columnID="ACL3" Empty="true"></Filter><!-- Mail Owner -->
	<SuspendRedraw value="false"></SuspendRedraw>

	<!--The following If condition will test if the main grid has any rows loaded. If there are any rows loaded (meaning that Mail Owners were found) the nested child actions will be carried out.-->
	<if target="Grid" test="VisibleRowsCount" Mode="GreaterThan" Value="0">

		<!--The following If condition declares that if this script is not being used in a loop, the Excel file will be opened as soon as it is generated. This can't be done if a loop is being run since the Excel file still may need to be worked on with the results of another server (depending on what you need to do). Keep in mind that we can't set an If condition with a SetParam value, hence the use of this variable. The variable is initialised first, and it will be changed if not in a loop.-->
		<SetVar vOpenExcelFile="False"></SetVar>
		<if target="var" test="{%ListSize%}" mode="Equals" Value="">
			<SetVar vOpenExcelFile="true"></SetVar>
		</if>

		<!--Finally, any findings regarding the databases and their respective mail owners, and the rights those mail owners hold, will be exported. Note that this report will be generated in the same location that this file is being run from.-->
		<Export>
			<SetParam field="FilePath" value="{%CurFilePath%}report_aclEZ.xlsx"></SetParam>
			<SetParam field="SelectedRowsOnly" value="false"></SetParam>
			<SetParam field="ExportType" value="Excel"></SetParam>
			<SetParam field="Mode" value="AppendRows"></SetParam>
			<SetParam field="ExcelSheetName" value="Email Owner Access"></SetParam>
			<SetParam field="OpenFileOnceGenerated" value="{%vOpenExcelFile%}"></SetParam>
		</Export>
	</if>
</ytriaAutomation>
Script Level: Easy
Create a new item across all documents in a specific category—and across multiple databases.
This script can be used by itself in scanEZ to process a currently opened database, or with the new function found in databaseEZ that lets you launch a script on a selection of databases directly from within the interface. Learn more about this function here.
Small in size, yet very flexible in where you can take it, this script will simply select a category of documents and create a new item across all documents within that focused selection.
<ytriaAutomation Application="scanEZ" ApplicationVersion="16.5" Version="1.0">

<!--The following three lines let you specify the name and value of the item to be added, as well as the document category whose documents the item will be deployed to. Simply enter your desired values where indicated.-->
<SetVar ItemToAdd="Enter your value here"></SetVar>
<SetVar ItemValue="Enter your value here"></SetVar>
<SetVar DocumentCategory="Enter your value here"></SetVar>

<!--The following Expand/Focus sequence will allow the focus to be placed on the documents within the selection tree category specified.-->
<Expand target="tree" category="Documents" type="{%DocumentCategory%}"></Expand>
<focus target="tree" category="Documents" type="{%DocumentCategory%}"></focus>

<!--The CreateItem script block is where we define the item to be added. If the item already exists, it will not create a new one, instead it will skip the document and move on to the next. In this particular case, the item added will be a Text item that will use the name and value defined in the beginning of the script.-->
<CreateItem OnExisting="skip">
	<SetParam field="TypeList" value="Text"></SetParam>
	<SetParam field="FieldName" value="{%ItemToAdd%}"></SetParam>
	<SetParam field="FieldValue" value="{%ItemValue%}"></SetParam>
	<SetParam field="IsProtected" value="true"></SetParam>
</CreateItem>
</ytriaAutomation>
Script Level: Intermediate
Find all documents that match a given formula across a selection of databases, and export the findings into an Excel file.
This script can be used by itself in scanEZ to process a currently opened database, or with the new function found in databaseEZ that lets you launch an automation script on a selection of databases directly from within the interface. Learn more about this function here.
This intermediate script allows you to specify desired values in the beginning of the script using variables, minimizing any changes to the body of the script itself. This script will search a selection of databases for all the documents that match a defined formula. The name of the database that they are found in, as well as their UNIDs, will be exported into an Excel report.
<ytriaAutomation Application="scanEZ" ApplicationVersion="16.5">

	<!--This will set the scripts behavior when encountering an error. In this case, it will continue.-->
	<onerror continue="true" ></onerror>
	<!--Use the following variables to adapt the script to your own needs.-->
	<!--TO SET :: this is THE FORMULA used. Note that the formula follows the general XML rules of "escaping". -->
	<SetVar vSearchFormula="@Contains(Subject;"Help us protect your account")"></SetVar>

	<!--TO SET :: This is the item to use as a main "key" for the report.-->
	<SetVar vItemToUseAsKey="Subject"></SetVar>
	<!--This script block will perform the search for the documents.-->
	<SearchBy Type="Formula">
		<Setparam Field="SetFormula" Value="{%vSearchFormula%}"></Setparam>
		<Setparam Field="SearchDocuments" Value="true"></Setparam>
		<Setparam Field="SearchDesigns" Value="false"></Setparam>
		<Setparam Field="PutSearchInSelCreateName" Value="All Docs Found"></Setparam>
	</SearchBy>

	<!--The following Focus line will place the focus on the newly created My Selection folder named "All Docs Found".-->
	<Focus Target="Tree" Category="All Docs Found"></Focus>

	<!--The following If condition declares that If the My Selection exists (i.e. something has been found), the nested child actions will be carried out.-->
	<if Target="Tree" Test="FocusRoot" Mode="NotEquals" Value="True">

		<!--This will set the displayed document titles to the current database name, for reference in the resulting report.-->
		<ChangeDocumentTitle>
				<Setparam Field="TitleOptionType" Value="Formula"></Setparam>
				<Setparam Field="TitleOptionFormula" Value="@Implode(@DbName;"!!")"></Setparam>
		</ChangeDocumentTitle>

		<!-- This will enact a Diff operation on the documents within the My Selection folder and select the main "key" item by the specified name.-->
		<Diff></Diff>
		<Select target="DiffGrid" Lines="ByValue">
			<SetParam ColumnID="AI2" Value="{%vItemToUseAsKey%}"></SetParam>
		</Select>

		<!-- This opens the Values grid.-->
		<Values>

			<!-- This will remove the Type column.-->
			<ShowTypeColumns value="false"></ShowTypeColumns>

			<!-- And this adds a custom column where the UNID will be displayed.-->
			<AddCustomColumn name="UNID">
				<SetParam field="TitleOptionType" Value="System"></SetParam>
				<SetParam field="TitleOptionSystem" Value="UNID"></SetParam>
			</AddCustomColumn>
			<Evaluate></Evaluate>

			<!--Finally, the results of the search will be exported into a report titled report_DeleteDoc.xlsx. If this script is to be executed as part of a Loop/List, the newly found information will be exported and appended to the same file.-->
			<Export>
				<SetParam field="FilePath" value="{%CurFilePath%}report_DeleteDoc.xlsx"></SetParam>
				<SetParam field="SelectedRowsOnly" value="false"></SetParam>
				<SetParam field="ExportType" value="Excel"></SetParam>
				<SetParam field="Mode" value="AppendRows"></SetParam>
				<SetParam field="ExcelSheetName" value="DOCS FOUND"></SetParam>
				<SetParam field="OpenFileOnceGenerated" value="False"></SetParam>
			</Export>
		</Values>
	</if>
</ytriaAutomation>
Script Level: Advanced
Find and report all scheduled agents that have and have not run on a given server and create a concise report of agents in both conditions.
This script can be used by itself in agentEZ to process a currently opened server, or with the new function found in replicationEZ that lets you launch a script on a selection of servers directly from within the interface. Learn more about this function here.
This advanced script will load all enabled and scheduled agents on a currently loaded server and designate those that did not run. Additionally, it will create an Excel report of all agents, putting those that did run and those that did not on two separate pages. The report’s layout will be set up in a way so that it is easy to check the status.
<ytriaAutomation Application="agentEZ" ApplicationVersion="16.5">
	<!--This will set the script's behavior when encountering an error. In this case, it will continue.-->
	<onerror continue="true" ></onerror>

	<!--At this point, we don't want to automatically load the detailed agent information. This will set it as "false". -->
	<Option Type="AutoLoadDetailedAgentInfo" value="False"></Option>

	<!--This will allow the automatic Check Presence in NAB feature to be carried out on the agent signer for each agent loaded.-->
	<Option Type="PresenceInNAB" value="true"></Option>

	<!--This will set the option to use the Design Collection Note which is a much faster loading option.-->
	<UseDesignCollection value="true"></UseDesignCollection>

	<!--This defines our search as looking only for scheduled agents.-->
	<AgentTriggerType value="Scheduled" ></AgentTriggerType>
	<!--This will select all databases on the loaded server.-->
	<TreeSelectionLive Value="False"></TreeSelectionLive>
	<select target="tree" server="true"></select>
	<TreeSelectionLive Value="True"></TreeSelectionLive>
	<!--The next part of the script will handle the grid layout so the results are presented in a clear order. A Suspend Grid Redraw function is added so the processing will be held off until all columns are set.-->
	<SuspendRedraw value="true"></SuspendRedraw>

	<!--All columns are removed from the main grid in order to prepare for the columns that will be added.-->
	<RemoveAllcolumns></RemoveAllcolumns>

	<!--Second, the columns that we want are added back into the first position and in reverse order.-->
	<Add ColumnID="STATUS_LOAD" Position="1"></Add><!-- Is Agent Fully Loaded? -->
	<Add ColumnID="D33" Position="1"></Add><!-- Is background agent disabled on database -->
	<Add ColumnID="B6" Position="1"></Add><!-- Comment -->
	<Add ColumnID="D3" Position="1"></Add><!-- Database Type -->
	<Add ColumnID="R24" Position="1"></Add><!-- Run on week-ends -->
	<Add ColumnID="R23" Position="1"></Add><!-- Stop running agent on this date -->
	<Add ColumnID="R22" Position="1"></Add><!-- Start running agent on this date -->
	<Add ColumnID="R21" Position="1"></Add><!-- Running Interval -->
	<Add ColumnID="M13" Position="1"></Add><!-- Signer -->
	<Add ColumnID="B5" Position="1"></Add><!-- Last Alias -->
	<Add ColumnID="B4" Position="1"></Add><!-- Name -->
	<Add ColumnID="D2" Position="1"></Add><!-- Database Filename -->
	<Add ColumnID="D1" Position="1"></Add><!-- Database Path -->
	<Add ColumnID="L17" Position="1"></Add><!-- Last Run Duration -->
	<Add ColumnID="L15" Position="1"></Add><!-- Last Run Start Date -->
	<Add ColumnID="STATUS" Position="1"></Add><!-- Status -->

	<!--Then, all groupings are removed.-->
	<UngroupAll></UngroupAll>

	<!--And we will set a new grouping configuration.-->
	<GroupBy ColumnID="D46"></GroupBy><!-- Server -->
	<GroupBy ColumnID="R9"></GroupBy><!-- Run On -->
	<GroupBy ColumnID="R12"></GroupBy><!-- Agent Schedule -->

	<!--Also, a new sorting configuration is set.-->
	<Sort columnID="L17" Ascending="false"></Sort><!-- Last Run Duration -->
	<Sort columnID="D1" Ascending="true"></Sort><!-- Database Path -->
	<Sort columnID="D3" Ascending="true"></Sort><!-- Database Type -->
	<Sort columnID="D2" Ascending="true"></Sort><!-- Database Filename -->
	<!--All existing filters are cleared, and then the grid processing is reactivated by turning off the Suspend Grid Redraw state.-->
	<ClearFilters></ClearFilters>
	<SuspendRedraw value="false"></SuspendRedraw>

	<!--Note that the agent details don't need to be loaded in this situaiton, as this info is provided without a full information load.-->
	<Filter columnID="R8" Value="checked"></Filter><!-- Enable -->

	<!--The following If condition declares that if something is found (and thus making the grid count greater than 0), the nested child actions will be carried out.-->
	<if target="Grid" test="VisibleRowsCount" Mode="GreaterThan" Value="0">

		<!--All enabled agents will be selected (rows loaded in the grid).-->
		<Select lines="all"></Select>

		<!--Then, all the detailed agent information is loaded for all selected lines.-->
		<LoadMoreInfo></LoadMoreInfo>
		<!--A filter is added to find all agents that are enabled and did run correctly.-->
		<Filter columnID="L17" Empty="true"></Filter><!-- Last Run Duration not set... -->

		<!--These findings can now be exported. Note that this report will be generated in the same location that this file is being run from.-->
		<Export>
			<SetParam field="FilePath" value="report_agentEZ.xlsx"></SetParam>
			<SetParam field="SelectedRowsOnly" value="false"></SetParam>
			<SetParam field="ExportType" value="Excel"></SetParam>
			<SetParam field="Mode" value="AppendRows"></SetParam>
			<SetParam field="ExcelSheetName" value="Enabled Scheduled Agents - LAST RUN"></SetParam>
			<SetParam field="OpenFileOnceGenerated" value="False"></SetParam>
		</Export>

		<!--All filters will be cleared from the Last Run Duration column.-->
		<ClearFilters columnID="L17"></ClearFilters><!-- Last Run Duration... -->

		<!--A filter is then added to find all agents that are enabled, but did not run correctly. A small trick is used here: hiding anything that contains a ":" character (and thus indicating a duration).-->
		<Filter columnID="L17" Mode="NotContains" Text=":"></Filter><!-- Last Run Duration... -->

		<!--The following If condition declares that if this script is not being used in a loop, the Excel file will be opened as soon as it is generated. This can't be done if a loop is being run since the Excel file still may need to be worked on with the results of another server (depending on what you need to do). Keep in mind that we can't set an If condition with a SetParam value, hence the use of this variable. The variable is initialised first, and it will be changed if not in a loop.-->
		<SetVar vOpenExcelFile="False"></SetVar>
		<if target="var" test="{%ListSize%}" mode="Equals" Value="">
			<SetVar vOpenExcelFile="true"></SetVar>
		</if>

		<!--Finally, any findings regarding agents that did not run can be exported. Note that this report will be generated in the same location that this file is being run from.-->
		<Export>
			<SetParam field="FilePath" value="{%CurFilePath%}report_agentEZ.xlsx"></SetParam>
			<SetParam field="SelectedRowsOnly" value="false"></SetParam>
			<SetParam field="ExportType" value="Excel"></SetParam>
			<SetParam field="Mode" value="AppendRows"></SetParam>
			<SetParam field="ExcelSheetName" value="DID NOT RUN"></SetParam>
			<SetParam field="OpenFileOnceGenerated" value="{%vOpenExcelFile%}"></SetParam>
		</Export>
	</if>

</ytriaAutomation>
<p style="color: #d70f64; font-weight: bolder;">Script Level: Advanced</p>Find multiple different types of profile documents and create reports of each different type found.
This script can be used by itself in scanEZ to process a currently opened database, or with the new function found in databaseEZ that lets you launch an automation script on a selection of databases directly from within the interface. Learn more about this function here.
This advanced script will iterate over a List containing different user-definable profile document names, and, for each given name, conduct a regex search to find the profile documents that contain a matching name. A multi-faceted report containing a full breakdown of all the items and their values within each document will be exported to an Excel file; each document name’s search results will be placed in its own page in the file.
<ytriaAutomation Application="scanEZ" ApplicationVersion="16.5">
	<!--This will set the script's behavior when encountering an error. In this case, it will continue.-->
	<onerror continue="true" ></onerror>
	<!--This will allow the script to run if called from databaseEZ by using the option 'Execute Automation File On...'-->
	<if target="var" test="{%ListSize%}" mode="NotEquals" Value="">
		<ExecuteListAction></ExecuteListAction>
	</if>
	<!--The script uses Loop and List actions. The Loop itself can be modified to fit your needs.-->
	<!--TO SET: these variables define the profile you are looking for. You may change the values to suit your needs and even add in more lines to the list keeping the format shown. Note: Personal profile documents are arranged in a level further down in scanEZ's selection tree and must be selected in a different way.-->
	<List name="allProfileName" Action="SetVar" vProfileName="CalendarProfile"></List>
	<List name="allProfileName" Action="SetVar" vProfileName="NotExistProfile"></List>
	<List name="allProfileName" Action="SetVar" vProfileName="ColorProfile"></List>
	<!--This line will expand the Profile Documents section of the selection tree.-->
	<Expand target="tree" Category="Profile Documents"></Expand>
	<!--Beginning here, the rest of the script is the Loop setup. All actions within this Loop section will be carried out in turn on all the lines in the List section (above) that use the specified name. The Loop is set to call on the List name allProfileName".-->
	<Loop list="allProfileName" OnError="Next">

		<!--This next action is mandatory in order for the action within the List lines referenced to be carried out. In the case of the lines in the List "allProfileName", the SetVar action is to be executed.-->
		<ExecuteListAction></ExecuteListAction>
		<!--Then, everything in the tree will be deselected.-->
		<UnSelect Target="tree" name="All"></UnSelect>

		<!--This will place the focus on the Profile Documents category so that the SelectByRegex action can be used on the first-level entries within.-->
		<Focus Target="Tree" Category="Profile Documents"></Focus>

		<!--The following line will enact a regex search on the first-level profile documents to find any profile documents that contain the name provided.-->
		<SelectByRegex Regex="{%vProfileName%}"></SelectByRegex>

		<!--As stated early on in this script, Personal Profile documents are arranged at a deeper level in the selection tree. If you want to be able to search through both of these levels at the same time to find both the first level profile documents and personal profile documents with this name use this line in place of the regex search above <Select Target="Tree" Category="Profile Documents" Type="{%vProfileName%}"></Select> -->

		<!--This will create a new My Selection folder containing the found documents. By doing this the displayed titles can be set to your desired form (titles cannot be set within the Profile Documents category).-->
		<MySelection>
			<Setparam Field="MySelectionName" Value="Selection of {%vProfileName%}"></Setparam>
			<Setparam Field="TitleOptionType" Value="Formula"></Setparam>
			<Setparam Field="TitleOptionFormula" Value="@Implode(@DbName;"!!")"></Setparam>
		</MySelection>
		<!--Then the focus is placed on the newly created My Selection folder.-->
		<Focus Target="Tree" Category="Selection of {%vProfileName%}"></Focus>

		<!--The following If condition declares that if the My Selection does exist, (meaning that something has been found) the nested child actions will be enacted.-->
		<if Target="Tree" Test="FocusRoot" Mode="NotEquals" Value="True">

			<!--A Values function is carried out on the focused My Selection folder.-->
			<Values>

				<!--All items within the Values grid are selected.-->
				<SetParam Target="SelectDocumentItems" Field="All" value="true"></SetParam>

				<!--And finally all the findings are exported to an Excel file; the results for each profile name will be placed on its own sheet within the file. The file will be saved in the same location as the this Automation file.-->
				<Export>
				   <SetParam field="FilePath" value="{%CurFilePath%}report_FindProfile.xlsx"></SetParam>
				   <SetParam field="SelectedRowsOnly" value="false"></SetParam>
				   <SetParam field="ExportType" value="Excel"></SetParam>
				   <SetParam field="Mode" value="AppendRows"></SetParam>
				   <SetParam field="ExcelSheetName" value="{%vProfileName%}"></SetParam>
				   <SetParam field="OpenFileOnceGenerated" value="False"></SetParam>
				</Export>
			</Values>

		</if>

	</Loop>
</ytriaAutomation>
New in Automation
Automate more tasks thanks to a fully matured command language
First introduced in version 12, automation has always held a lot of promise for performing large, repetitive tasks. EZ Suite 16.5 sees the XML-based automation command language optimized and expanded beyond the original set of tags, and the capabilities that were available even as recently as version 16. The available catalog full of tags can be found in our Help section.
Record your actions to scripts with the powerful new Automation Recorder.
An all-new Automation Recorder takes performance optimization to another level by letting you record and “replay” actions you’ve performed in the EZ Suite tools. Simply hit Record at the beginning of your process, do your work, and the recorder will save the steps in an independent automation file that can be either recalled at a later time “as is,” or modified to fit your needs.
Launch scripts on a current selection through other EZ Suite tools.
Bridges between EZ Suite tools have become far more robust! Thanks to a new right-click menu option for multi-server and multi-database tools (not applicable to consoleEZ), you can now process a current selection of entries through other tools by employing a pre-saved automation script. Process a selection of servers with agentEZ or aclEZ, process a selection of databases with scanEZ—the possibilities are huge, and only a few clicks away!
Build your automation lists fast with the 'Create Automation List from Selection' feature.
Thanks to the new Create Automation List from Selection function, you can quickly “export” a selection of entries to a properly formatted List that can be used in an automation script Loop.
See the progress of your automation scripts in real time, and with a level of detail that you choose.
A new, dedicated console displays a full log of operations carried out through automation scripts—in real time—and with script-responsive verbosity levels.
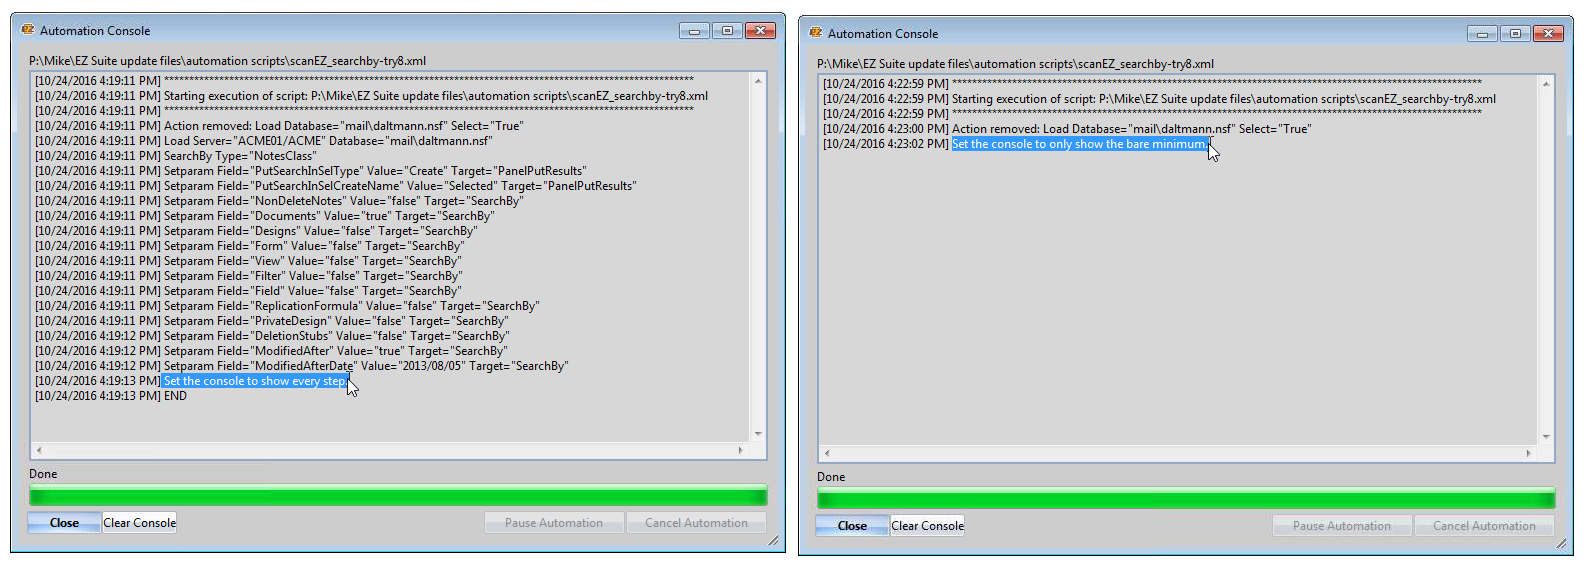
The flexYgrid
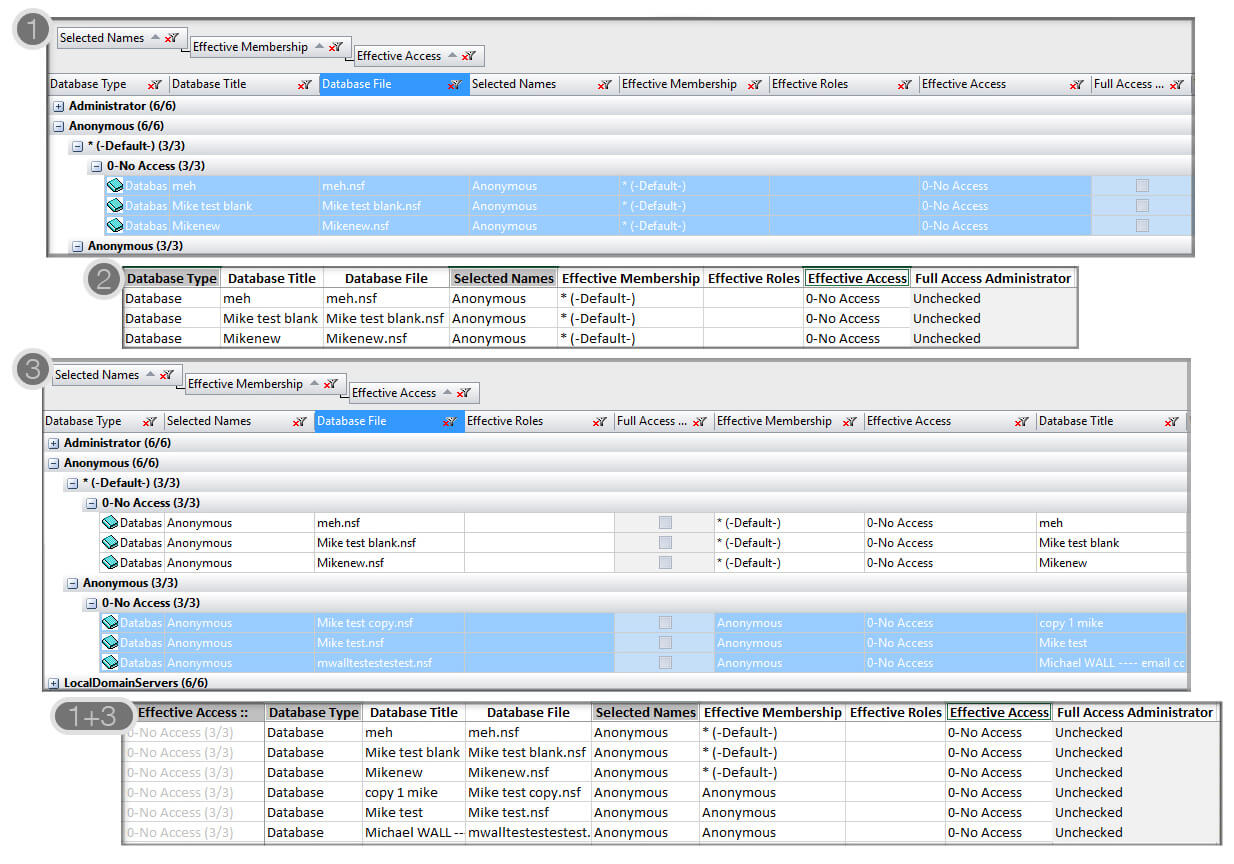
Create better reports faster with the improved 'Append Rows' Export option.
Reporting is cleaner and easier to manage thanks to improvements in the “Append Rows” Export option that automatically reuses matching column headers. Combine reports worry-free. Regardless of how you have your grid columns placed, data exports now recognize columns and will append the like data to the proper place in your reports.
Keep your selection focus while performing Group/Sort operations.
Stay focused, on your current selections that is. Your selections now stay intact after Sort and Filter operations. And a new auto-scroll feature brings your focused entries back into view with only a key
Focus columns automatically thanks to Search function enhancements.
The flexYgrid Find First… regex search option will now focus the column in which the regex match is found—guesswork is eliminated.
Group/Ungroup easier thanks to quick toolbar buttons.
New one-click Group/Ungroup command buttons can now be found in the toolbar. Group by the currently focused column in the click of a button (or a CTRL+ I), or reset even the heaviest grouping arrangement (CTRL+SHIFT+G).
Choose from new options to Hide/Unhide columns.
Hiding columns just got easier, and safer! New right-click menu options and key commands let you hide currently selected columns (CTRL+F6) and unhide the last hidden column (CTRL+F6) for a virtual undo, or toggle between states.
Combine filters on individual columns for heightened precision.
Already a powerful function, the precision of column filters has been enhanced through the ability to enact multiple filters on the same column header. Zero in on specifics by adding in one filter after another.
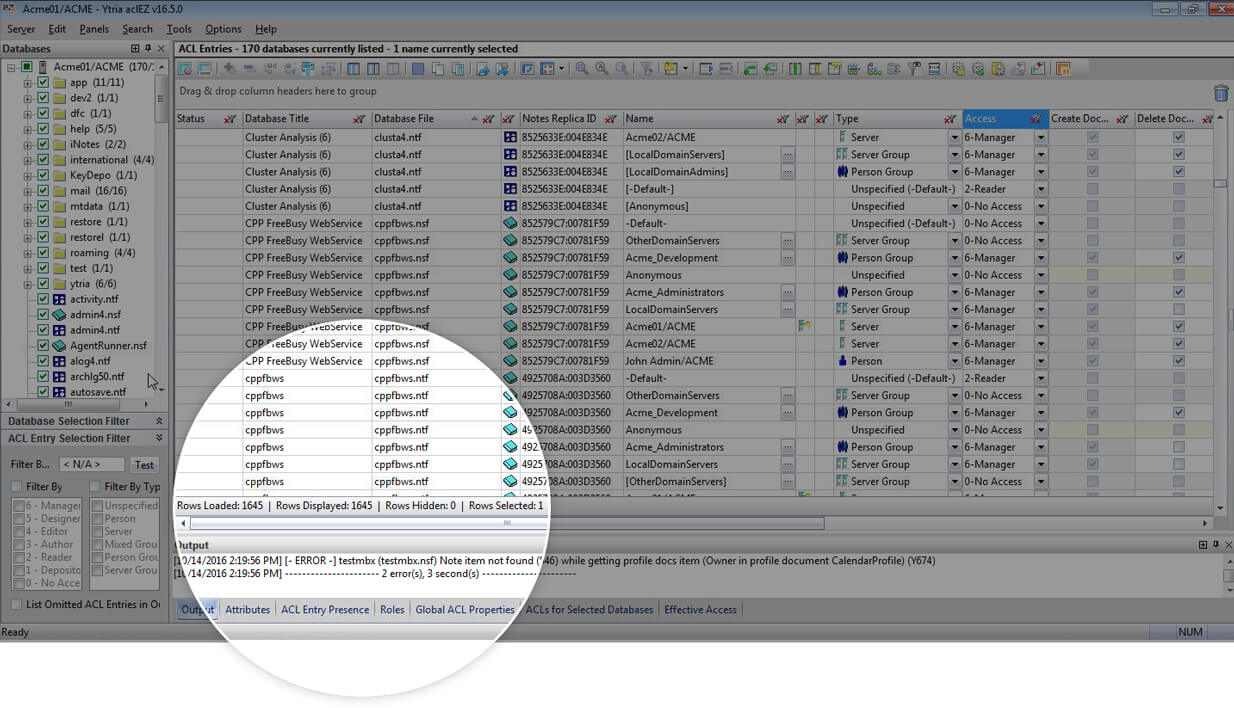
See grid counts fast with the new grid status bar.
See totals for rows loaded, rows displayed, hidden rows, and selected rows at a glance thanks to a new count-status bar available in every flexYgrid panel.
Filter values more accurately through "Real value" Filter logic.
Sort operations are more precise, regardless of cell and group formatting, due to a process that uses the “real” values and not the text-formatted value displayed in the grid.
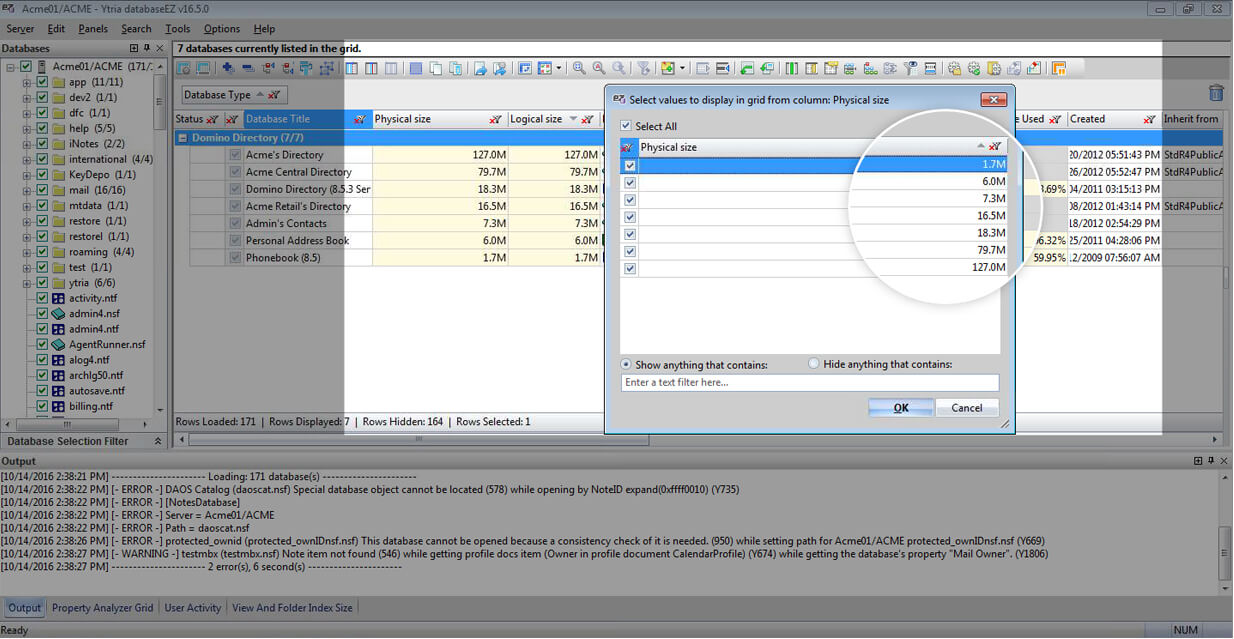
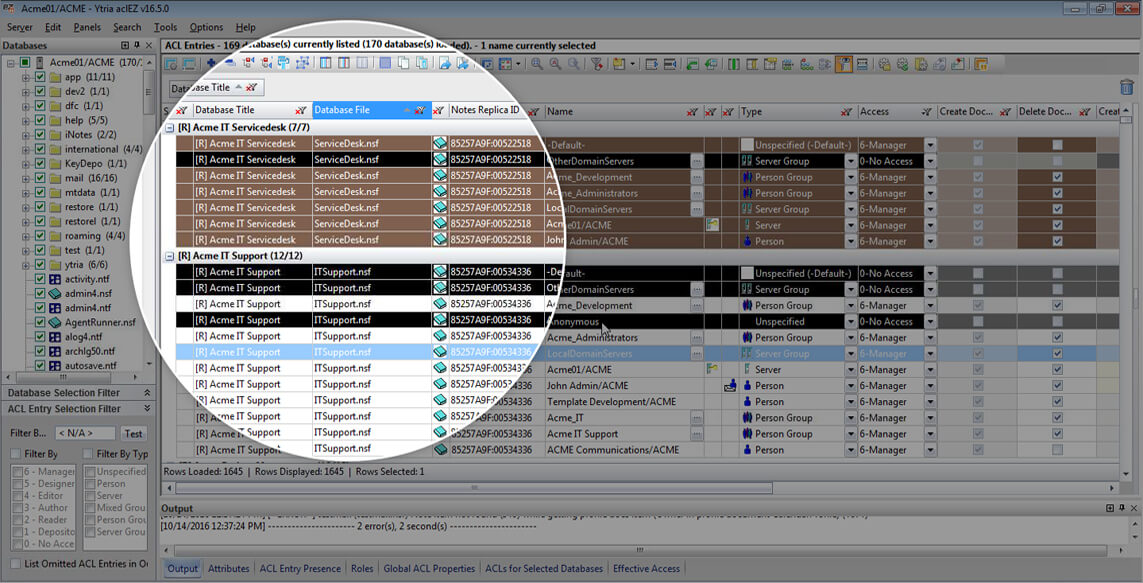
Display all filtered and manually-hidden rows at the click of a button.
Keep a firm grasp on the totality of your data throughout your operations. In just the click of a button, or with a CTRL + ALT + V, toggle the display of all rows filtered out of, or hidden in, a grid panel. These rows are color coded for easy identification.
Hold operation processing for quicker data manipulation.
Sometimes, the amount of data you’re working with is so large that processing between operations inevitably takes a bit of time. Group, Filter, Load etc. on grids with extremely large data volumes are still comparatively fast, but the minute waiting times between processes can add up. The Suspend Grid Redraw feature lets you hold the processing until you’ve set up all of your operations, and then take care of them all at once.
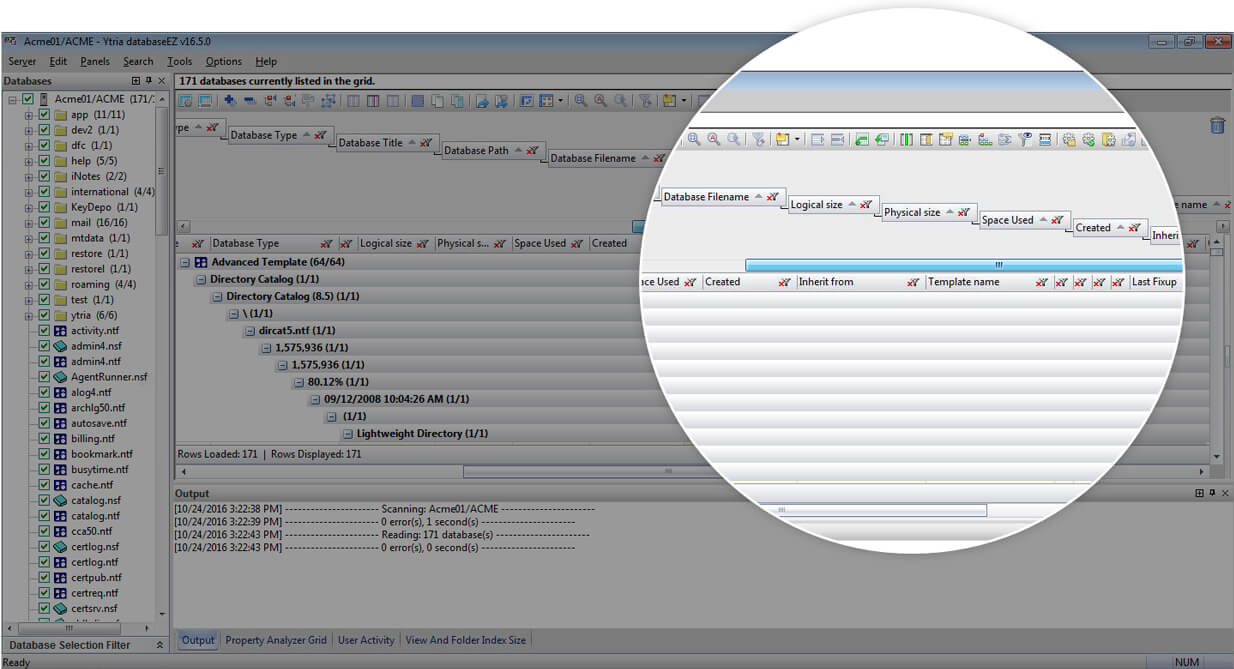
View everything in your group zone.
Perform as many groupings as you want, see them ALL thanks to a scrollable group zone.
Reset grid configurations in total security.
A lot of preparation and work can go into finding the data you need. When it’s time to revert back to your default settings, or even the original layout, you’ve got to be sure. By requiring a confirmation before the reset is carried out, any wrong clicks will be avoided.
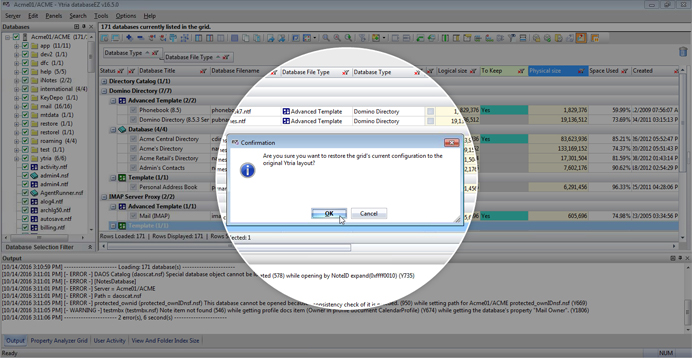
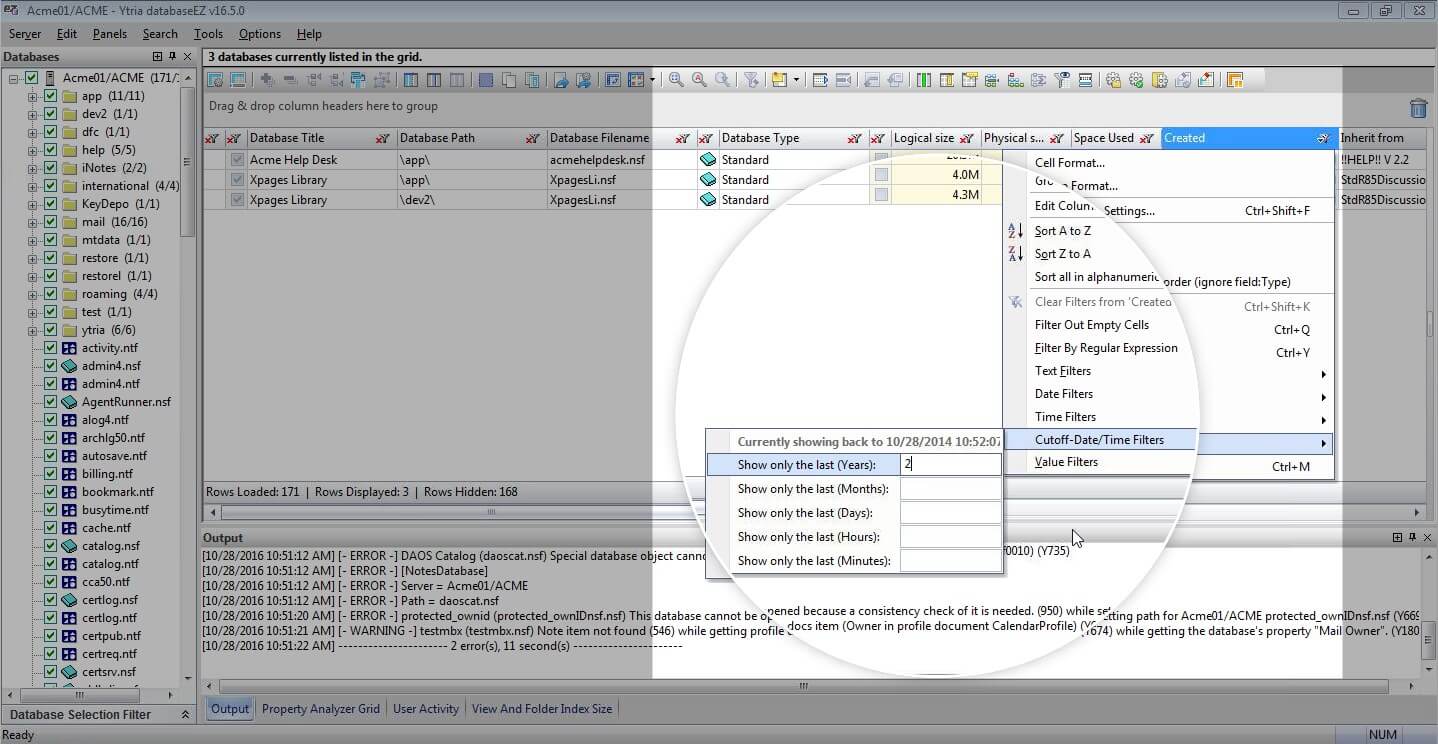
View your data based on a specific time span back from the current date.
An all-new cut-off date column filter option lets you choose to see only entries that fall within a specified time span back from the current date.
New in scanEZ
Copy/Move documents with powerful new options to control how they are copied or moved in addition to the folder structure of their destination.
The Copy/Move Documents to Multiple Databases function is the closest thing Notes users can get to a drag-n-drop operation for Notes databases, and it has undergone both UX improvements and backend expansion. In addition to the ability to keep the original folder structure—or manually specify a new one—for the target documents, you can now choose from 4 different ways to carry out a Copy or Move operation: copy documents as new, replicate them, or replicate them with the option to force increment their sequence number depending on if the documents already exist in the target databases or not.
Export all files and attachments from a selection of documents in only a couple of clicks.
With scanEZ’s new Export All Attachments and Files… feature, attachment archival across scores of documents has literally become a 2-step process. Select the documents, and select where you want to save the attachments. That’s all there is to it!
Conduct in-depth audits between two non-replica databases with the new Database Comparator.
Have you ever wished that you could direct the Replication Auditor’s unique powers towards two databases that aren’t replicas? scanEZ now includes the new Database Comparator that lets you conduct Note Info audits between any two like databases that contain the same key UNIDs. Display only differences between them, or display the entire audit.
Get more out of the $Flags help section.
The valuable $Flags quick reference definition bank is now flexYgrid enabled.
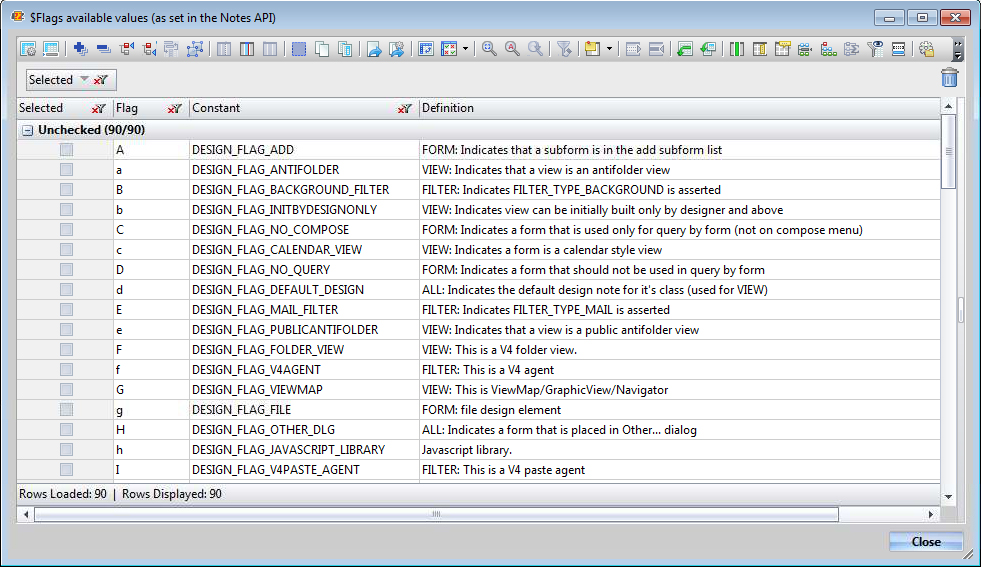
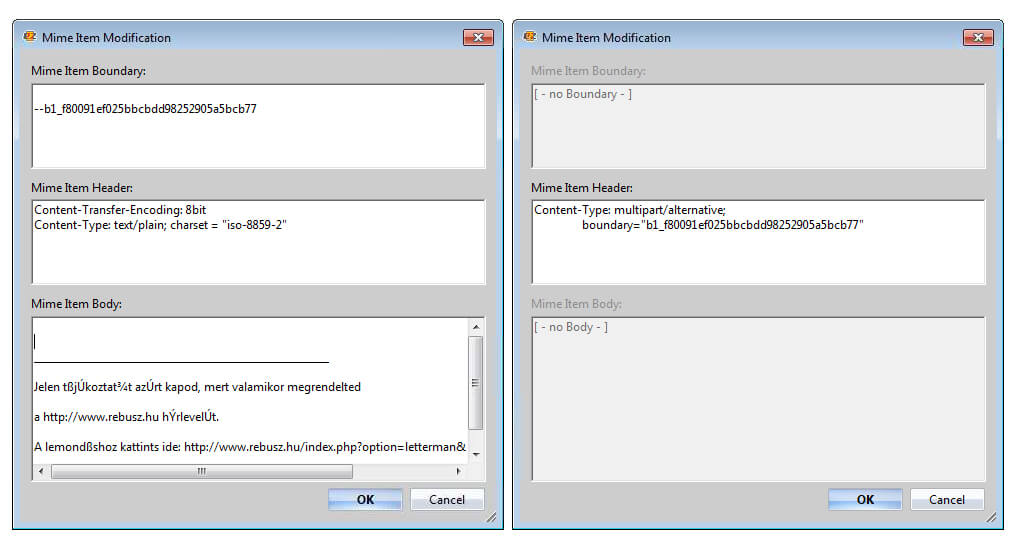
Edit MIME/RFC822 compatible items.
scanEZ is now fully compliant with MIME/RFC 822 standards and thus has the ability to read out and edit related items.
Manage design source files in design elements like Xpages. (See also the new document attachment export feature.)
Reach beyond the backend of XPages with the ability to parse and export the contents of multiple components that just weren’t reliably accessible before—access compiled javascript, eclipse files, custom control components, and more.
New in databaseEZ
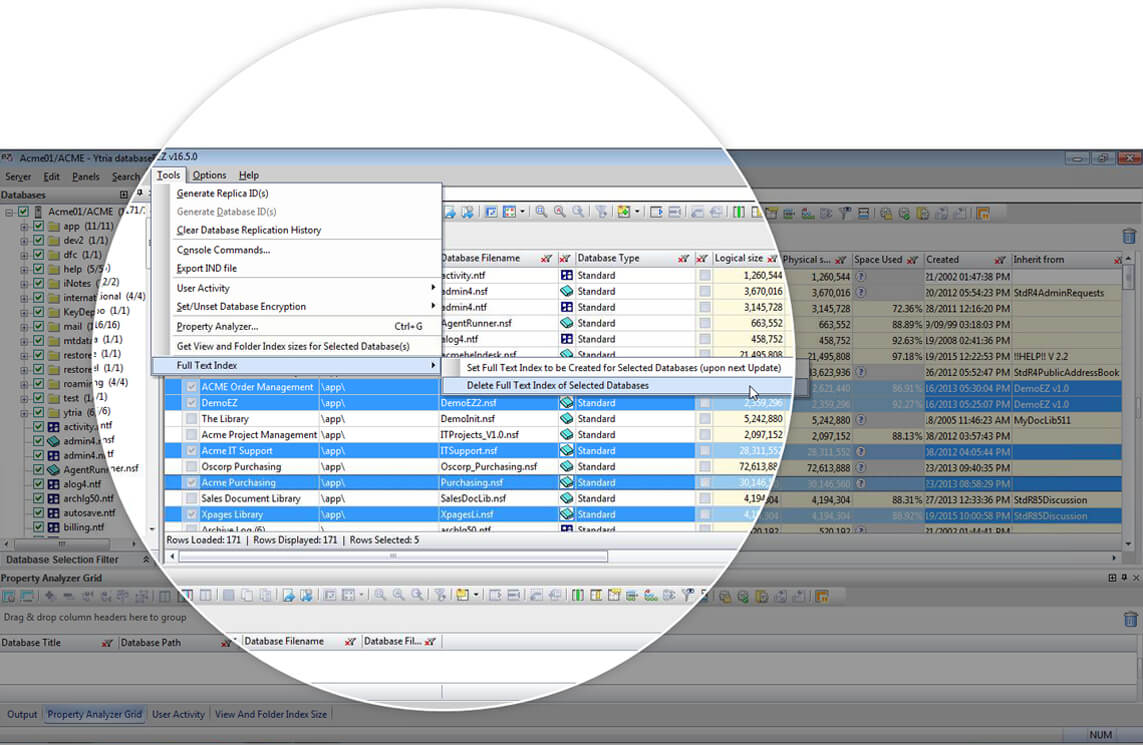
Create/delete Full Text indexes across multiple databases.
databaseEZ now supports creation/deletion of Full Text Indexes. (Note: Full Text Index creation only takes effect at the next Update.)
New in replicationEZ
Safeguard your grid entries for replicas loaded across servers while changing your selection.
An improved process for selecting/deselecting databases in the selection panel now offers the option to prevent unloading databases if you already have replicas from other servers loaded in the grid.
Get a clearer view of servers thanks to alphabetical selection tree ordering.
Finding your desired server within a full-capacity replicationEZ selection tree just got a whole lot easier. Your servers are now displayed in alphabetical order.
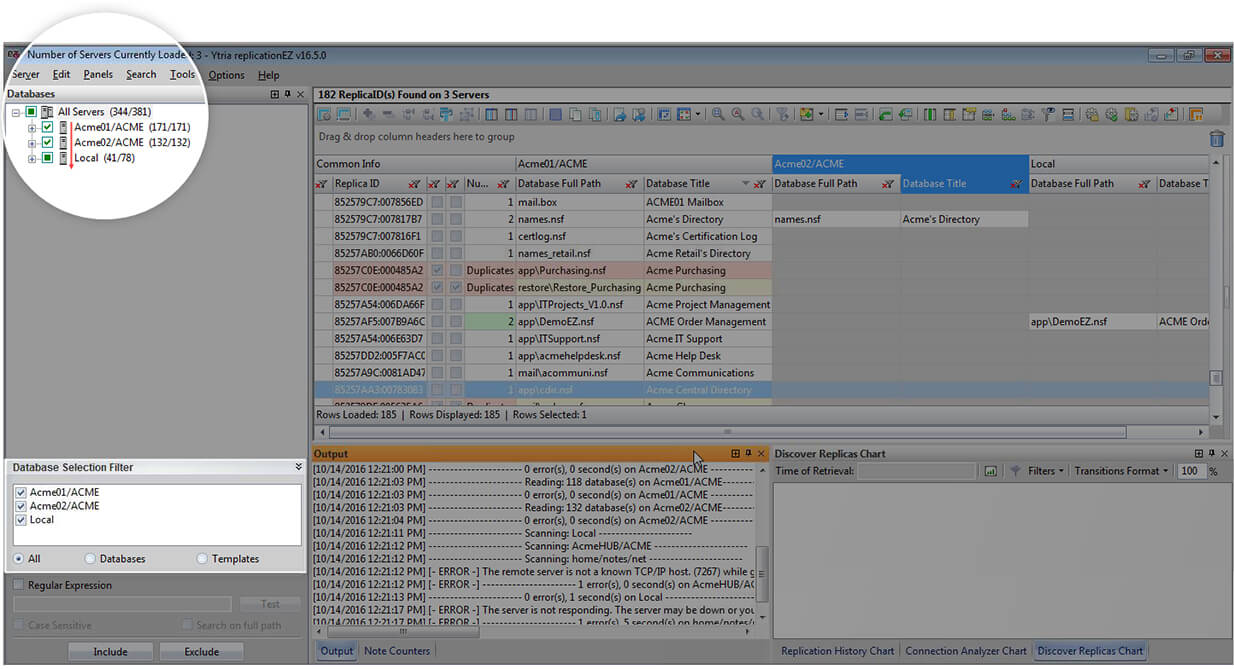
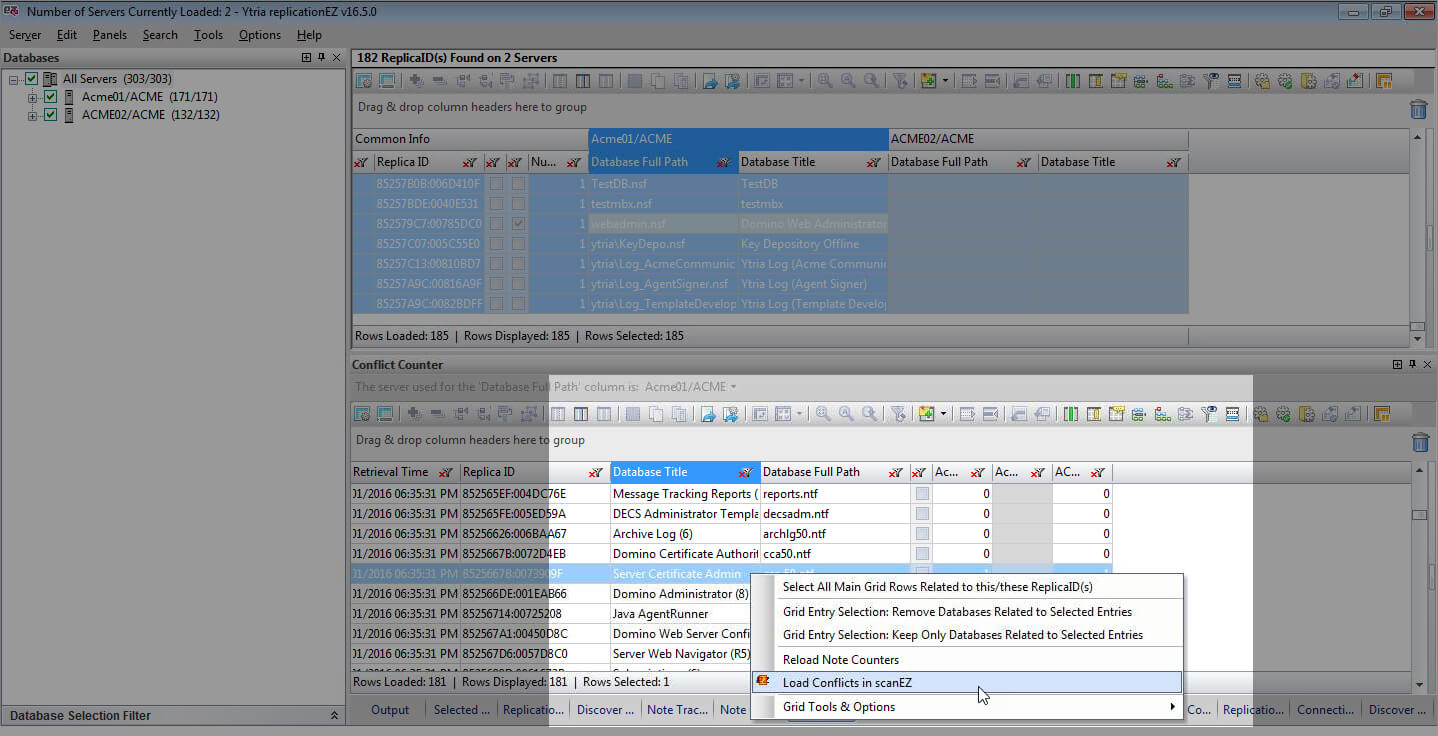
Drill down into conflicts directly from replicationEZ's Conflict Counter panel.
Finding your desired server within a full-capacity replicationEZ selection tree just got a whole lot easier. Your servers are now displayed in alphabetical order.
New in consoleEZ
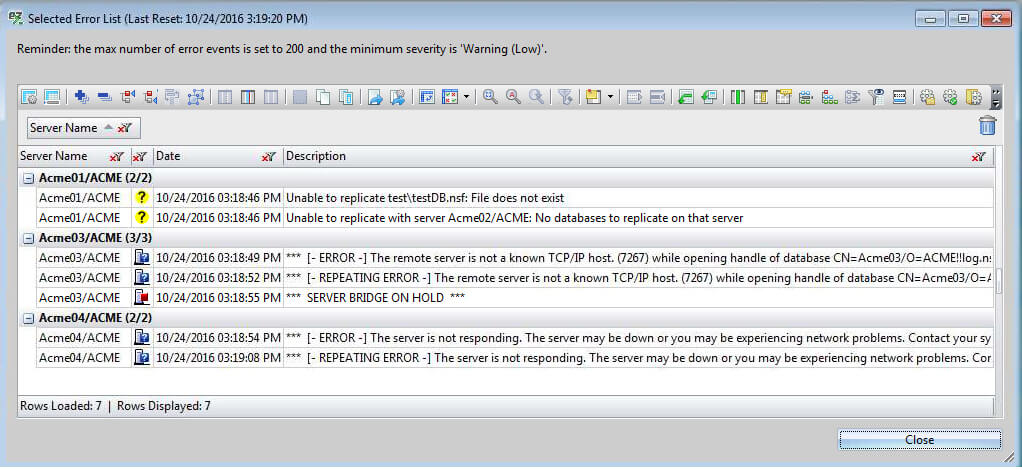
View detailed error logs for multiple servers at once.
Expanded functionality in consoleEZ’s Dashboard panel now lets you see the error log details for multiple servers at once.
Pause "live" grids to activate all "static" grid capabilities.
Live grids like the grid in consoleEZ dashboard are powerful tools, but the live nature of the data stream presented barriers between these grids and the built-in flexYgrid tools like the Pivot Table builder and Data Comparator. This is no longer true: thanks to the Pause Data Stream option, you’ll be able to use all the tools and options available in static flexYgrid panels on live grids (while paused).
New in agentEZ
Automate more tasks thanks to a fully matured command language
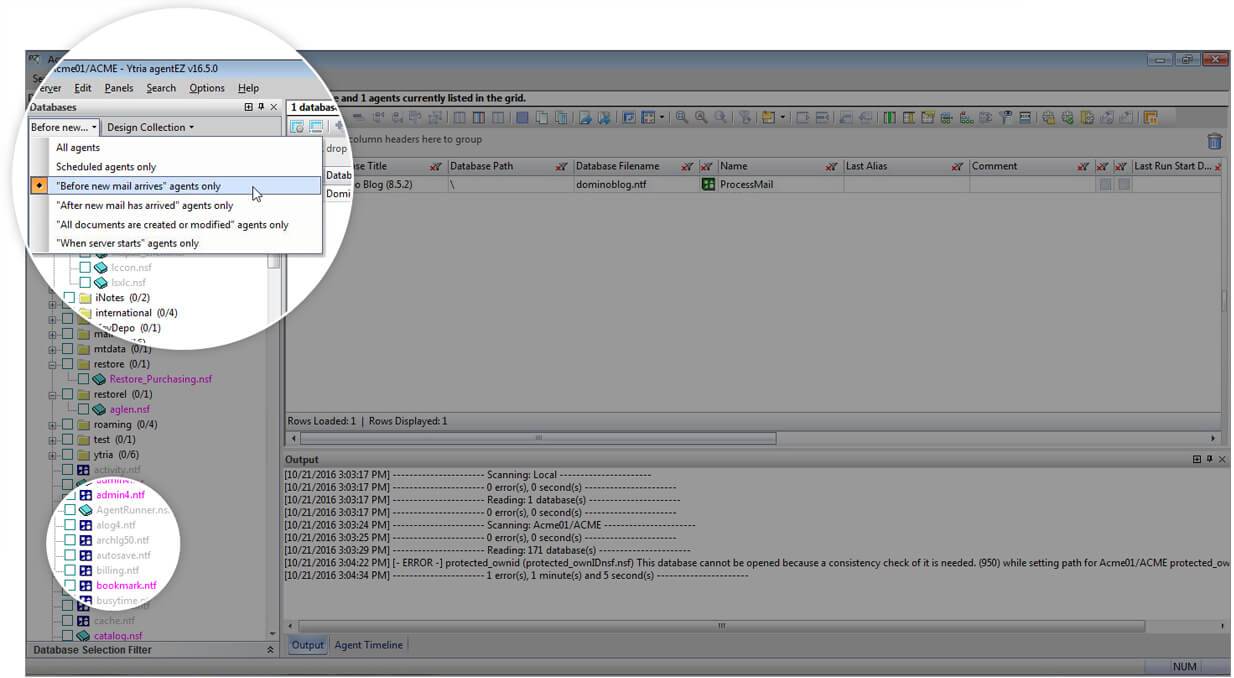
See agent presence faster thanks to color coding enhancements in the database selection tree.
A new display development in agentEZ’s database selection tree now indicates different stages of agent presence at a glance. Databases displayed in gray text lack agents of any type and pink text indicates a lack of the specific type of agent indicated in the agent search filter.
EZ Suite
See just how much faster and more fluid your HCL Notes and Domino administration and development can be.
Automation
What is the Ytria automation API?
Go even bigger with your EZ Suite tools—through large-scale repeatable processes.
EZ Suite tools can be automated? Yes!
First introduced in EZ Suite version 12, the Ytria automation API lets you perform large, repetitive tasks quickly and efficiently. EZ Suite 16.5 sees the focus of the command language and the scope of possibilities greatly expanded.
Here’s how you can start putting automation to work for you
Following through this page will help your understanding of what you can do with automation and how you can get started doing it. We’ll also introduce you to some key automation resources you’ll want to keep handy for the future.
First, let’s look at a quick-and-easy script.
Try out the script below in aclEZ with a server already loaded. You’ll get a concise readout of all ACL entries, and their corresponding access levels for all databases on a loaded server.
- Simply copy/paste the script shown here into any text editor and save it as an XML file.
- Open aclEZ and load a server into the selection tree. Then, select the option ‘Load Automation File…’ from the Server (or use CTRL+X).
- Find the file you just saved and click ‘Open.’
That’s all there is to it! You’ll have a complete listing of all databases on the loaded server, as well as all applicable ACL entries grouped by access level and name.
<?xml version="1.0"?>
<ytriaAutomation Application="aclEZ" ApplicationVersion="16.5">

<RemoveAllColumns></RemoveAllColumns>
<Add ColumnID="DB1" Position="1"></Add>
<Add ColumnID="ACL5" Position="1"></Add>
<Add ColumnID="ACL1" Position="1"></Add>

<GroupBy ColumnID="DB1"></GroupBy>
<GroupBy ColumnID="ACL5"></GroupBy>
<GroupBy ColumnID="ACL1"></GroupBy>
<Collapse/>
</ytriaAutomation>
Want to learn more? Start here
Our automation scripts are written in XML. If you are currently unfamiliar with XML, w3schools.com has some excellent tutorials to help kickstart your understanding.
To learn more about automation itself, visit our “XML Basics” page by clicking the link below. You’ll find simple examples of the types of components found in a good automation script—including their structure and purpose.
Tip: Once you start to get the general idea of what automation is all about, check out some commands that you’ll want to know. Some of the concepts involved require a bit of familiarization, but once you have the knowledge under your belt, large scale operations are a cinch to handle:
Basics
To learn more about automation itself, visit our “XML Basics” page by clicking the link below. You’ll find simple examples of the types of components found in a good automation script—including their structure and purpose.
Global Actions
This section contains high-level commands used universally across all tools. For example, loading a server or database.
Check out the full scope of functionality
Check out the ever-expanding catalog of functions that you can automate. Some of these command tags will sound familiar, some will seem brand new. A vast amount of possibilities exist. Each tag has it’s own page that contains an explanation of exactly what it will do, an example that puts it in context, and the technical information surrounding its use in a script.
Ytria Automation API Tag Catalog
Check out the ever-expanding catalog of functions that you can automate. Some of these command tags will sound familiar, some will seem brand new.
Drill down into the specifics
Every product has its own exclusive functions. Click the links below for a direct access to the pages describing the specific action tags that are used to automate the individual products’ functionality.
Let us work for you with these ready-made scripts
Click below for some working scripts that you can put to work immediately. For your convenience, comments have been included as explanations of key functionalities. Feel free to change the values to meet your needs—when doing so, be sure to keep the Ytria Automation tag specifics in mind to ensure that your scripts function properly.
Search multiple servers for all invalid ACL entries
This script will automatically search three servers for any and all invalid ACL entries—entries for names not found in the NAB—and then export the results to a per-server report, one Excel file each.
<?xml version="1.0"?>
<ytriaAutomation Application="aclEZ" ApplicationVersion="16.5">

<RemoveAllColumns></RemoveAllColumns>
<Add ColumnID="DB1" Position="1"></Add>
<Add ColumnID="ACL5" Position="1"></Add>
<Add ColumnID="ACL1" Position="1"></Add>

<GroupBy ColumnID="DB1"></GroupBy>
<GroupBy ColumnID="ACL5"></GroupBy>
<GroupBy ColumnID="ACL1"></GroupBy>
<Collapse/>
</ytriaAutomation>
Load a server and export all ACL information
This script will load all databases on a server of your choice and then export all ACL attributes and roles to an HTML file.
<ytriaAutomation Application="aclEZ" ApplicationVersion="16.5">
<OnError continue="True"></OnError>
<Echo Mode="False"></Echo>
<!--The variable in the next line will set the server to load.
Simply change this variable value to accommodate your needs.-->
<SetVar srv="Enter your server name here."></SetVar>
<!-- Initialize -->
<Load Server="{%srv%}" select="true"></Load>
<Export Type="FlagsAndRoles">
<SetParam target="ExportToFile" field="FilePath" value="aclEZ_export.html"></SetParam>
<SetParam target="ExportToFile" field="ExportType" value="HTML"></SetParam>
<SetParam target="ExportToFile" field="FileOutput" value="Unicode"></SetParam>
<SetParam target="ExportToFile" field="OpenFileOnceGenerated" value="true"></SetParam>
</Export>
</ytriaAutomation>
Find and report all Mail Owner access levels and various connected properties and settings regarding their permissions across multiple databases on multiple servers
This script can be used by itself in aclEZ to process a currently opened server, or with the new function found in replicationEZ that lets you launch a script on a selection of servers directly from within the interface. Learn more about this function here.
This script will parse the entire mail directory folder on a given server to find all mail owners set side by side with a selection of key properties and settings that govern access and permissions to their respective mail databases. A report will be generated and exported into an Excel file. Each access level will be reported on its own sheet within the file.
<ytriaAutomation Application="aclEZ" ApplicationVersion="16.5">
<!--This will set the script's behavior when encountering an error.
In this case, it will continue.-->
<onerror continue="true" ></onerror>

<!--First it is specified that the NAB presence is NOT to be checked and groups are NOT
to be "expanded."-->
<Option Type="PresenceInNAB" value="false"></Option>
<Option Type="GroupExpander" value="ExpandNone"></Option>
<TreeSelectionLive Value="True"></TreeSelectionLive>
<!--All databases on the current server will be deselected in the tree.-->
<unselect target="tree" server="true"></unselect>

<!--Then the mail directory folder for the current server will be selected.-->
<select target="tree" folder="mail"></select>

<!--The next part of the script defines the actions to be taken within the Audit grid.
The grid layout will be set as stated below.
A Suspend Grid Redraw function is added so the processing will be held off until
all columns are set.-->
<SuspendRedraw value="true"></SuspendRedraw>

<!--All columns are removed from the main grid in order to prepare for the columns
that will be added.-->
<RemoveAllcolumns></RemoveAllcolumns>

<!--The grid columns are moved to the first position in reverse order.
The name of the columns are indicated.-->
<Add ColumnID="DB6" Position="1"></Add><!-- Catalog Categories -->
<Add ColumnID="DB4" Position="1"></Add><!-- Database Type -->
<Add ColumnID="A9" Position="1"></Add><!-- Replicate or Copy Documents -->
<Add ColumnID="A8" Position="1"></Add><!-- Write Public Documents -->
<Add ColumnID="A7" Position="1"></Add><!-- Read Public Documents -->
<Add ColumnID="A6" Position="1"></Add><!-- Create LS/Java Agents -->
<Add ColumnID="A5" Position="1"></Add><!-- Create Shared Folder/Views -->
<Add ColumnID="A4" Position="1"></Add><!-- Create Private Folders/Views -->
<Add ColumnID="A3" Position="1"></Add><!-- Create Private Agents -->
<Add ColumnID="A2" Position="1"></Add><!-- Delete Documents -->
<Add ColumnID="A1" Position="1"></Add><!-- Create Documents -->
<Add ColumnID="ACL4" Position="1"></Add><!-- Type -->
<Add ColumnID="ACL1" Position="1"></Add><!-- Name -->
<Add ColumnID="DB3" Position="1"></Add><!-- Database File -->
<Add ColumnID="DB2" Position="1"></Add><!-- Database Path -->
<Add ColumnID="STATUS" Position="1"></Add><!-- Status -->
<!--Any residual grouping and sorting is cleared.-->
<Reset></Reset>

<!--A new grouping configuration is set.-->
<GroupBy ColumnID="ACL5"></GroupBy><!-- Access -->
<GroupBy ColumnID="DB7"></GroupBy><!-- Server -->

<!--And a new sorting configuration is set.-->
<Sort columnID="DB2" Ascending="true"></Sort><!-- Database Path -->
<Sort columnID="DB4" Ascending="true"></Sort><!-- Database Type -->
<Sort columnID="DB3" Ascending="true"></Sort><!-- Database Filename -->

<!--A filter is added to isolate only mail owners,and then the grid processing is
reactivated by turning off
the Suspend Grid Redraw state.-->
<Filter columnID="ACL3" Empty="true"></Filter><!-- Mail Owner -->
<SuspendRedraw value="false"></SuspendRedraw>

<!--The following If condition will test if the main grid has any rows loaded.
If there are any rows loaded (meaning that Mail Owners were found) the nested
child actions
will be carried out.-->
<if target="Grid" test="VisibleRowsCount" Mode="GreaterThan" Value="0">

<!--The following If condition declares that if this script is not being used in a
loop, the Excel file will be opened as soon as it is generated.
This can't be done if a loop is being run since the Excel file still may need
to be worked on with the results of another server (depending on what you need
to do). Keep in mind that we can't set an If condition with a SetParam value,
hence the use of this variable.
The variable is initialised first, and it will be changed if not in a loop.-->
<SetVar vOpenExcelFile="False"></SetVar>
<if target="var" test="{%ListSize%}" mode="Equals" Value="">
<SetVar vOpenExcelFile="true"></SetVar>
</if>

<!--Finally, any findings regarding the databases and their respective mail owners,
and the rights those mail owners hold, will be exported.
Note that this report will be generated in the same location that this file
is being run from.-->
<Export>
<SetParam field="FilePath" value="{%CurFilePath%}report_aclEZ.xlsx"></SetParam>
<SetParam field="SelectedRowsOnly" value="false"></SetParam>
<SetParam field="ExportType" value="Excel"></SetParam>
<SetParam field="Mode" value="AppendRows"></SetParam>
<SetParam field="ExcelSheetName" value="Email Owner Access"></SetParam>
<SetParam field="OpenFileOnceGenerated" value="{%vOpenExcelFile%}"></SetParam>
</Export>
</if>
</ytriaAutomation>
Create a new item across all documents in a specific category—and across multiple databases
This script can be used by itself in scanEZ to process a currently opened database, or with the new function found in databaseEZ that lets you launch a script on a selection of databases directly from within the interface. Learn more about this function here.
Small in size, yet very flexible in where you can take it, this script will simply select a category of documents and create a new item across all documents within that focused selection.
<?xml version="1.0" encoding="UTF-8"?>
<ytriaAutomation Application="scanEZ" ApplicationVersion="16.5" Version="1.0">

<!--The following three lines let you specify the name and value of the item to be added,
as well as the document category whose documents the item will be deployed to.
Simply enter your desired values where indicated.-->
<SetVar ItemToAdd="Enter your value here"></SetVar>
<SetVar ItemValue="Enter your value here"></SetVar>
<SetVar DocumentCategory="Enter your value here"></SetVar>

<!--The following Expand/Focus sequence will allow the focus to be placed on the documents
within the selection tree category specified.-->
<Expand target="tree" category="Documents" type="{%DocumentCategory%}"></Expand>
<focus target="tree" category="Documents" type="{%DocumentCategory%}"></focus>

<!--The CreateItem script block is where we define the item to be added. If the item already
exists, it will not create a new one, instead it will skip the document and move on to the
next. In this particular case, the item added will be a Text item that will use the name
and value defined in the beginning of the script.-->
<CreateItem OnExisting="skip">
<SetParam field="TypeList" value="Text"></SetParam>
<SetParam field="FieldName" value="{%ItemToAdd%}"></SetParam>
<SetParam field="FieldValue" value="{%ItemValue%}"></SetParam>
<SetParam field="IsProtected" value="true"></SetParam>
</CreateItem>
</ytriaAutomation>
Find all documents that match a given formula across a selection of databases, and export the findings into an Excel file
This script can be used by itself in scanEZ to process a currently opened database, or with the new function found in databaseEZ that lets you launch an automation script on a selection of databases directly from within the interface. Learn more about this function here.
This intermediate script allows you to specify desired values in the beginning of the script using variables, minimizing any changes to the body of the script itself. This script will search a selection of databases for all the documents that match a defined formula. The name of the database that they are found in, as well as their UNIDs, will be exported into an Excel report.
<?xml version="1.0"?>
<ytriaAutomation Application="aclEZ" ApplicationVersion="16.5">

<RemoveAllColumns></RemoveAllColumns>
<Add ColumnID="DB1" Position="1"></Add>
<Add ColumnID="ACL5" Position="1"></Add>
<Add ColumnID="ACL1" Position="1"></Add>

<GroupBy ColumnID="DB1"></GroupBy>
<GroupBy ColumnID="ACL5"></GroupBy>
<GroupBy ColumnID="ACL1"></GroupBy>
<Collapse/>
</ytriaAutomation>
Find and report all scheduled agents that have and have not run on a given server and create a concise report of agents in both conditions
This script can be used by itself in scanEZ to process a currently opened database, or with the new function found in databaseEZ that lets you launch an automation script on a selection of databases directly from within the interface. Learn more about this function here.
This intermediate script allows you to specify desired values in the beginning of the script using variables, minimizing any changes to the body of the script itself. This script will search a selection of databases for all the documents that match a defined formula. The name of the database that they are found in, as well as their UNIDs, will be exported into an Excel report.
<ytriaAutomation Application="agentEZ" ApplicationVersion="16.5">
<!--This will set the script's behavior when encountering an error.
In this case, it will continue.-->
<onerror continue="true" ></onerror>

<!--At this point, we don't want to automatically load the detailed agent information.
This will set it as "false". -->
<Option Type="AutoLoadDetailedAgentInfo" value="False"></Option>

<!--This will allow the automatic Check Presence in NAB feature to be carried out on
the agent signer for each agent loaded.-->
<Option Type="PresenceInNAB" value="true"></Option>

<!--This will set the option to use the Design Collection Note which is a much
faster loading option.-->
<UseDesignCollection value="true"></UseDesignCollection>

<!--This defines our search as looking only for scheduled agents.-->
<AgentTriggerType value="Scheduled" ></AgentTriggerType>
<!--This will select all databases on the loaded server.-->
<TreeSelectionLive Value="False"></TreeSelectionLive>
<select target="tree" server="true"></select>
<TreeSelectionLive Value="True"></TreeSelectionLive>
<!--The next part of the script will handle the grid layout so the results are presented
in a clear order. A Suspend Grid Redraw function is added so the processing will
be held off until all columns are set.-->
<SuspendRedraw value="true"></SuspendRedraw>

<!--All columns are removed from the main grid in order to prepare for the columns that
will be added.-->
<RemoveAllcolumns></RemoveAllcolumns>

<!--Second, the columns that we want are added back into the first position
and in reverse order.-->
<Add ColumnID="STATUS_LOAD" Position="1"></Add><!-- Is Agent Fully Loaded? -->
<Add ColumnID="D33" Position="1"></Add><!-- Is background agent disabled on database -->
<Add ColumnID="B6" Position="1"></Add><!-- Comment -->
<Add ColumnID="D3" Position="1"></Add><!-- Database Type -->
<Add ColumnID="R24" Position="1"></Add><!-- Run on week-ends -->
<Add ColumnID="R23" Position="1"></Add><!-- Stop running agent on this date -->
<Add ColumnID="R22" Position="1"></Add><!-- Start running agent on this date -->
<Add ColumnID="R21" Position="1"></Add><!-- Running Interval -->
<Add ColumnID="M13" Position="1"></Add><!-- Signer -->
<Add ColumnID="B5" Position="1"></Add><!-- Last Alias -->
<Add ColumnID="B4" Position="1"></Add><!-- Name -->
<Add ColumnID="D2" Position="1"></Add><!-- Database Filename -->
<Add ColumnID="D1" Position="1"></Add><!-- Database Path -->
<Add ColumnID="L17" Position="1"></Add><!-- Last Run Duration -->
<Add ColumnID="L15" Position="1"></Add><!-- Last Run Start Date -->
<Add ColumnID="STATUS" Position="1"></Add><!-- Status -->

<!--Then, all groupings are removed.-->
<UngroupAll></UngroupAll>

<!--And we will set a new grouping configuration.-->
<GroupBy ColumnID="D46"></GroupBy><!-- Server -->
<GroupBy ColumnID="R9"></GroupBy><!-- Run On -->
<GroupBy ColumnID="R12"></GroupBy><!-- Agent Schedule -->

<!--Also, a new sorting configuration is set.-->
<Sort columnID="L17" Ascending="false"></Sort><!-- Last Run Duration -->
<Sort columnID="D1" Ascending="true"></Sort><!-- Database Path -->
<Sort columnID="D3" Ascending="true"></Sort><!-- Database Type -->
<Sort columnID="D2" Ascending="true"></Sort><!-- Database Filename -->
<!--All existing filters are cleared, and then the grid processing is reactivated
by turning off the Suspend Grid Redraw state.-->
<ClearFilters></ClearFilters>
<SuspendRedraw value="false"></SuspendRedraw>

<!--Note that the agent details don't need to be loaded in this situaiton, as this info is
provided without a full information load.-->
<Filter columnID="R8" Value="checked"></Filter><!-- Enable -->

<!--The following If condition declares that if something is found (and thus making
the grid count greater than 0), the nested child actions will be carried out.-->
<if target="Grid" test="VisibleRowsCount" Mode="GreaterThan" Value="0">

<!--All enabled agents will be selected (rows loaded in the grid).-->
<Select lines="all"></Select>

<!--Then, all the detailed agent information is loaded for all selected lines.-->
<LoadMoreInfo></LoadMoreInfo>
<!--A filter is added to find all agents that are enabled and did run correctly.-->
<Filter columnID="L17" Empty="true"></Filter><!-- Last Run Duration not set... -->

<!--These findings can now be exported. Note that this report will be generated
in the same location that this file is being run from.-->
<Export>
<SetParam field="FilePath" value="report_agentEZ.xlsx"></SetParam>
<SetParam field="SelectedRowsOnly" value="false"></SetParam>
<SetParam field="ExportType" value="Excel"></SetParam>
<SetParam field="Mode" value="AppendRows"></SetParam>
<SetParam field="ExcelSheetName" value="Enabled Scheduled Agents - LAST RUN"></SetParam>
<SetParam field="OpenFileOnceGenerated" value="False"></SetParam>
</Export>

<!--All filters will be cleared from the Last Run Duration column.-->
<ClearFilters columnID="L17"></ClearFilters><!-- Last Run Duration... -->

<!--A filter is then added to find all agents that are enabled, but did not run
correctly. A small trick is used here: hiding anything that contains a
":" character (and thus indicating a duration).-->
<Filter columnID="L17" Mode="NotContains" Text=":"></Filter><!-- Last Run Duration... -->

<!--The following If condition declares that if this script is not being used in a
loop, the Excel file will be opened as soon as it is generated. This can't be done
if a loop is being run since the Excel file still may need to be worked on with the
results of another server (depending on what you need to do).
Keep in mind that we can't set an If condition with a SetParam value,
hence the use of this variable.
The variable is initialised first, and it will be changed if not in a loop.-->
<SetVar vOpenExcelFile="False"></SetVar>
<if target="var" test="{%ListSize%}" mode="Equals" Value="">
<SetVar vOpenExcelFile="true"></SetVar>
</if>

<!--Finally, any findings regarding agents that did not run can be exported.
Note that this report will be generated in the same location that this file
is being run from.-->
<Export>
<SetParam field="FilePath" value="{%CurFilePath%}report_agentEZ.xlsx"></SetParam>
<SetParam field="SelectedRowsOnly" value="false"></SetParam>
<SetParam field="ExportType" value="Excel"></SetParam>
<SetParam field="Mode" value="AppendRows"></SetParam>
<SetParam field="ExcelSheetName" value="DID NOT RUN"></SetParam>
<SetParam field="OpenFileOnceGenerated" value="{%vOpenExcelFile%}"></SetParam>
</Export>
</if>

</ytriaAutomation>
Find multiple different types of profile documents and create reports of each different type found
This script can be used by itself in scanEZ to process a currently opened database, or with the new function found in databaseEZ that lets you launch an automation script on a selection of databases directly from within the interface. Learn more about this function here.
This advanced script will iterate over a List containing different user-definable profile document names, and, for each given name, conduct a regex search to find the profile documents that contain a matching name. A multi-faceted report containing a full breakdown of all the items and their values within each document will be exported to an Excel file; each document name’s search results will be placed in its own page in the file.
<ytriaAutomation Application="agentEZ" ApplicationVersion="16.5">
<!--This will set the script's behavior when encountering an error.
In this case, it will continue.-->
<onerror continue="true" ></onerror>

<!--At this point, we don't want to automatically load the detailed agent information.
This will set it as "false". -->
<Option Type="AutoLoadDetailedAgentInfo" value="False"></Option>

<!--This will allow the automatic Check Presence in NAB feature to be carried out on
the agent signer for each agent loaded.-->
<Option Type="PresenceInNAB" value="true"></Option>

<!--This will set the option to use the Design Collection Note which is a much
faster loading option.-->
<UseDesignCollection value="true"></UseDesignCollection>

<!--This defines our search as looking only for scheduled agents.-->
<AgentTriggerType value="Scheduled" ></AgentTriggerType>
<!--This will select all databases on the loaded server.-->
<TreeSelectionLive Value="False"></TreeSelectionLive>
<select target="tree" server="true"></select>
<TreeSelectionLive Value="True"></TreeSelectionLive>
<!--The next part of the script will handle the grid layout so the results are presented
in a clear order. A Suspend Grid Redraw function is added so the processing will
be held off until all columns are set.-->
<SuspendRedraw value="true"></SuspendRedraw>

<!--All columns are removed from the main grid in order to prepare for the columns that
will be added.-->
<RemoveAllcolumns></RemoveAllcolumns>

<!--Second, the columns that we want are added back into the first position
and in reverse order.-->
<Add ColumnID="STATUS_LOAD" Position="1"></Add><!-- Is Agent Fully Loaded? -->
<Add ColumnID="D33" Position="1"></Add><!-- Is background agent disabled on database -->
<Add ColumnID="B6" Position="1"></Add><!-- Comment -->
<Add ColumnID="D3" Position="1"></Add><!-- Database Type -->
<Add ColumnID="R24" Position="1"></Add><!-- Run on week-ends -->
<Add ColumnID="R23" Position="1"></Add><!-- Stop running agent on this date -->
<Add ColumnID="R22" Position="1"></Add><!-- Start running agent on this date -->
<Add ColumnID="R21" Position="1"></Add><!-- Running Interval -->
<Add ColumnID="M13" Position="1"></Add><!-- Signer -->
<Add ColumnID="B5" Position="1"></Add><!-- Last Alias -->
<Add ColumnID="B4" Position="1"></Add><!-- Name -->
<Add ColumnID="D2" Position="1"></Add><!-- Database Filename -->
<Add ColumnID="D1" Position="1"></Add><!-- Database Path -->
<Add ColumnID="L17" Position="1"></Add><!-- Last Run Duration -->
<Add ColumnID="L15" Position="1"></Add><!-- Last Run Start Date -->
<Add ColumnID="STATUS" Position="1"></Add><!-- Status -->

<!--Then, all groupings are removed.-->
<UngroupAll></UngroupAll>

<!--And we will set a new grouping configuration.-->
<GroupBy ColumnID="D46"></GroupBy><!-- Server -->
<GroupBy ColumnID="R9"></GroupBy><!-- Run On -->
<GroupBy ColumnID="R12"></GroupBy><!-- Agent Schedule -->

<!--Also, a new sorting configuration is set.-->
<Sort columnID="L17" Ascending="false"></Sort><!-- Last Run Duration -->
<Sort columnID="D1" Ascending="true"></Sort><!-- Database Path -->
<Sort columnID="D3" Ascending="true"></Sort><!-- Database Type -->
<Sort columnID="D2" Ascending="true"></Sort><!-- Database Filename -->
<!--All existing filters are cleared, and then the grid processing is reactivated
by turning off the Suspend Grid Redraw state.-->
<ClearFilters></ClearFilters>
<SuspendRedraw value="false"></SuspendRedraw>

<!--Note that the agent details don't need to be loaded in this situaiton, as this info is
provided without a full information load.-->
<Filter columnID="R8" Value="checked"></Filter><!-- Enable -->

<!--The following If condition declares that if something is found (and thus making
the grid count greater than 0), the nested child actions will be carried out.-->
<if target="Grid" test="VisibleRowsCount" Mode="GreaterThan" Value="0">

<!--All enabled agents will be selected (rows loaded in the grid).-->
<Select lines="all"></Select>

<!--Then, all the detailed agent information is loaded for all selected lines.-->
<LoadMoreInfo></LoadMoreInfo>
<!--A filter is added to find all agents that are enabled and did run correctly.-->
<Filter columnID="L17" Empty="true"></Filter><!-- Last Run Duration not set... -->

<!--These findings can now be exported. Note that this report will be generated
in the same location that this file is being run from.-->
<Export>
<SetParam field="FilePath" value="report_agentEZ.xlsx"></SetParam>
<SetParam field="SelectedRowsOnly" value="false"></SetParam>
<SetParam field="ExportType" value="Excel"></SetParam>
<SetParam field="Mode" value="AppendRows"></SetParam>
<SetParam field="ExcelSheetName" value="Enabled Scheduled Agents - LAST RUN"></SetParam>
<SetParam field="OpenFileOnceGenerated" value="False"></SetParam>
</Export>

<!--All filters will be cleared from the Last Run Duration column.-->
<ClearFilters columnID="L17"></ClearFilters><!-- Last Run Duration... -->

<!--A filter is then added to find all agents that are enabled, but did not run
correctly. A small trick is used here: hiding anything that contains a
":" character (and thus indicating a duration).-->
<Filter columnID="L17" Mode="NotContains" Text=":"></Filter><!-- Last Run Duration... -->

<!--The following If condition declares that if this script is not being used in a
loop, the Excel file will be opened as soon as it is generated. This can't be done
if a loop is being run since the Excel file still may need to be worked on with the
results of another server (depending on what you need to do).
Keep in mind that we can't set an If condition with a SetParam value,
hence the use of this variable.
The variable is initialised first, and it will be changed if not in a loop.-->
<SetVar vOpenExcelFile="False"></SetVar>
<if target="var" test="{%ListSize%}" mode="Equals" Value="">
<SetVar vOpenExcelFile="true"></SetVar>
</if>

<!--Finally, any findings regarding agents that did not run can be exported.
Note that this report will be generated in the same location that this file
is being run from.-->
<Export>
<SetParam field="FilePath" value="{%CurFilePath%}report_agentEZ.xlsx"></SetParam>
<SetParam field="SelectedRowsOnly" value="false"></SetParam>
<SetParam field="ExportType" value="Excel"></SetParam>
<SetParam field="Mode" value="AppendRows"></SetParam>
<SetParam field="ExcelSheetName" value="DID NOT RUN"></SetParam>
<SetParam field="OpenFileOnceGenerated" value="{%vOpenExcelFile%}"></SetParam>
</Export>
</if>

</ytriaAutomation>
Record your actions to scripts with the powerful new Automation Recorder
An all-new Automation Recorder takes performance optimization to another level by letting you record and “replay” actions you’ve performed in the EZ Suite tools. Simply hit Record at the beginning of your process, do your work, and the recorder will save the steps in an independent automation file that can be either recalled at a later time “as is,” or modified to fit your needs.
Build your automation lists fast with the ‘Create Automation List from Selection’ feature
Thanks to the new Create Automation List from Selection function, you can quickly “export” a selection of entries to a properly formatted List that can be used in an automation script Loop.